
OPENPATH ACCESS CONTROL
USER GUIDE FOR
ADMINISTRATOR WEB PORTAL

Rev. 4.2 © Openpath 2023 2
© 2023, Openpath Security, Inc. All rights reserved.
Allegion, ENGAGE technology and Schlage are trademarks of Allegion plc, its
subsidiaries and/or affiliates in the United States and other countries. Safari is a
trademark of Apple Inc., registered in the U.S. and other countries and regions.
WORKDAY and the Workday Logo are trademarks of Workday, Inc., some registered in
the United States and elsewhere. All other brand and product names are trademarks
or registered trademarks of their respective holders.
PDF-20230119-EN

Rev. 4.2 © Openpath 2023 3
REVISIONS
Guide Description
Rev.4.2 Workday® Human Capital Management report integration
l
OPENPATH APP MARKETPLACE on page66, WORKDAY REPORTS on
page77, ALERTS on page86
Menu name and icon updates ('Try the new look')
Other updates:
l
Openpath Embedded USB Smart Reader support: ISSUE
CREDENTIALS on page24
l
CUSTOM DASHBOARDS (PREMIUM ORENTERPRISE PLANS ONLY) on
page13
l
Menu label updates in the Control Center
l
European (EU) Partner Center Control Center: ONELOGIN on
page74, SIGNING IN on page8, CREATE ACU OR SDC on page57,
RULES on page84, ALERTS on page86
l
Okta integration in OKTA on page72 and general updates in
OPENPATH APP MARKETPLACE on page66
l
PIN field added in USERS on page18, CREATE USER on page21,
ISSUE CREDENTIALS on page24
l
User photo upload in CREATE USER on page21, UPLOAD PHOTO on
page22
l
Enable Multi-Factor field in ADDENTRY STATE on page47
l
Enable remote unlock by default for new users in SECURITY
SETTINGS on page94
l
Standalone Mode field in CREATE VIDEOREADER on page61
l
Figures in BADGE VIEW on page89, BADGE TEMPLATES on page91

Rev. 4.2 © Openpath 2023 4
TABLEOFCONTENTS
REVISIONS 3
TABLEOFCONTENTS 4
GETTING STARTED 7
TERMINOLOGY 7
SIGNING IN 8
FOR MORE INFORMATION 9
DASHBOARDS 9
ACTIVITY DASHBOARD 9
CAMERA SNAPSHOTS 10
ENTRYDASHBOARD 10
DEVICES 11
CONTROLLER STATUS 11
REMOTE DIAGNOSTICS 12
CUSTOM DASHBOARDS (PREMIUM ORENTERPRISE PLANS ONLY) 13
CREATE A CUSTOM DASHBOARD 14
UPDATE DASHBOARD TITLE 15
ORGANIZE YOURWIDGETS 16
SET DEFAULT DASHBOARD 16
DELETE DASHBOARD 16
VIEW DASHBOARD 17
CAMERAS 17
USERS 18
USER DATA MODEL 18
USER MANAGEMENT 20
EXPORT DATA TOCSV 20
SHOWORHIDE DATA 20
CREATE USER 21
UPLOAD PHOTO 22
IMPORT USERS BYCSV FILE 23
ISSUE CREDENTIALS 24
USER ACCESS 25
USER SECURITY 26
ISSUE ACTIONS TO USERS 26
GENERATE GUEST ACCESS LINKS AND WEBHOOK URLS 27
GROUP MANAGEMENT 28
EXPORT DATA TO CSV 28
SHOW ORHIDEDATA 28
CREATE GROUP 29
ROLE MANAGEMENT 29
EXPORT DATA TO CSV 30
SHOWORHIDEDATA 30
CREATE ROLE 30
USER SCHEDULES 31
CREATE USER SCHEDULE 32
MULTIPLE SCHEDULES 33
CUSTOM FIELDS 33
SITES 34
SITE MANAGEMENT 34
EXPORT DATA TO CSV 34
SHOW ORHIDE DATA 35
CREATE SITES 35
ZONE MANAGEMENT 35
EXPORT DATA TO CSV 35
SHOWORHIDEDATA 35

Rev. 4.2 © Openpath 2023 5
ZONE SHARING 35
CREATE ZONE 36
ANTI-PASSBACKAND OCCUPANCY MANAGEMENT 36
ENTRY MANAGEMENT 38
EXPORT DATA TO CSV 39
SHOWORHIDEDATA 39
CREATE ENTRY 39
ENTRY SETTINGS 40
ENTRY STATES 46
ADDENTRY STATE 47
ENTRY SCHEDULES 49
CREATE ENTRY SCHEDULE 49
CREATE HOLIDAYSCHEDULE 51
LOCKDOWN PLANS 53
EXPORT DATA TO CSV 53
SHOW ORHIDE DATA 53
CREATE LOCKDOWN PLAN 53
TRIGGER A LOCKDOWN PLAN 55
DEVICES 56
ACU MANAGEMENT 56
EXPORT DATATO CSV 56
SHOW ORHIDE DATA 56
CREATE ACU OR SDC 57
ADD EXPANSION BOARD 58
EDIT ACU PORTS 59
READER MANAGEMENT 59
EXPORT DATA TO CSV 59
SHOWORHIDE DATA 60
CREATEREADER 60
VIDEOREADER MANAGEMENT 60
EXPORT DATA TO CSV 60
SHOWORHIDE DATA 60
CREATE VIDEOREADER 61
WIRELESS LOCK MANAGEMENT 63
EDIT LOCK 63
WIRELESS LOCK GATEWAY MANAGEMENT 64
REPORTS 65
GENERATEA REPORT 66
SCHEDULE A REPORT (PREMIUM AND ENTERPRISE PLANS ONLY) 66
VIEW REPORTHISTORY (PREMIUM AND ENTERPRISE PLANS ONLY) 66
OPENPATH APP MARKETPLACE 66
GOOGLE WORKSPACE 67
SETUPTHE INTEGRATION 67
MICROSOFT AZURE ACTIVE DIRECTORY 69
SETUPTHEINTEGRATION 69
OKTA 72
ONELOGIN 74
SINGLE SIGN-ON 77
MANUALLY SYNC 77
WORKDAY REPORTS 77
CAMIO 80
RHOMBUS 80
MILESTONE 80
CISCO MERAKI 83
ENVOY 83
SLACK 84
ALLEGION 84

Rev. 4.2 © Openpath 2023 6
ZAPIER 84
WEBHOOKS 84
CONFIGURATIONS 84
RULES 84
CREATE ANEW RULE 84
ALERTS 86
MOBILE APP 88
BADGE VIEW 89
ENABLE BADGE VIEW 89
CUSTOMIZE BADGE DESIGN 89
TIPS FOR BADGE DESIGN 90
BADGE TEMPLATES 91
ADMINISTRATION 93
ACCOUNT 94
SECURITY SETTINGS 94
QUICK START 95
MY PROFILE 95
CONFIGURING OPENPATH CONTROL CENTER WITH LEGACY SYSTEMS 95
REGULATORY 97
UL 294 97
CAN/ULC 60839-11-1-16 GRADE 1 97
FCC 97
IEC 62368-1 98
RF RADIATION HAZARD WARNING 98
INDUSTRY CANADA NOTICE AND MARKING 98

Rev. 4.2 © Openpath 2023 7
GETTING STARTED
The Openpath Control Center is an online portal where Administrators can configure
the Openpath Access Control system through an Internet browser. This user guide will
explain how to get started in the Control Center, manage users and hardware, and
provide access to your entries.
Note: Some features in the Control Center are only available in certain software
packages and as add-on features. Also, depending on your role, not all of these
features may be visible to you.
TERMINOLOGY
l
ACU:A cloud-based control panel that manages access to a secured area.
l
Cloud Key Credential:A credential that lets users generate links to provide
temporary access through the Openpath Mobile App or through the Control
Center.
l
Control Center:An online portal that lets administrators manage users, set up
entries and permissions, and troubleshoot hardware.
l
Credential:A key presented to a reader to gain access to an entry. Examples
include cards, key fobs, and mobile credentials.
l
CSN: A card serial number on the key card.
l
Entry:A door, gate, turnstile, elevator floor, or other point of access. Often
secured with a reader or wireless lock.
l
Entry State: Determines whether an entry is locked or unlocked and defines
what kinds of credentials and trigger methods are valid.
l
Mobile Credential:An access method tied to a user's smartphone through the
use of the Openpath Mobile App.
l
Openpath Mobile App:Used for providing mobile credentials and remote
unlock for users. The app is available for iOS and Android devices.
l
Remote Unlock:A feature that lets users unlock an entry via the Openpath
Mobile App without needing to be in rangeof the Reader.
l
Request to Exit:A sensor that detects when someone is exiting an entry which
lets the Smart Hub ACU know to unlock the door.
l
Schedule:A set of defined dates and times that can be used to restrict access
to entries or users.
l
Site:A physical location (usually a building) that contains zones and entries.

Rev. 4.2 © Openpath 2023 8
l
Smart Reader:A device installed near an entry capable of reading information
stored on key cards, fobs, and Openpath mobile credentials.
l
Trigger Method:A combination of credential type and 1FA/2FA.
l
User:A person defined in the Control Center with credentials.
l
Wiegand Reader:A device installed near an entry capable of reading
information stored on a Wiegand card and transmitting to an access control
unit.
l
Zone:Contains one or more entries within a site. Zones are the units of physical
access permissions that you assign to users and groups.
l
1FA: Single-Factor Authentication.
l
2FA: Two-Factor Authentication.
SIGNING IN
1. Go to control.openpath.com/loginand log in. To access the European Partner
Center, go to control.eu.openpath.com/login.
2. There are two ways to sign in.
l
If you received admin credentials through Openpath Control Center, enter
your email and password, and click Sign in.
l
To use the Single sign-on (SSO) method, your organization must have
enabled authentication with an identity provider and sign-in using an
identity credential, such as your OKTA on page72 account. If enabled,
enter your email and click Continue. Enter the two-factor authentication
(2FA) code and click Sign in.
Note: If an error asks for your namespace, it means your organization
has enabled SSO for two or more identity providers. Ask the admin who
set up the identity provider integrations for the correct namespace to
use. See also USER DATA MODEL on page18.
Rev. 4.2 © Openpath 2023 9
Figure 1 Sign in page
FOR MORE INFORMATION
For additional product and support documentation, see support.openpath.com.
DASHBOARDS
The Dashboards page lets you monitor access control events in the default
Activity, Alarm, Device, and Entry dashboards, and to create custom dashboards for
your org.
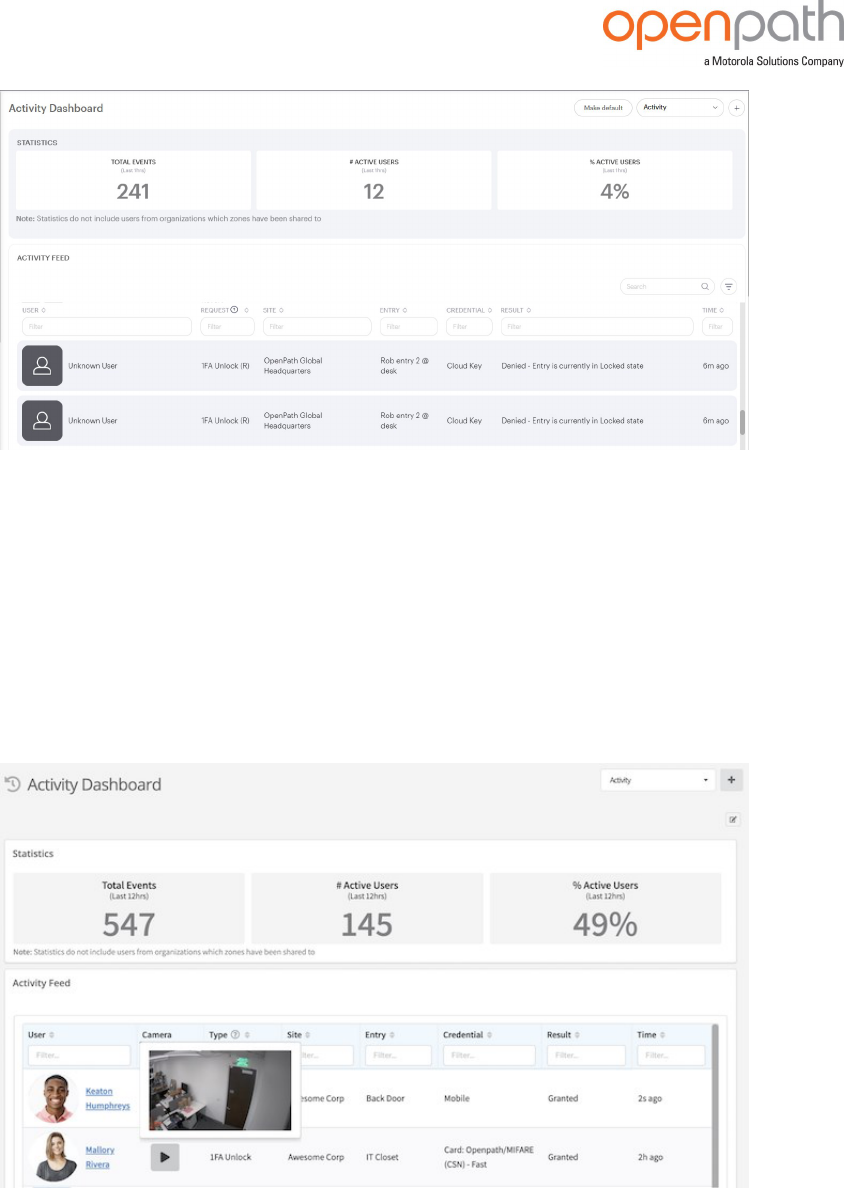
ACTIVITY DASHBOARD
After signing in, you'll see the Activity Dashboard page which shows a live feed of
access events from the past hour, as well as statistics about event activity and active
users. Click the name of a user to view their details.
Rev. 4.2 © Openpath 2023 10
Figure 2 Activity Dashboard
CAMERA SNAPSHOTS
If you have the Cisco Meraki integration enabled or you have VideoReader Pros
installed, you'll see a Camera column in the Activity Dashboard, where you can view
snapshots of entry events by hovering over the Play icon. Click on the Play icon to
view the video footage in the Meraki dashboard. Snapshots may take up to a minute
to appear in the Openpath Control Center.
Figure 3 Camera snapshots in Activity Dashboard
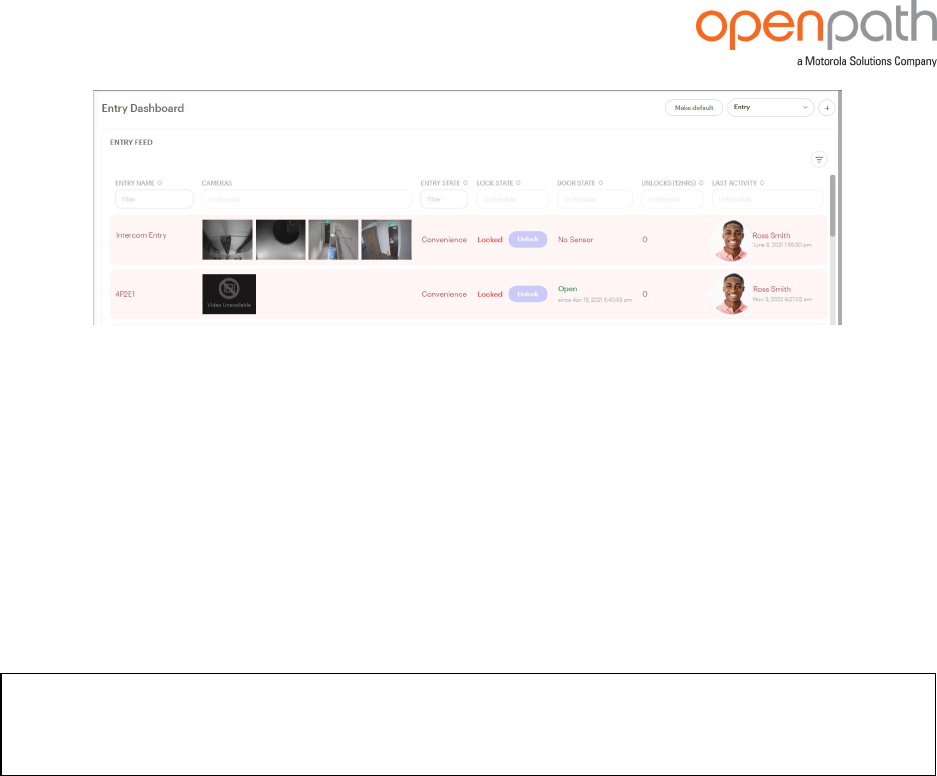
ENTRYDASHBOARD
The Entry Dashboard shows a live status of every entry in your site.
Rev. 4.2 © Openpath 2023 11
Figure 4 Entry Dashboard
This is where you can see your organization's usage statistics as well as the current
lock state for entries. The data on the Dashboard is real time, so as soon as an entry
unlock request is made or denied or a lock state changes, the data displayed will
update immediately.
If you have a Cloud Key and remote unlock permissions (and the entry's state also
allows remote unlock requests), you can unlock entries from the Main Dashboard by
clicking the Unlock button next to the entry's name.
Note: If a door is ajar or not properly closed, the Door Ajar alarm will be
prominently displayed in the Door State column.
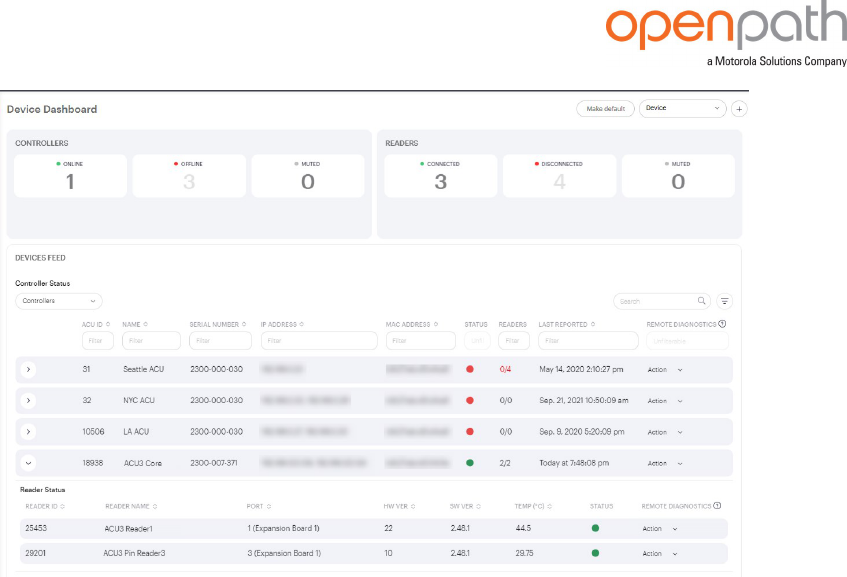
DEVICES
The Device Dashboard is where you can get a high-level overview of your
organization's Controllers (ACUs) and readers.
CONTROLLER STATUS
The Devices page in the Control Center indicates the online status of ACUs and Video
Readers (listed as Controllers and Video Controllers) in the STATUS column:
l
A green dot indicates the ACU is online and communicating normally.
l
A yellow dot indicates the last message received from the ACU is more than 12
minutes old and the VPN is down.
l
A red dot indicates the ACU is offline: the last message received from the ACU is
more than 60 minutes old OR more than 20 minutes old and the VPN is down.
Rev. 4.2 © Openpath 2023 12
Figure 5 Device Dashboard showing controller status and reader status
REMOTE DIAGNOSTICS
In the Controller (and Video Controller) Status table under the REMOTEDIAGNOSTICS
column, select an Action:
l
Identify: Identify a Controller to verify that the physical wiring matches the
Control Center configuration. Clicking this will cause the STATUS LED on the
Controller to flash green.
l
Refresh: Refresh a Controller to send the latest data from the physical device to
the Control Center to ensure that the device is online.
l
The restartactions will restart individual software services on the Controller:
o
Restart APIServer: The core application that processes authorization,
authentication, and execution of unlock requests. Restart this service if
you're having issues with the mobile app, such as unlock requests not
working.
o
Restart Cloud Communicator: The service that receives live messages
from the cloud, including entry-related configuration changes, user
permissions changes, and cloud-based unlock requests. Restart this
service if changes (new credentials, new schedules) made on the Control
Center aren't syncing with the ACUs or if you're experiencing issues with
remote unlock requests.

Rev. 4.2 © Openpath 2023 13
o
Restart Device Communicator: The service that sends and receives data
between the ACU core and peripheral hardware. Restart this service if
you're experiencing issues with readers or expansion boards.
l
Mute:Muting a Controller changes its status icon to gray on the Device
Dashboard. It will not affect any alerts or rules regarding the Controller, and it
will only appear as muted on your browser.
Note: Restarting a service may interrupt the affected service for up to 60 seconds.
We recommend restarting services one at a time, waiting a few seconds after
restarting one before restarting the next.
You can also perform REMOTEDIAGNOSTICS actions on readers. Expand a Controller
to see its associated readers. Under the REMOTEDIAGNOSTICS column, you can
perform the following actions:
l
Identify: Identify a reader to verify that the physical wiring matches the Control
Center configuration. Clicking this will cause the following:
o
The reader's outer ring LED will light up.
o
The reader's center dot will light up green.
o
The reader's buzzer will beep several times.
l
Restart: Restart a reader to force a reboot. This will interrupt services provided
by the reader for up to 60 seconds.
l
Mute:Muting a reader changes its status icon to gray on the Devices
dashboard. It will not affect any alerts or rules regarding the reader, and it will
only appear as muted on your browser.
CUSTOM DASHBOARDS (PREMIUM ORENTERPRISE PLANS ONLY)
You can create custom dashboards by adding widgets for use in your org in addition
to the Openpath default dashboards ( Activity, Alarm, Device, and Entry).
Note: Your dashboard can be viewed and edited by all Super Admin users in your
org.
Rev. 4.2 © Openpath 2023 14
CREATE A CUSTOM DASHBOARD
1.
Go to the Dashboards page, and click the button in the upper-right
corner.
2. Enter a name for the dashboard and click Save.
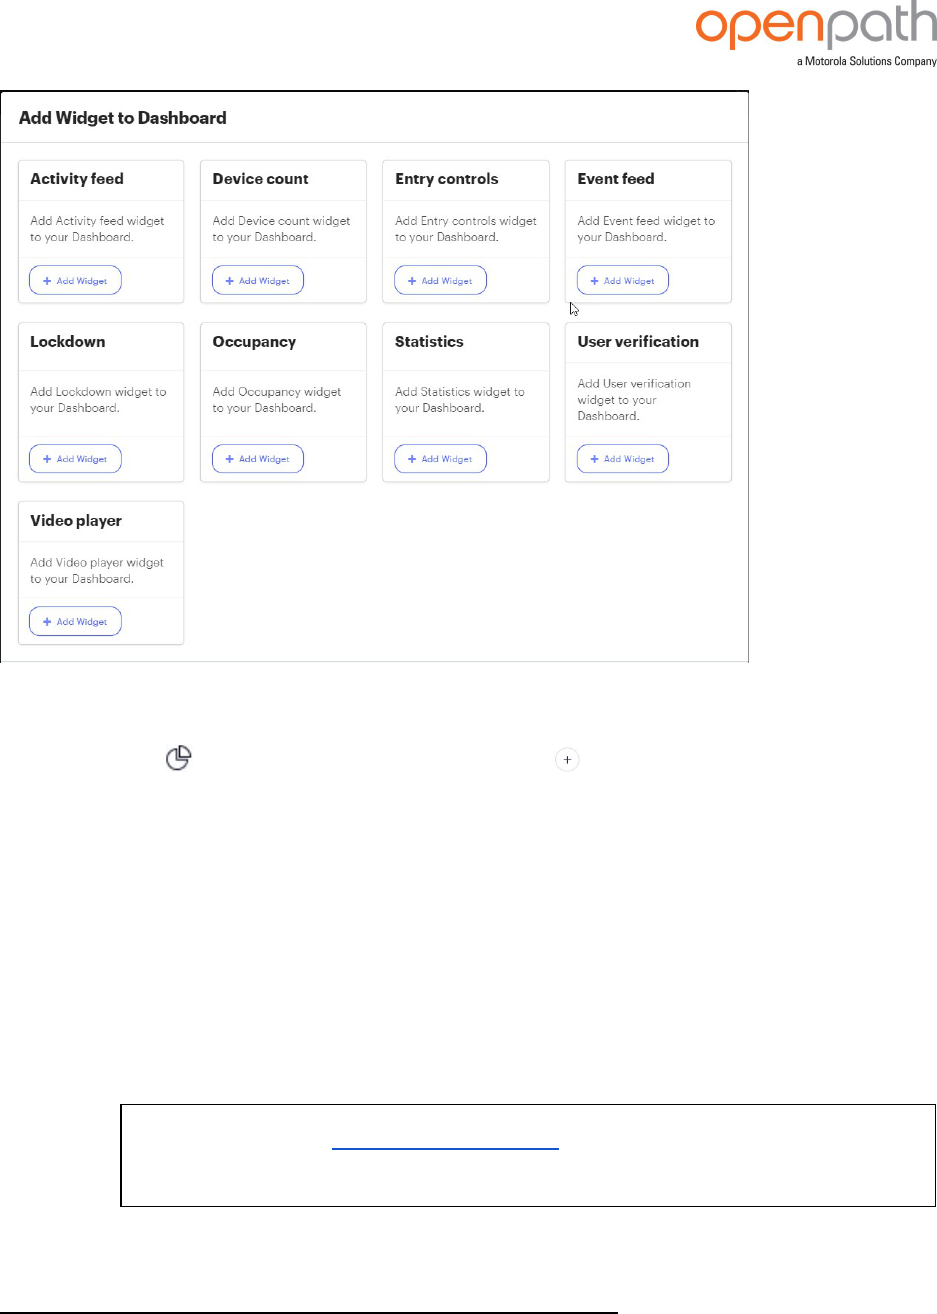
3. Click Add Your First Widget in the tool tip and choose a widget.
l
Activity feed is a live feed of the entry activity log.
l
Device count displays the number of controllers and readers configured
in the system and their online status.
l
Entry controlslets you pin one or more entries to the dashboard, and lets
you temporarily unlock them instantly, or keep them unlocked for 5, 10, 15,
or 60 minutes.
Note: You need a Cloud Key credential
*
and appropriate access to one
or more entries in order to trigger unlocks.
*
For more information, refer to https://support.openpath.com/what-are-cloud-key-credentials-and-
how-do-i-send-guest-access-links-HJ3crp38_.
Rev. 4.2 © Openpath 2023 15
l
Event feed is a live feed of entry events, door ajar and door propped open
alarms, and lockdown activations.
l
Lockdown displays all lockdown plans in the org with buttons to trigger
and revert plans.
Note: You need user permission to trigger and revert lockdown plans.
For more information, see Assign User and Group Permission on
page54.
l
Occupancy shows you the occupancy of areas configured using anti-
passback.
Note: You need to configure anti-passback and set occupancy limits
to use this widget. For more information, see ANTI-PASSBACKAND
OCCUPANCY MANAGEMENT on page36.
l
Statistics displays the total events, number of active users, and
percentage of active users from the last 12 hours.
l
User verification lets you monitor access events at a particular entry and
displays a user's photo when they unlock an entry.
l
Video player displays a live feed of the selected video reader.
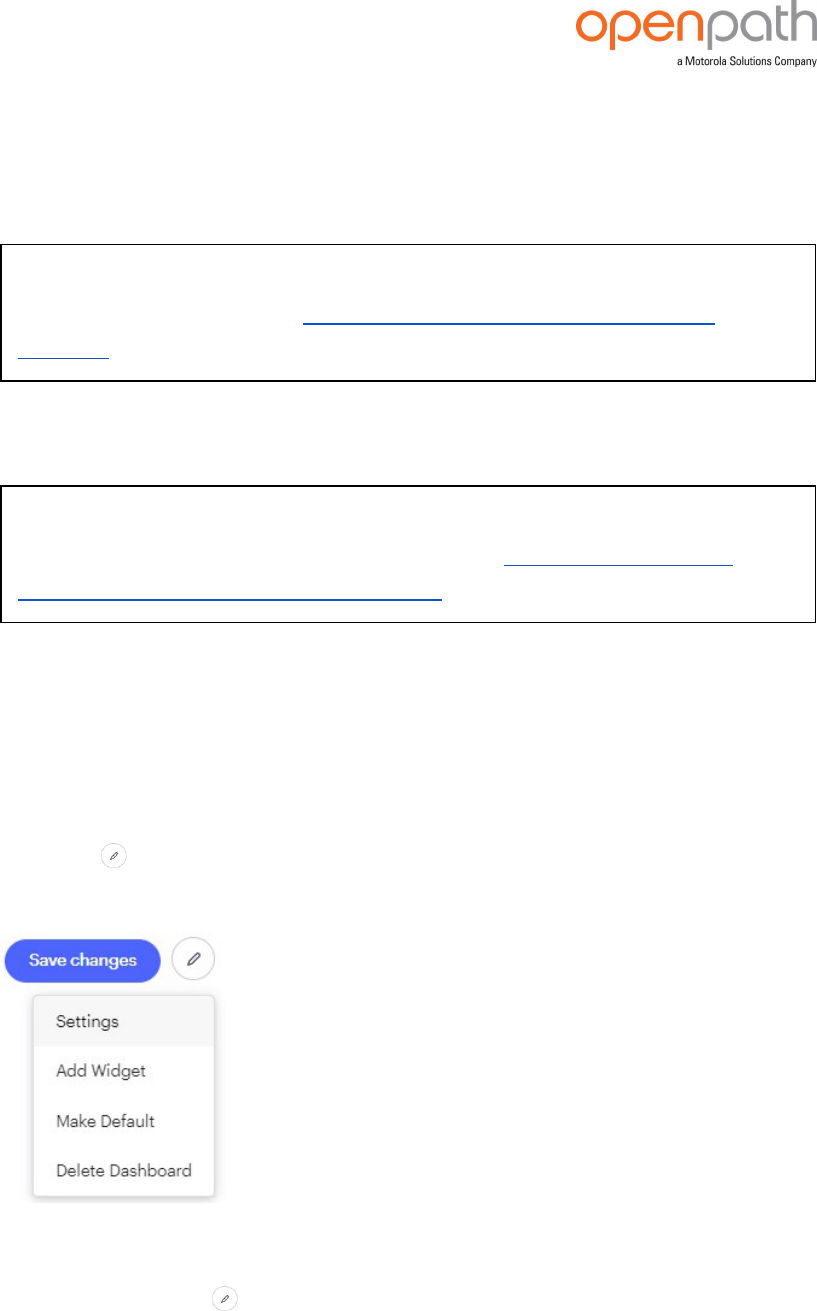
4. Click the + Add Widget button. The widget is added to your new dashboard.
l
Click the edit button in the upper-right corner for the customization
options.
UPDATE DASHBOARD TITLE
1.
Select Settings from the edit menu.
2. Update the Dashboard Title and click Save.

Rev. 4.2 © Openpath 2023 16
ORGANIZE YOURWIDGETS
1.
Select Add Widget from the edit menu.
2. Choose a widget and do any of the following:
a. Click and drag to place the widget anywhere on the dashboard.
b. Click in the upper-right corner; the widget flips over with more options.
Click in the upper-right corner to delete the widget.
c. Resize the widget by clicking and dragging the lower-right corner.
SET DEFAULT DASHBOARD
l
Select Make Default from the edit menu.
DELETE DASHBOARD
l
Select Delete Dashboard from the edit menu.
Rev. 4.2 © Openpath 2023 17
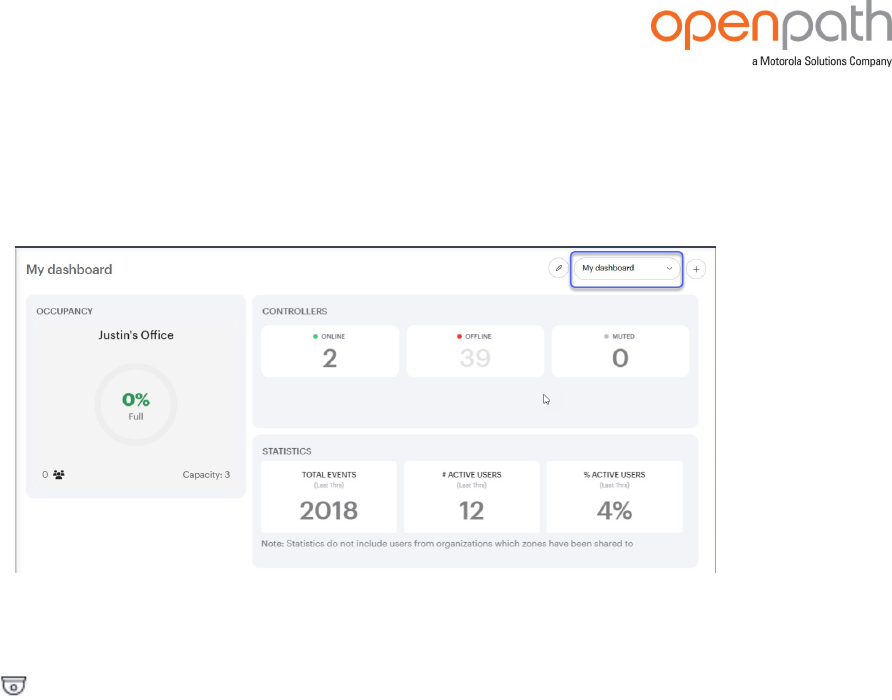
VIEW DASHBOARD
l
Click Save changeswhen you're done customizing the dashboard.
The custom dashboard appears in the Dashboards dropdown.
CAMERAS
The Cameras page shows all cameras in your org, including Cisco Meraki cameras
and Openpath Video Readers. Clicking on a Cisco Meraki camera will take you to the
Cisco Meraki dashboard, while clicking on a Video Reader will open a live feed and
show a list of events.
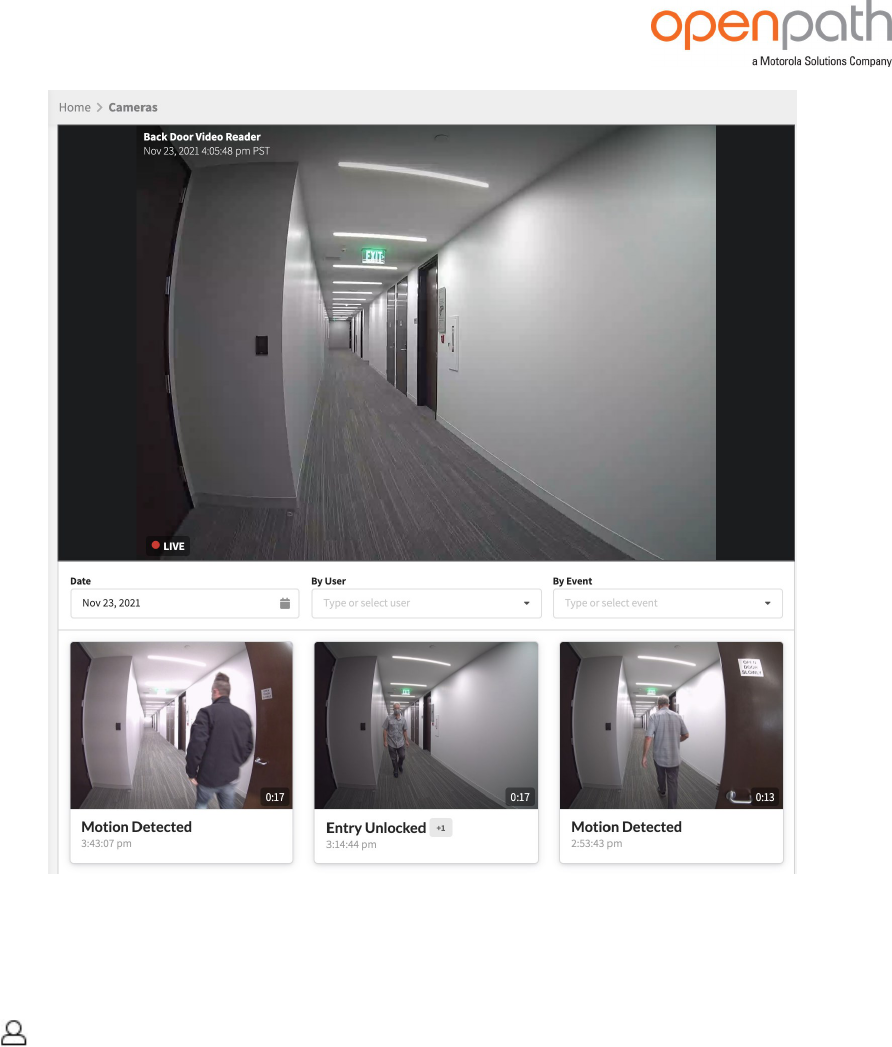
Rev. 4.2 © Openpath 2023 18
Figure 6 Openpath Video Reader live feed
USERS
The Userspage lets you manage and import users, and create and define groups,
credentials, and roles for users.
USER DATA MODEL
If you have access to more than one org in your Openpath online portal, or you're
using multiple identity provider integrations with SSO enabled, you should be familiar
with how the Openpath user data model works.

Rev. 4.2 © Openpath 2023 19
Figure 7 User data model
A namespaceis a contained pool of emails, all of which must be unique within the
namespace. These emails (along with first name and last name and other info) are
called identities. Identities are used for authentication and are what allow you to log
in to the Control Center. There are two types of namespaces: "identity provider" (e.g. G
Suite, Active Directory), and "local org."
Namespaces allow the flexibility of having multiple instances of the same email that
might come from different sources or have different authentication mechanisms (i.e.
local password authentication or SSO). For example, you might have one identity
([email protected]) from when the org was created (under the local org
namespace) that is authenticated through email and password. If you sync with an

Rev. 4.2 © Openpath 2023 20
identity provider that has the same email ([email protected]) in it, another identity
will be created under the identity provider namespace.
Identitiesare separate from, but related to Users. A Useris an instance of an identity
that belongs to a specific org, so a single identity could have multiple Users. This
model allows a single identity (email and password) to be able to access multiple
orgs, which is useful for resellers and installers that need to be able to log in once but
have access to many orgs. Identities are what let you log into the Control Center;
Users are where you configure portal access, roles, and entry access for a particular
org.
USER MANAGEMENT
The Users page is where you can view and manage users.
Figure 8 User management
EXPORT DATA TOCSV
l
Click the Export to CSV icon.
SHOWORHIDE DATA
l
Click the Filter Column icon to show or hide data.
For example, The IDENTITYPROVIDER column lists the user database from where
the users were created, such as within the portal, from Active Directory, G Suite,
and more. Toggle this column to show the namespace. For more information,
see USER DATA MODEL on page18.

Rev. 4.2 © Openpath 2023 21
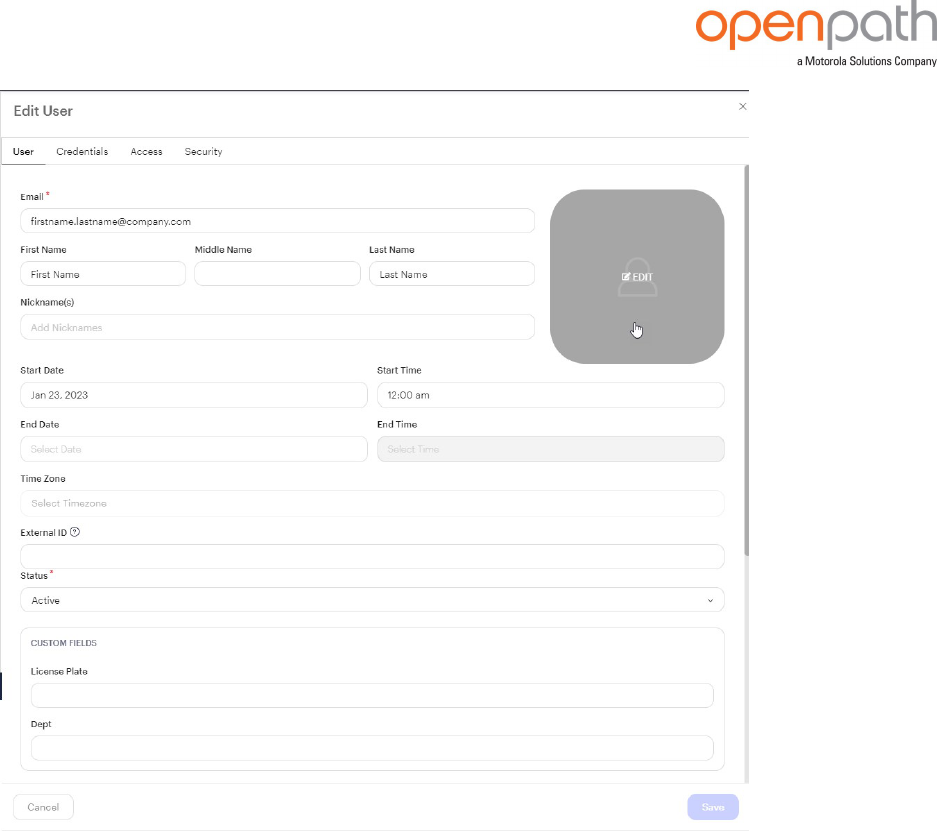
CREATE USER
1.
Go to Users > Users.
2.
Click the Add Userbutton in the upper-right corner.
3. Enter the user's Email and name.
Note: If the user belongs to another organization, you can skip the name and
enter a checkmark in the Add a user from an existing namespacebox and
the namespace in Namespace. For more information about namespaces,
see USER DATA MODEL on page18.
4. Enter the Start Date and End Date.
5. Enter other fields, as needed.
l
External ID — For employee IDs or other useful information.
l
CUSTOMFIELDS — Additional fields that are configured by your
administrator (for example, License Plate).
l
Portal Access — For a user who is an admin and requires access to the
administrator web portal. Toggle the slider and add the Super Admin role.
Note: Only give administrator portal access to users who require it, such
as an office manager or security guard. If you want to give someone
limited access to the Control Center, create a role with GRANULAR
PERMISSIONS.
6. Click Save.
Rev. 4.2 © Openpath 2023 22
Figure 9 Edit User
UPLOAD PHOTO
To display the user's photo in the Control Center and in the user's Openpath mobile
app:
1. Click the EDIT button in the Edit User page.
2. Click the + Add photo button.
l
To take a new photo using your device's built-in camera or webcam, click
Use camera and then Take photo and Save photo.
l
To upload a new photo, click Upload photo, the photo and then Save
photo.

Rev. 4.2 © Openpath 2023 23
Figure 10 Save photo
IMPORT USERS BYCSV FILE
You can import and update users by uploading a CSV file. To import users by using a
directory service integration, see OPENPATH APP MARKETPLACE on page66.
1.
Go to Users > Import users.
Or, click the Import users button in the upper-right corner of the Users page.
2. Create the CSV file in one of the following ways:
l
Click Download Sample CSVand fill out all required fields in the supported
formats. Save the file as a CSV file (for example, openpath-bulk-import-
users.csv). Excel file extensions do not work.
l
Click the Export to CSV icon in the upper-right corner of the Users page,
and modify the downloaded file.
Tip: Refer to the Valid Fields tooltip for the supported values.
3. Click the Select CSV button and locate the file.
4. Select the Namespace:
l
Local— For adding new users or updating existing ones, and if you are not
using an identity provider. Choose to Skip existing users or Update them in
the How To Handle Existing Users field.
l
Google Workspace, Microsoft Azure AD, Okta,or OneLogin — For
updating existing users you previously synced with the Openpath system.
New users will not be added.

Rev. 4.2 © Openpath 2023 24
5. Click the Upload File button.
The Upload Statusfield will log all users added, updated, and skipped. This step
may take a few minutes. When finished, you'll see an IMPORTCOMPLETE
message along with any errors that may have occurred.
ISSUE CREDENTIALS
You can issue credentials to a user. A credential is a key presented to a reader to gain
access to an entry.
Note: When adding card credentials, consider that high frequency (HF) readers
require MIFARE, DESFire, or ISO14443A cards, and low frequency (LF) readers use
Wiegand cards.
Note: The Openpath Embedded USB Smart Reader supports only Openpath Mifare
or DESFire EV3card credentials. Mobile credentials are not supported at this time.
1.
Select a user on the Users page, and click the Credentialstab.
2. Select the type of credential depending on the device.
l
Mobile: Requires the Openpath mobileapp for access to an entry. If you
choose this option, see ADD A MOBILE CREDENTIAL on the next page after
saving.
l
Cloud Key - For Guest Passes, Portal Dashboards, APIIntegrations:
Sends a web link issued by the Openpath mobile app or the Openpath
Control Center to grant temporary or scheduled access to an entry. If you
choose this option, see GENERATE GUEST ACCESS LINKS AND WEBHOOK URLS
on page27.
l
Card: Openpath/MIFARE (CSN) - Fast: Requires the Card Serial Number of
an Openpath HF key fob or card to access an entry.
l
Card: Openpath DESFire (Encrypted) - Secure: Requires an Openpath HF
card to access an entry.
Note: The user should hold card on the reader a little longer than the
CSN option.
l
Card: Wiegand ID: Requires an Openpath LF key fob or card to access an
entry. If you choose this option, see ADD A WIEGAND CREDENTIAL on the next
page after saving.
Rev. 4.2 © Openpath 2023 25
l
PIN: Requires a PIN on the keypad of a Openpath Smart Keypad Reader to
access an entry.
3. Enter the required information depending on the device and click Save.
ADD A MOBILE CREDENTIAL
After you add a mobile credential:
l
Click Sendto email instructions to the user on how to set up their mobile device
as a credential. The Activation Pendingcolumn indicates that an email has
been sent, but the user has not yet activated their mobile credential.
ADD A WIEGAND CREDENTIAL
After you add a Wiegand credential:
l
For Openpath LF cards, select Prox 26-bit (H10301) in Card Format.
l
If you're unsure of the card format, select Raw 64-bit in Card Format and enter
the Card Number.
Note: If you're unsure of the card number, you can swipe the card at the
reader and take note of the rejected access entry in Reports > Activity logs.
The card number will be displayed In the Credential Detail column.
l
If you'd like to send card credential data to a third-party control panel, set Use
for Gatewayto Enabled. You must also configure the Wiegand reader to enable
this feature. See WIEGAND DEVICE on page45.
USER ACCESS
The Access tab on the Edit User page is where you can assign groups, sites, and
zones, and enable Remote Unlock for a user.
l
Use the Groupsfield to add a user to a group and give them access to zones
available for that group. See CREATE GROUP on page29.
l
Alternatively, you can manually assign access to sites and zones by using the
toggle buttons.
l
Enable Override Permissionto give the user permission to unlock entries in the
Lockdown (Override Only) state.
l
Enable Remote Unlockto let the user unlock a door remotely (i.e. physically
outside of Bluetooth range of the door reader) using the mobile app.

Rev. 4.2 © Openpath 2023 26
l
The Group Schedules column will display any applicable Group Schedules if
you assigned a group with a schedule.
l
The User Schedule column lets you assign user-specific schedules. See USER
SCHEDULES on page31.
Figure 11 User Access
USER SECURITY
The Security tab is where you can manage Multi-Factor Authentication (MFA)
credentials. You cannot add MFA credentials for other users — only view and delete.
You can add a MFA credential for yourself under MY PROFILE on page95.
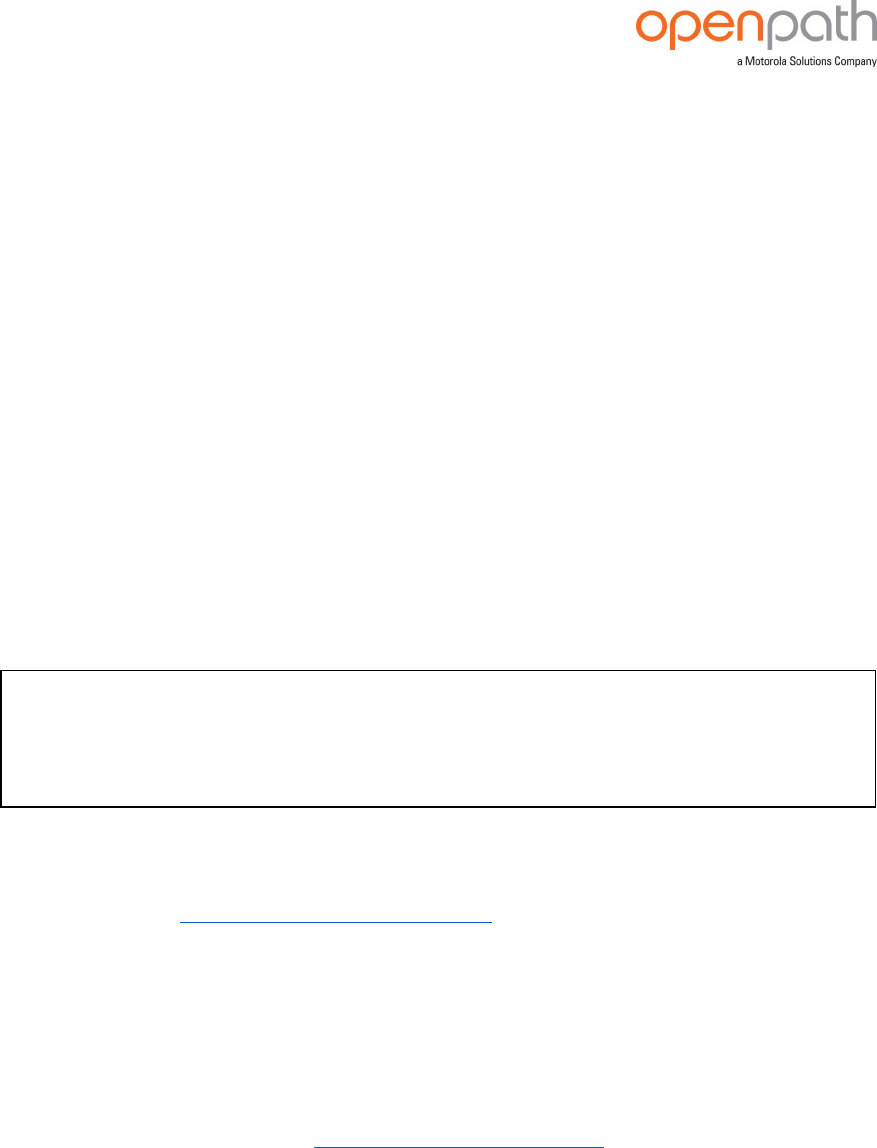
ISSUE ACTIONS TO USERS
1.
Go to Users > Users.
2. Enter a checkmark next to one or more users.
Rev. 4.2 © Openpath 2023 27
3. In Batch Actions (activated by the previous step), issue any of the following
actions to the selected users:
l
Activate Users: Reactivates a suspended user.
l
Suspend Users: Disables credential use and admin portal acces, if
granted to the user.
l
Delete Users: Revokes access from the user and keeps the user in the
system for reporting and record-keeping purposes.
l
Reset Anti-passback: Resets the anti-passback state of a user, if using
Anti-passback. See ANTI-PASSBACKAND OCCUPANCY MANAGEMENT on
page36.
l
Create Mobile Credentials: Automatically creates mobile credentials for
the selected users.
l
Send Mobile Credentials:Sends mobile setup emails to the selected
users. If a user has multiple mobile credentials, they'll receive multiple
setup emails.
l
Disable Remote Unlock:Disables the remote unlock permissions for the
selected users.
l
Enable Remote Unlock:Enables the remote unlock permissions for the
selected users.
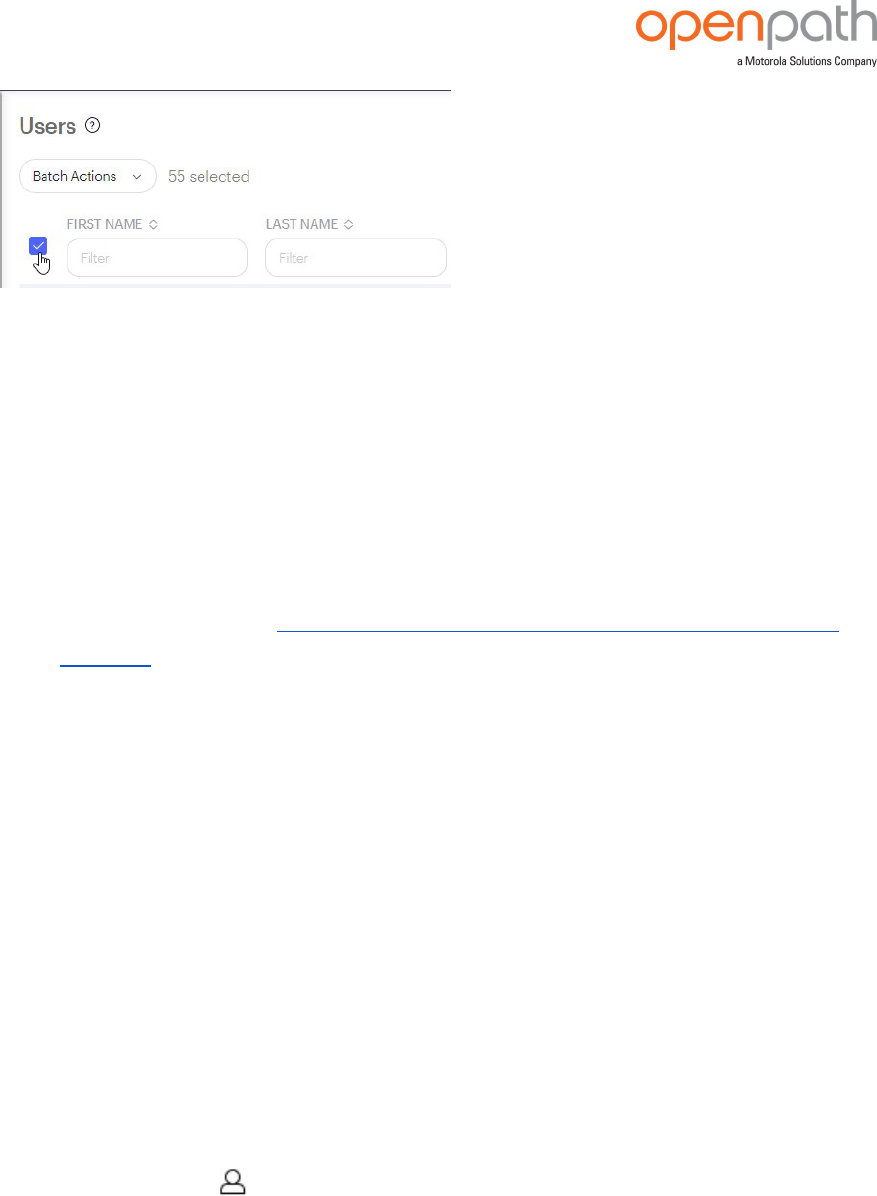
GENERATE GUEST ACCESS LINKS AND WEBHOOK URLS
Users with Cloud Keys can share temporary Guest Access Links and generate
webhook URLs. Webhook URLs can be used to unlock entries via a web browser, or
integrated into software or external services.
1.
Select a user on the Users page, and click the Credentialstab.
2. In the Cloud Key Credentials list, click Get Webhook URL next to the Cloud Key
credential.
Rev. 4.2 © Openpath 2023 28
3. In the window pop-up, select the entries the URL will unlock:
l
Entries (for example, front entry, rear entry)
l
Description
l
Start Time and End Time(optional)
4. Click Generate Links.
5. Click Guess Access Link: Copy to clipboard and share the URL with the guest.
Use the API Link for your own software or other external service.
Figure 12 Webhook URL generated
Note: A Cloud Key can have multiple webhooks for multiple entries associated
with it. Deleting a Cloud Key credential will also remove all the valid webhooks
associated with it.
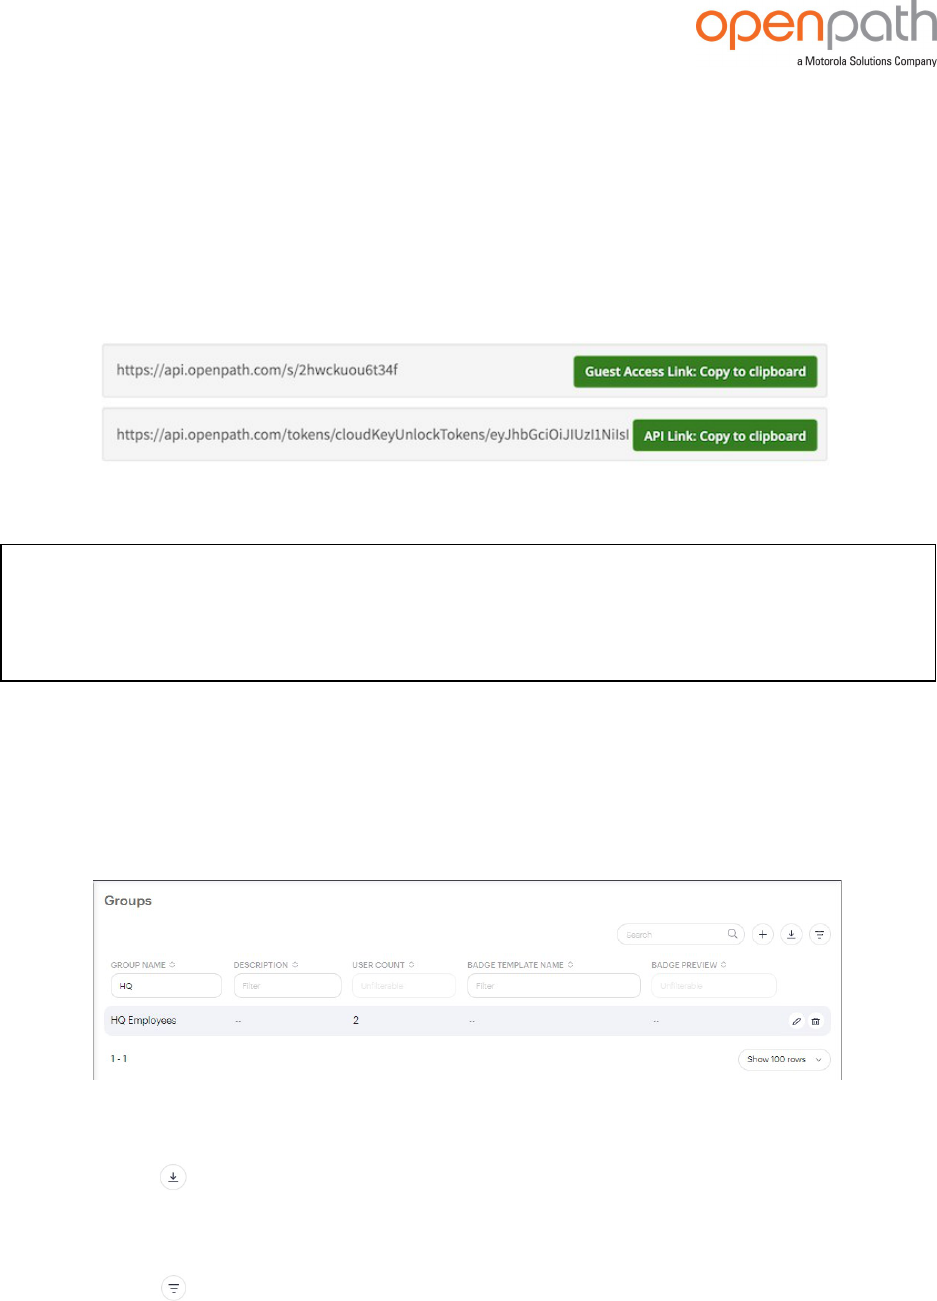
GROUP MANAGEMENT
The Groups page is where you can create and manage groups for users. Groups let
you assign access and entry permissions for one or more users, and they're useful for
organizing your user base by department or role.
EXPORT DATA TO CSV
l
Click the Export to CSV icon.
SHOW ORHIDEDATA
l
Click the Filter Column icon to show or hide data.

Rev. 4.2 © Openpath 2023 29
CREATE GROUP
1.
Go to Users > Groups.
2.
Click the Add Group button in the upper-right corner.
3. Enter a name, description, badge template, and assign users.
4. Select the sites and/or zones the group will have access to.
5. Click Save.
Figure 13 Create Group
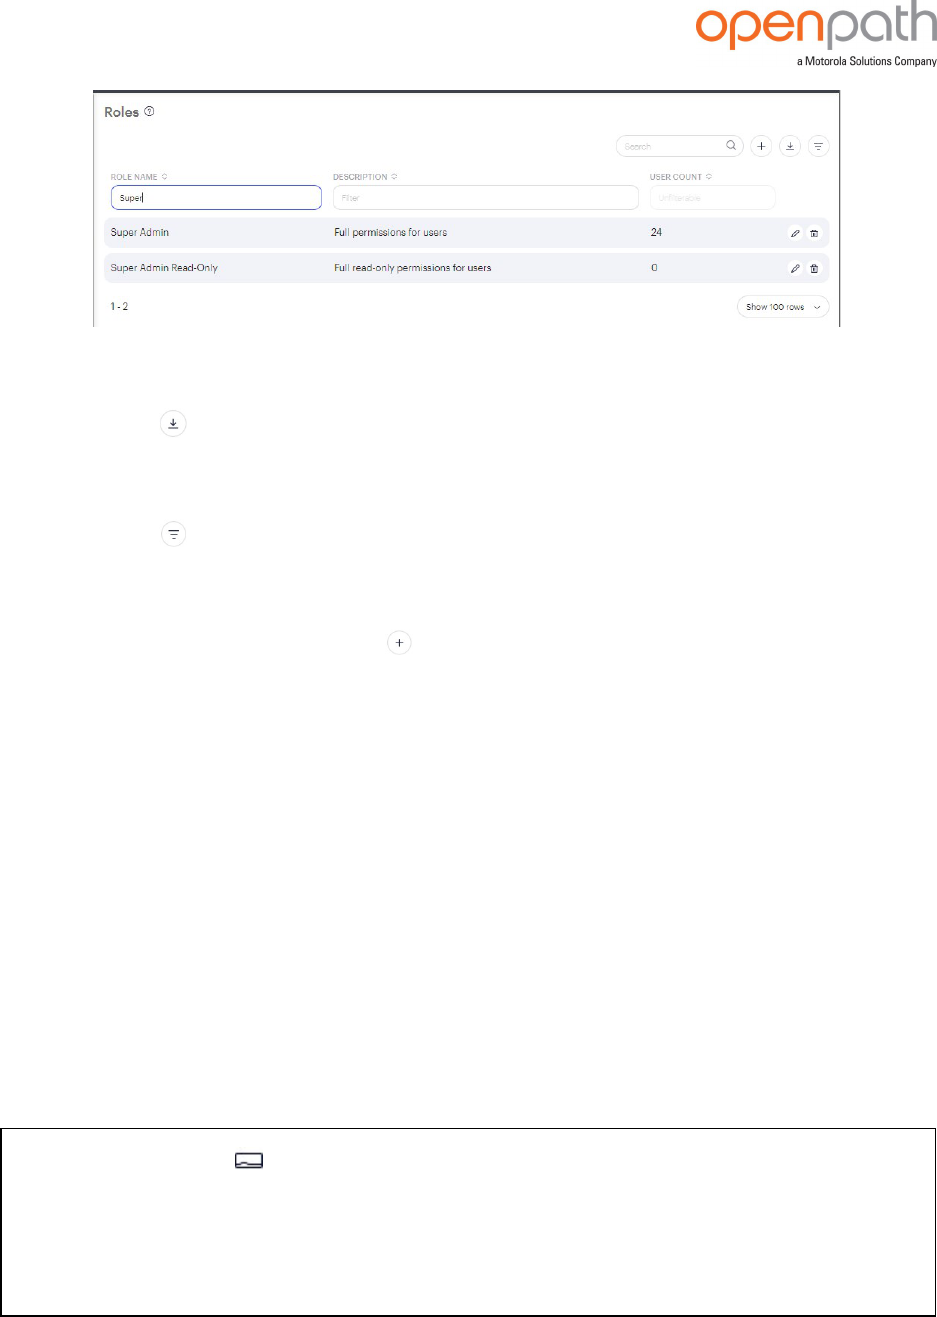
ROLE MANAGEMENT
A role is a set of portal access permissions that can be assigned to users. There are
two default roles that cannot be edited:
l
Super Admin — Gives full portal access with edit permissions.
l
Super Admin Read-Only— Gives full portal access with read permissions.
Note: Users with the Super Admin role can assign and revoke portal access for
other users.
Rev. 4.2 © Openpath 2023 30
EXPORT DATA TO CSV
l
Click the Export to CSV icon.
SHOWORHIDEDATA
l
Click the Filter Column icon to show or hide data.
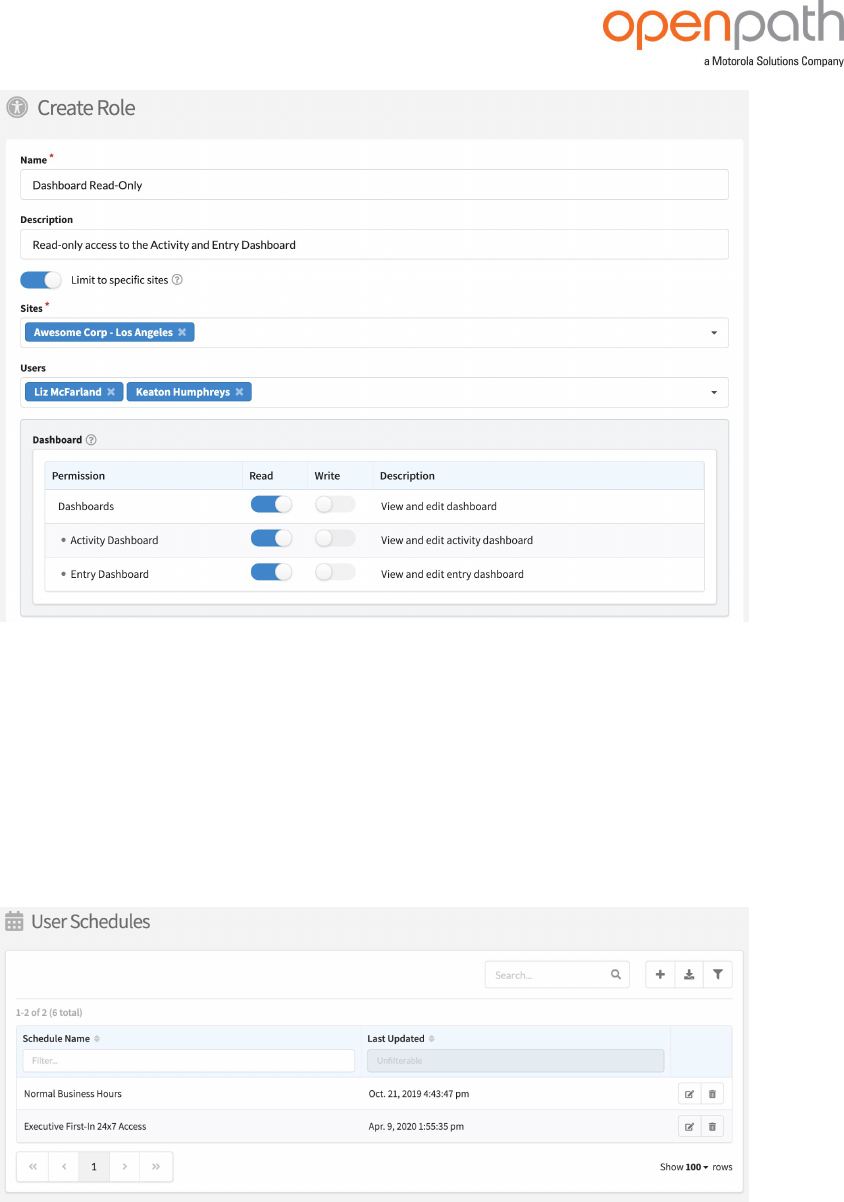
CREATE ROLE
1.
To create a new role, click the Add Role button in the upper-right corner. Enter
a name,description, and assign users.
2. Select the permissions you'd like this role to have, then click the Save button in
the lower-right corner.
Note: You cannot create a role with more permissions than you have, and you
cannot assign a role with more permissions to yourself or another admin.
Note: You can assign multiple roles to the same user. The user's permissions will
be cumulative across all assigned roles.
GRANULAR PERMISSIONS
Granular Permissions gives additional specificity when creating roles. For example,
you create a role that limits access to just the Entry Dashboard (see example below).
Or, create a role with full portal access but only for one site.
Note: Access to the Devices dashboard is provided by the Devices permission,
not the Dashboard permissions.
Note: You cannot limit access to the users of a specific site. If you create a role
that has access to users, the role will have access to all users within that org.
Rev. 4.2 © Openpath 2023 31
Figure 14 Create Role
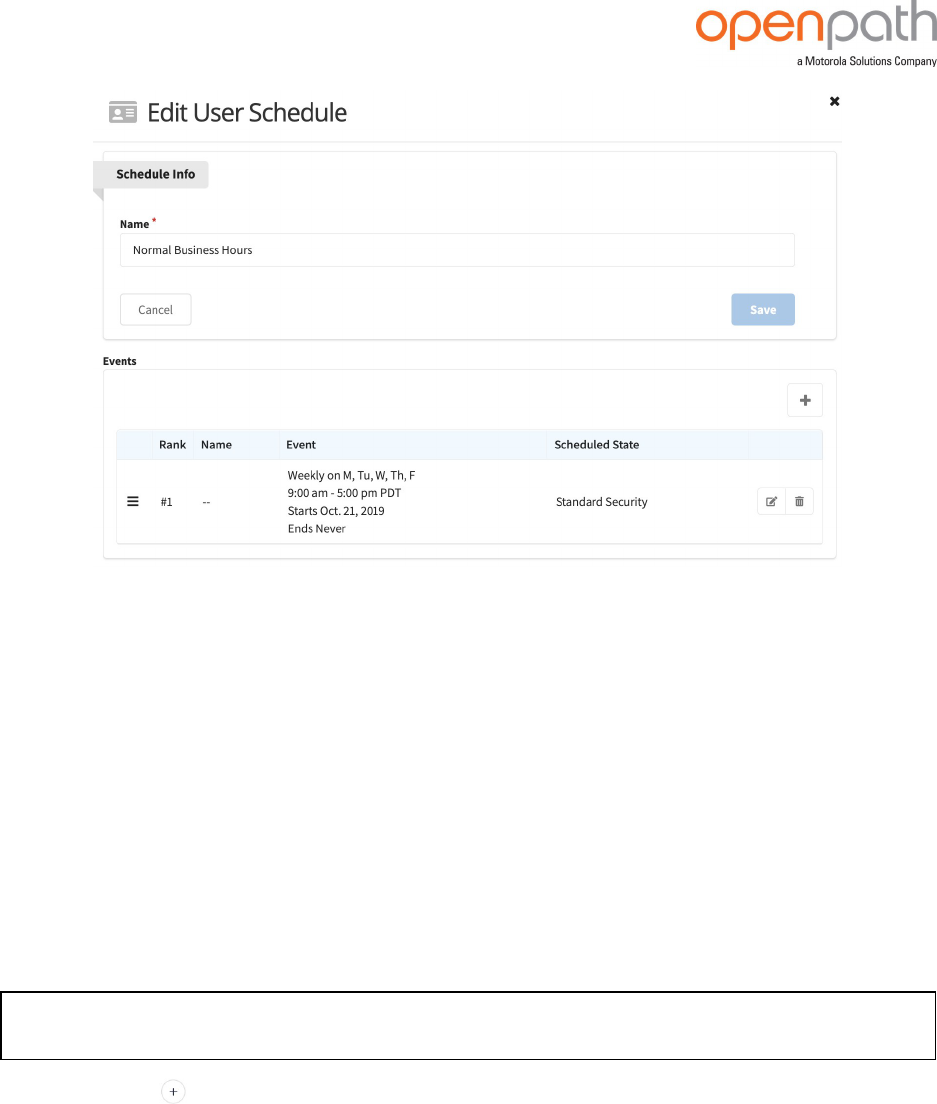
USER SCHEDULES
The User schedules page is where you can define schedules for users and groups.
User and group schedules are useful if you want to restrict access or trigger methods
for certain users and groups. For example, you can define normal business hours for
employees or require that certain users only use key cards.
Figure 15 User schedules

Rev. 4.2 © Openpath 2023 32
CREATE USER SCHEDULE
Note: If you want to disable remote unlock access to all users in a group, create a
schedule with Onsite Only as the Scheduled State.
1.
Click the Add Schedule button in the upper-right corner, enter a name, and
click Next.
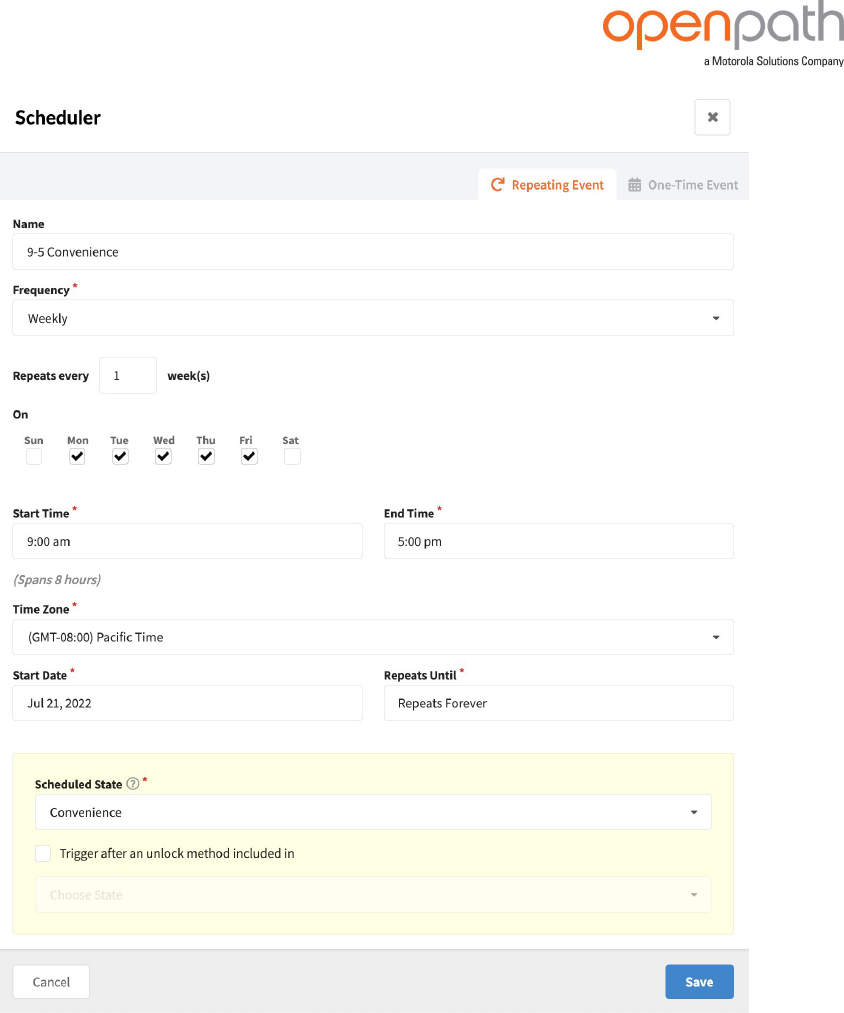
2. Click Add Event to create a new schedule.
a. Choose between a Repeating Eventand a One-Time Event.
b. Enter a Name (optional).
c. (Repeating Event) From the Frequency dropdown, select whether this
schedule will recur daily, weekly, monthly, or annually.
d. (Repeating Event) Select which days the schedule will occur on.
e. Enter a Start and End Time.
f. Select a Time Zone.
g. Enter a Start Date and End Date.
h. Select the Scheduled State from the dropdown.
i. (Optional)Enable and set Trigger after an unlock method
If enabled, the entry will not change to the scheduled state until the first
person with access triggers a door to unlock.
j. Click Save.
Note: A user schedule cannot be more permissive than what the entry allows. In
this example, we've defined the Scheduled State as Standard Security, which only
works if the entry state is also set to Standard Security or Convenience (but not
say, Strict Security).
Rev. 4.2 © Openpath 2023 33
Figure 16 Edit User Schedule
MULTIPLE SCHEDULES
You can assign multiple User or Group schedules to users or groups. Access is
cumulative of the assigned schedules. For example, if a user has a group schedule
that gives access 9:00 am to 5:00 pm and a user schedule that gives access 3:00 pm
to 9:00 pm, then that user will have a combined access of 9:00 am to 9:00 pm.
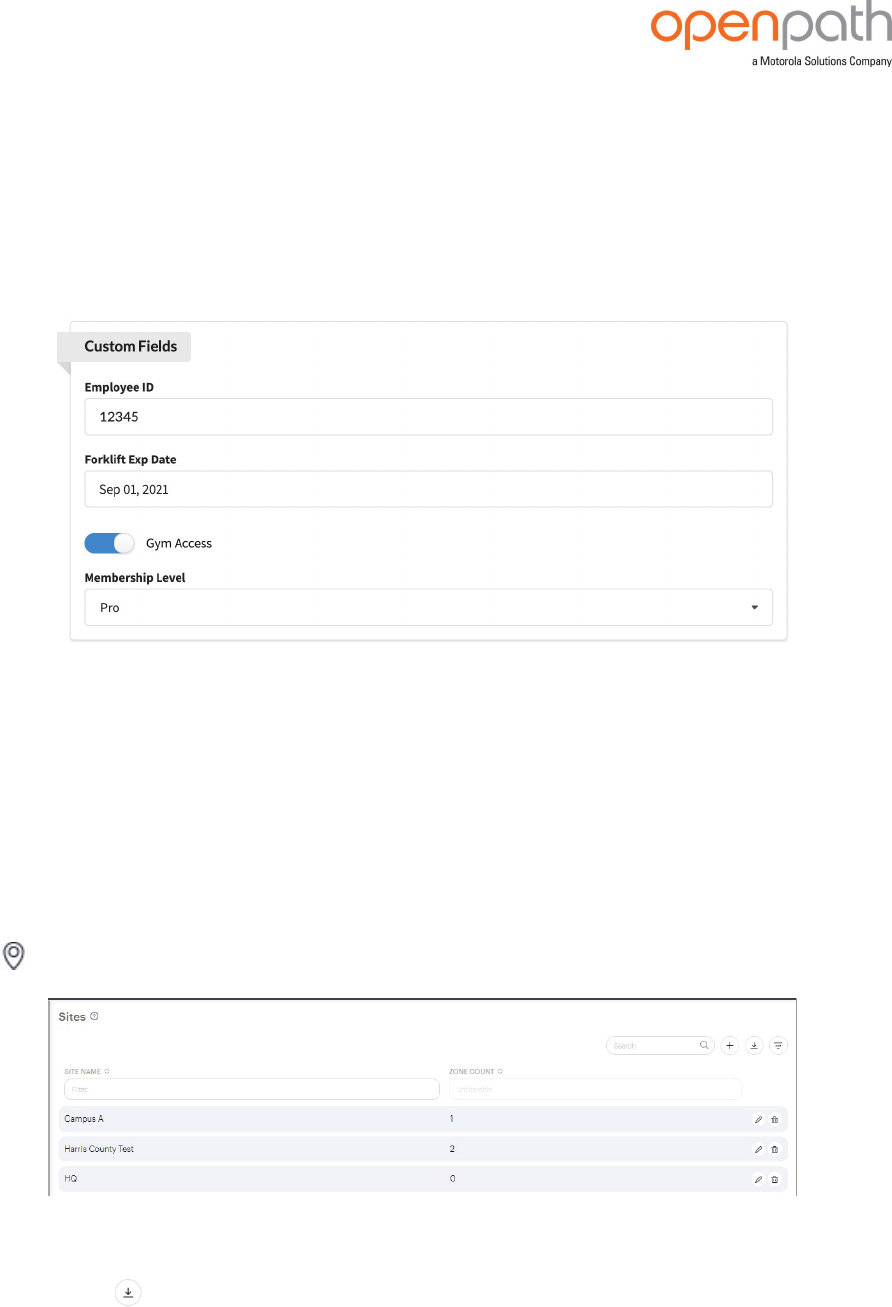
CUSTOM FIELDS
You can create custom, optional fields that appear when you create and edit users,
and also appear in the Users page.
Note: An Openpath Premium or Enterprise plan is required.
1.
Click the Add Custom Field button in the upper-right corner.
2. Enter a name for the field and select a Field Type from the dropdown:
l
Checkbox
l
Date
l
Dropdown
l
Text
3. The field is enabled by default—if you do not want to use the field just yet, click
the slider to disable.
Rev. 4.2 © Openpath 2023 34
4. Click Save.
5. If you selected a Dropdown field, click Create Dropdown Itemand enter a
name, click Save, then repeat for the remaining dropdown options.
6. The fields you create will appear at the bottom of User Details and can be
viewed in the User Management table by clicking Filter Columnsand clicking
the checkbox next to the field.
Figure 17 Custom Fields
SITES
Sites are physical locations (like office buildings) comprised of zones and entries. You
should create a site for every location where you have an Openpathsystem installed.
SITE MANAGEMENT
The Sites page is where you can view and manage sites.
EXPORT DATA TO CSV
l
Click the Export to CSV icon.

Rev. 4.2 © Openpath 2023 35
SHOW ORHIDE DATA
l
Click the Filter Column icon to show or hide data.
CREATE SITES
l
To create a site, click the Add Site button in the upper-right corner.
l
Enter a Site Name, address, and phone number, then click the Savebutton.
ZONE MANAGEMENT
The Zones page is where you can view and manage zones. Zones are groups of one
or more entries that you can assign to sites. Zones are useful for breaking up large
sites into smaller areas like floors or common areas (in multi-tenant scenarios). Most
significantly, zones are the units of physical access permissions that you assign to
users.
EXPORT DATA TO CSV
l
Click the Export to CSV icon.
SHOWORHIDEDATA
l
Click the Filter Column icon to show or hide data.
ZONE SHARING
Zones can be shared between multiple Openpath customers. This is useful if you're a
landlord who wants to share a zone of common entries with multiple tenants.
Recipients cannot edit shared zones.

Rev. 4.2 © Openpath 2023 36
CREATE ZONE
1.
Click the Add Zonebutton in the upper-right corner.
2. Enter a name and description (optional) and select the site to which the zone
will be assigned.
Note: A zone can only be assigned to one site, but a site can have multiple
zones assigned to it.
3. Add User Groups and Users to the zone (optional).
4. If you want to share this zone to a different Organization, enter the Org ID(s)
(optional).
5. Click Save.
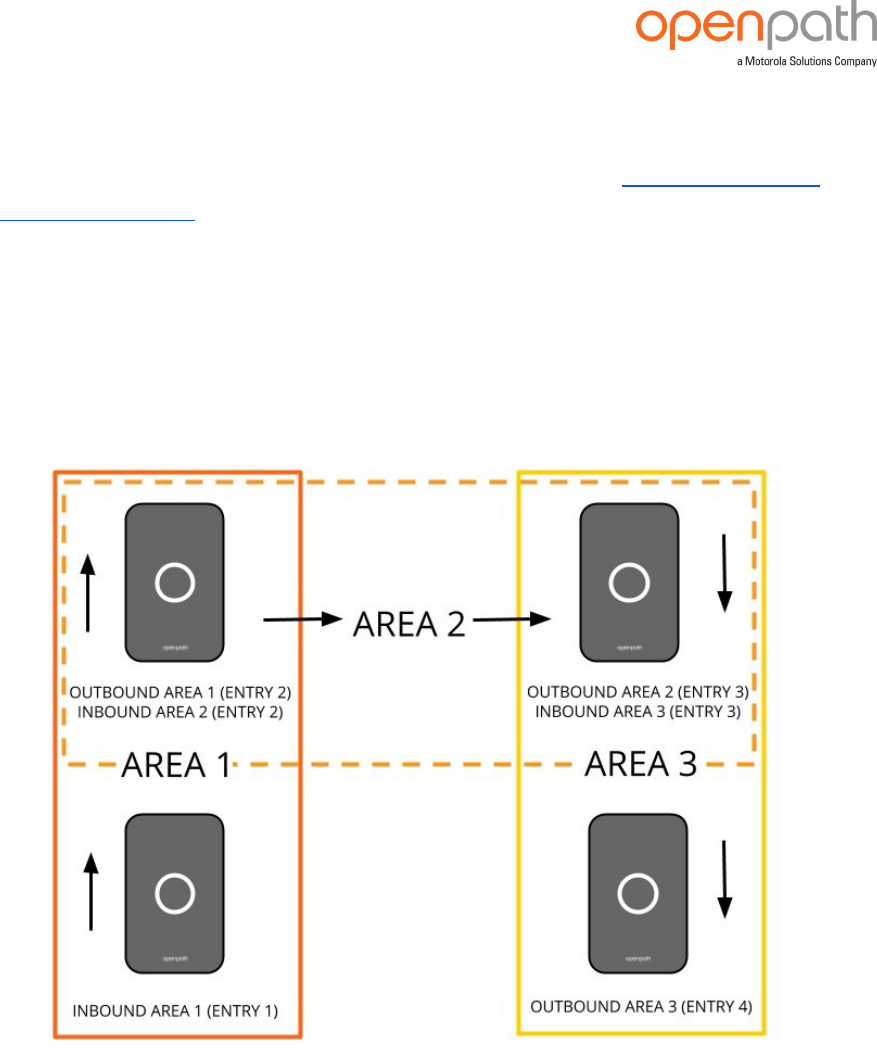
ANTI-PASSBACKAND OCCUPANCY MANAGEMENT
Anti-passback lets you define a sequence in which entries must be accessed in order
to gain entry. Sequences are defined using Areas—each Area contains a set of
inbound and outbound entries.For each Area, after every successful inbound entry
the user must exit through an outbound entry before entering an inbound entry
again. This feature is commonly used with parking gates and helps prevent users
from sharing credentials with other users. You can also use anti-passback to limit
occupancy and prevent users from accessing inbound entries until enough users exit
through outbound entries.
1. To set up anti-passback on a zone, click on the zone to edit it, then click the
Anti-passback tab.
2. Enter an Expiration Timein seconds after which the anti-passback state will
reset for the user.
3. EnableReset Anti-passback Periodically to configure a schedule during which
a user is not limited to anti-passback logic until after their second unlock
attempt.
4. Enable Use Contact Sensorto only change a user's anti-passback state until
after the Contact Sensor reports open
5. Enable Shared-To Orgs Can Reset Anti-passbackif you want orgs sharingthis
zone to have permission to reset anti-passback for their users.

Rev. 4.2 © Openpath 2023 37
6. Lastly, define the Area(s) within the zone to be enforced by anti-passback.
a. Enter a name.
b. Set the Inbound Modeand Outbound Mode, which determines how the
system reacts to anti-passback breaches:
l
None— access is granted; no additional response.
l
Alert— access is granted and an event is generated.
l
Enforce— access is denied and an event is generated.
c. Add Inbound and Outbound Entries.
Note: An entry can only be used once within an Area, either as Inbound
or Outbound but not both; however an entry canbe used in multiple
Areas. In addition, all entries within an Area must reside on the same
ACU, and all entries belonging to the parent zone must reside on the
same ACU.
d. If limiting occupancy, select either Alertor Enforce(definitions above)
from the Occupancy Limiting Mode dropdown, then enter the Occupancy
Limit.
e. Click Add Area.
f. ClickSave.
Internally, the ACU tracks each user's most recent direction of movement (inbound or
outbound) within each Area. When the user's most recent direction is known, then an
attempt by that user to move in the same direction again will result in an Anti-
Passback Breach event. When the user's most recent direction is unknown, as in the
case of a newly created Area, or following a scheduled or manual Reset action, then
the user's next movement will be allowed in either direction, after which normal rules
will apply again.
Anti-Passback Breach events can trigger alerts. See ALERTS on page86. They can also
be used to trigger custom integrations. See RULES on page84.
Note: Anti-passback logic also applies to Cloud Key credentials and other remote
unlock methods. In general, you might not want to allow remote unlock methods
on zones with Anti-passback enabled.
RESET ANTI-PASSBACK
You can reset anti-passback in two ways: on the Zone level and on the User level.
Rev. 4.2 © Openpath 2023 38
l
To reset anti-passback on the Zone level, go to Zones and click Reset Anti-
passback under the Anti-passback Areas column.
l
To reset anti-passback on a User (or multiple Users), see ISSUE ACTIONS TO
USERS on page26.
MULTIPLE AREA ANTI-PASSBACK
Most anti-passback scenarios will only require a single Area, but multiple Areas can
be used to create multi-step sequences of entry access. In this example, all four
Readers reside on the same ACU and are configured across three Areas, resulting in a
complex flow of movement.
Figure 18 Anti-passback logic
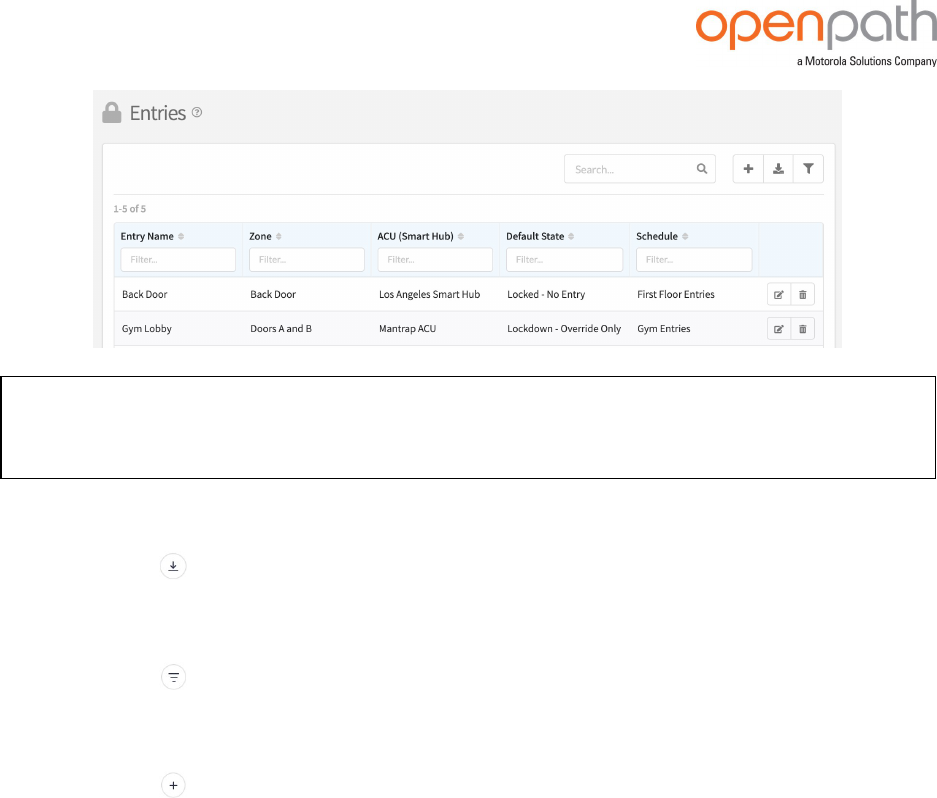
ENTRY MANAGEMENT
The Entries page is where you can add and manage entries. Generally speaking,
entries are doors, but can also be gates, turnstiles, and elevator floors. An entry is
often secured with an Openpath reader or wireless lock.
Rev. 4.2 © Openpath 2023 39
Note: Your Openpath installer may provision some or all of the following features
for you during the installation process.
EXPORT DATA TO CSV
l
Click the Export to CSV icon.
SHOWORHIDEDATA
l
Click the Filter Column icon to show or hide data.
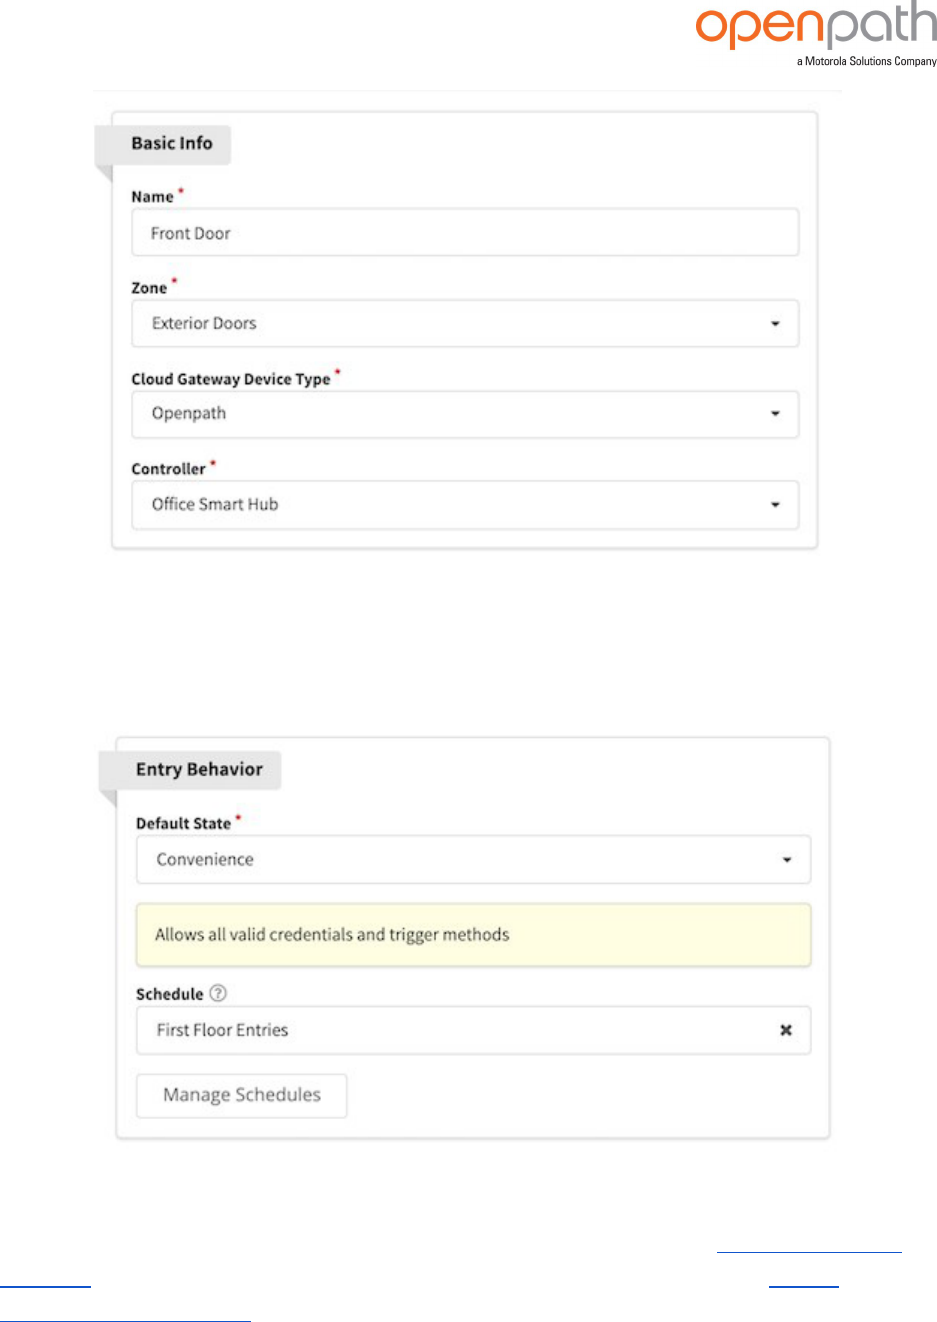
CREATE ENTRY
1.
Click the Add Entry button in the upper-right corner.
2. Enter a name and select the zone.
3. From the Cloud Gateway Device Type dropdown, select whether this is entry is
configured with Openpath hardware (Reader and ACU) or with Allegion Schlage
hardware (Gateway and Lock).
4. If using Openpath hardware, select the Controller (ACU). If using Allegion
hardware, select the Allegion Wireless Lock.
5. If setting up an entry for a Video Reader Pro, select the Video Reader from the
Controller dropdown.
6. Schlage hardware, select the Schlage Wireless Lock.

Rev. 4.2 © Openpath 2023 41
Note: Entries configured with Allegion Schlage NDEB and LEB Wireless Locks only
support Unlocked, No Entry, and Convenience states. Schlage Control locks do not
support entry states.
SCHLAGE WIRELESS LOCK
Figure 21 Schlage Wireless Lock
Entries configured with Schlage Wireless Locks have this additional section.
l
(NDEB/LEB only) Ajar Detectionand Forced Open Detectionare always
enabled for wireless locks.
l
Entry Open Duration determines how long the entry will remain unlocked
(maximum 30 seconds).
l
(NDEB/LEB only) Card Reader Sensitivityis set to Normal by default, but you
can select High or Max for more reliable reading of key fobs.
Rev. 4.2 © Openpath 2023 42
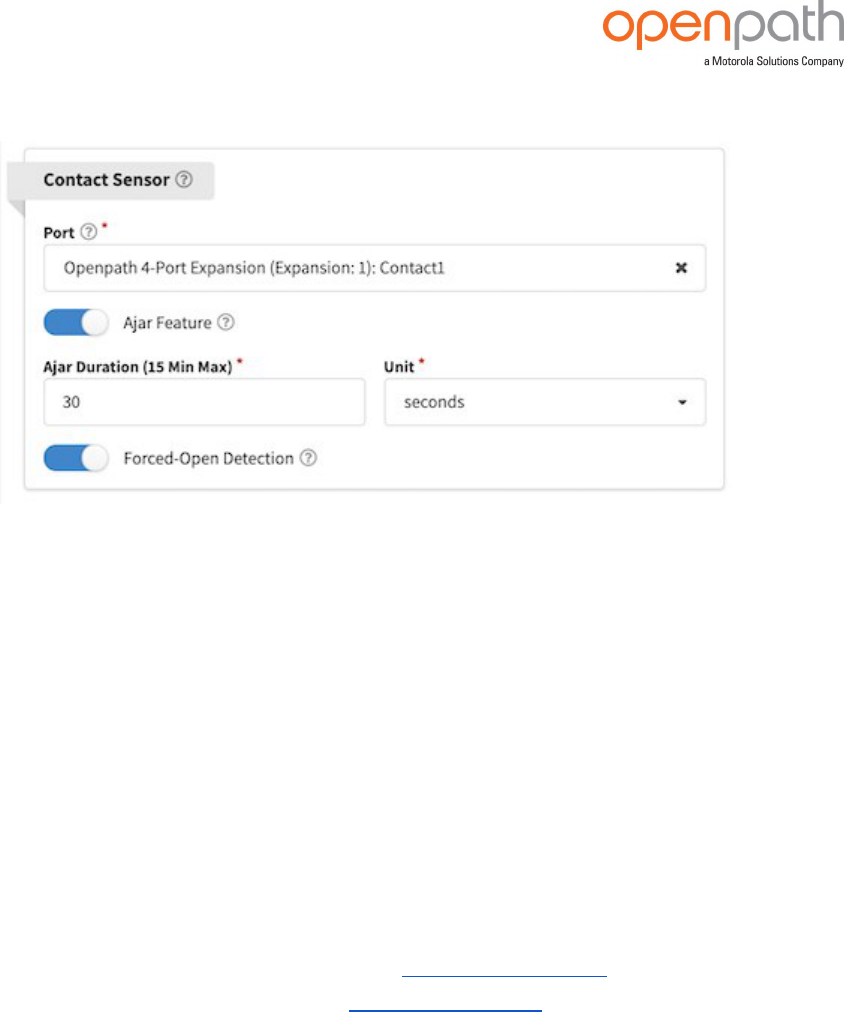
CONTACT SENSOR
Figure 22 Contact Sensor
A contact sensor detects if an entry is open.
l
Port— select the port for the contact sensor to which the entry is wired.
l
Ajar Feature— if enabled, you can specify the maximum allowed time the door
can be ajar before an event is generated indicating the door is ajar. If disabled,
there will be no system action if the door is ajar.
l
Duration— the maximum allowed time the door can be ajar before events are
generated.
l
Unit— select whether to use seconds or minutes.
l
Forced-Open Detection—if enabled, an entry opening without first unlocking
through Openpath or triggering the REX will generate an event.
Contact sensor events can trigger alerts. See ALERTS on page86. They can also be
used to trigger custom integrations. See RULES on page84.
Rev. 4.2 © Openpath 2023 43
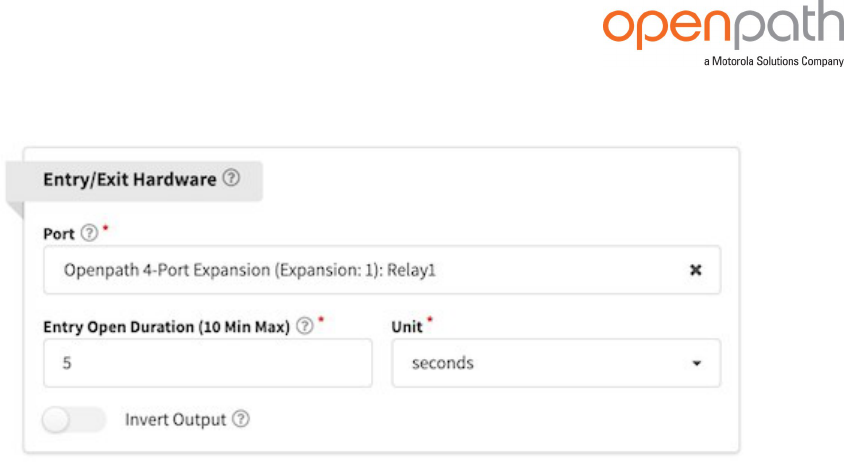
ENTRY/EXIT HARDWARE
Figure 23 Entry/Exit Hardware
Entry/Exit Hardware is where you can select a relay to use on the ACU (or expansion
board), like for controlling electric strikes or maglocks.
l
Port— select which port to assign the reader, from Relay 1-4. Technically, the
electric strike is wired to one of the 4 ACU ports, and the reader is wired to the
strike. You will need to select the ACU relay for which this reader/entry is wired
to the ACU.
l
Entry Open Duration— enter a time (between 1 second and 10 minutes) for how
long the entry remains unlocked before reverting back to its default state.
l
Unit— select whether to use seconds or minutes.
l
Invert Output — this advanced setting is typically only needed for elevator
relays; if enabled, it flips the NC/NO configuration of the physical relay.

Rev. 4.2 © Openpath 2023 44
OPENPATH READER
Figure 24 Openpath Reader
Associate the entry with the Openpath Reader.
l
Port— select the port on the ACU to which the Openpath Reader is connected.
l
Card Reading — enable this to allow RFID/NFC cards at this reader.
l
Wave to Unlock— enable this to allow Wave to Unlock and Touch Entry.
l
Mobile Authorization Range— This range specifies how close the mobile
device must be to the reader in order to register a Wave to Unlock. Set the range
using the slider.
l
Wave Detection Range— This range specifies how close the hand must be to
the Openpath reader to initiate the unlock attempt—this behavior may vary
depending on your environment and this setting might require adjustment.
l
Auto Proximity Unlock (Elevators Only)— enable this to unlock the entry when
a user with a valid mobile credential is in range of the reader. Set the range
using the slider.
l
Advanced Options—toggle this to configure advanced range options for the
Openpath Reader:
o
Mobile Reader Range— the distance that the reader can detect a mobile
phone that is in BLE range.
o
Mobile Beacon Range—the distance that the beacon can detect a
mobile phone and "wakes up" the Openpath app.
Rev. 4.2 © Openpath 2023 45
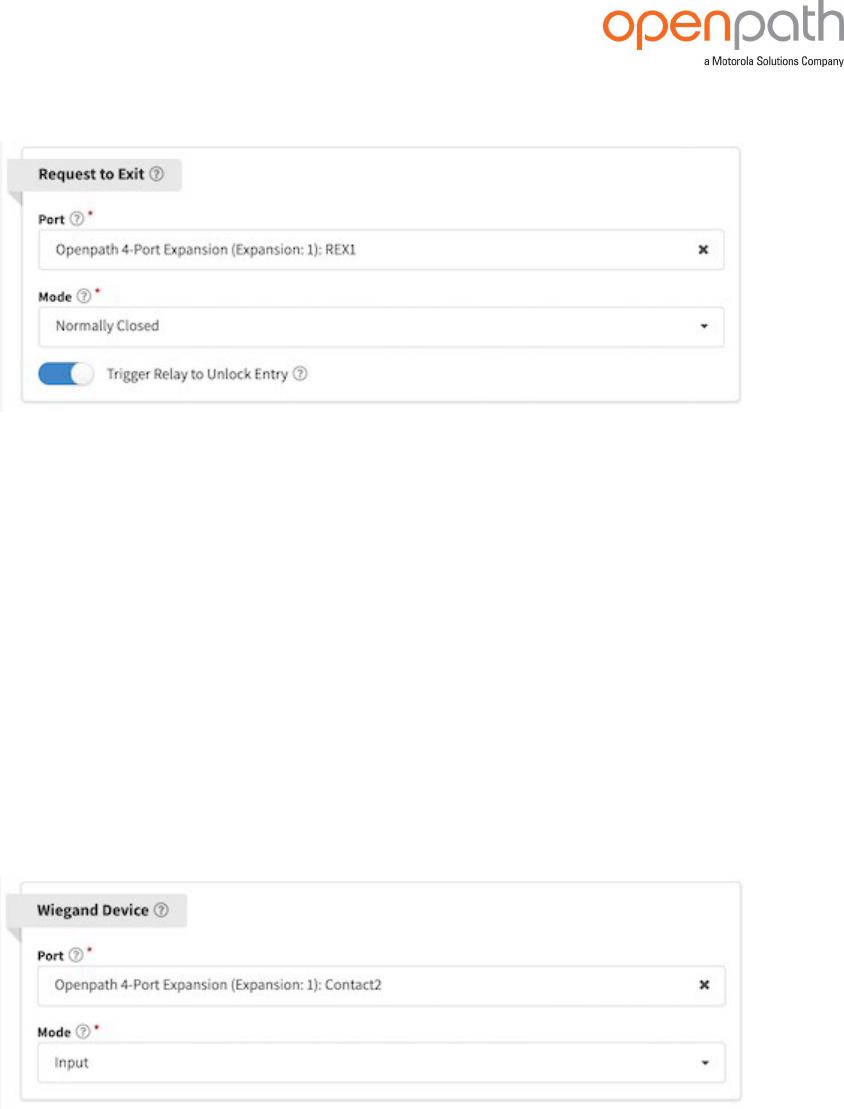
REQUEST TO EXIT
Figure 25 Request to Exit
Often, doors will have a Request to Exit button or sensor that will unlock the door from
the inside.
l
Port— select the port for the Request to Exit device to which the entry is wired.
l
Mode— this is an electrical term regarding how the Request to Exit device sends
the command to the ACU. Your installer will be able to give you guidance on
whether the Mode should be set to Normally Closed or Normally Open for a
particular entry configuration.
l
Trigger Relay to Unlock Entry— if enabled, a triggered REX will open the
associated Relay(s) and prevent forced-open alarms.
WIEGAND DEVICE
Figure 26 Wiegand Device
Openpath is compatible with legacy Wiegand Devices.

Rev. 4.2 © Openpath 2023 46
l
Port— select the port for the Wiegand Device to which this entry is wired.
l
Mode— select the Modeto set which direction the card credential data is sent:
o
Use Inputto receive data from devices such as a Wiegand reader.
o
Use Output(Gateway)to send credential data to a third—party control
panel. See CONFIGURING OPENPATH CONTROL CENTER WITH LEGACY
SYSTEMS on page95for more information.
ADD CONTROL
l
If an entry has more than one of any controls (Openpath Readers, Entry/Exit
Hardware, Contact Sensor, Request to Exit, or Wiegand Device) installed, you can
select which additional control(s) you would like to associate with the entry.
l
Once you add an additional control, it will appear in the relevant section on this
page.
Figure 27 Additional Controls
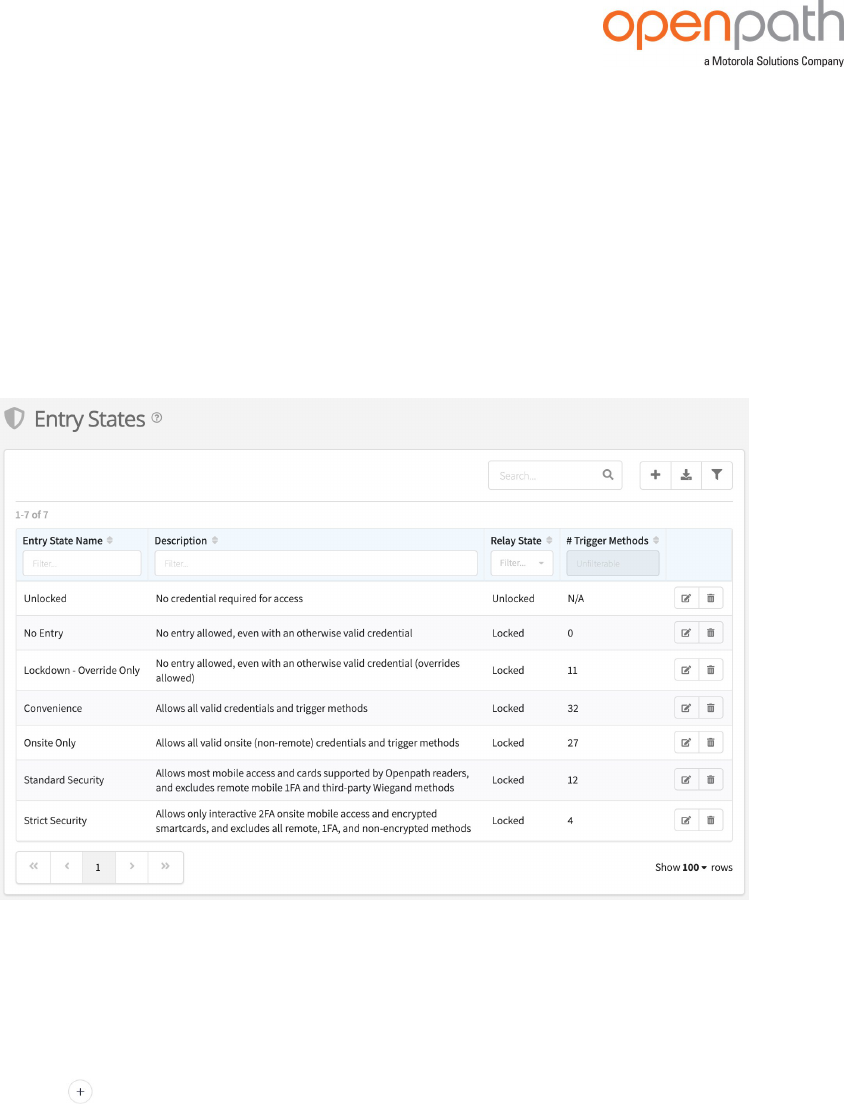
ENTRY STATES
An Entry State defines whether an entry is unlocked and what access methods may
be used to unlock it. Openpath provides the following default entry states:
l
Unlocked— No credential is required for access.
l
No Entry — No entry allowed, even with an otherwise valid credential.
l
Lockdown - Override Only — No entry allowed, even with an otherwise valid
credential, except for override unlock requests.
l
Convenience— Allows all valid credentials and trigger methods.
l
Onsite Only — Allows all valid onsite credentials and trigger methods.
l
Standard Security— Allows most mobile access and cards, and excludes
remote mobile 1FA and third-party Wiegand methods
l
Strict Security— Allows only interactive 2FA onsite mobile access and
encrypted smart cards. Excludes all remote, 1FA, and non-encrypted methods.
Rev. 4.2 © Openpath 2023 47
l
Standard Security MFA- PIN— Allows most mobile access, cards, and PINs
supported by Openpath readers, and excludes remote mobile 1FA and third-
party Wiegand methods for MFA with PIN required as the second factor.
l
Strict Security MFA - PIN — Allows only interactive 2FA onsite mobile access,
PINs, and encrypted smartcards excluding all remote, 1FA, and non-encrypted
methods for MFA with PIN required as the second factor.
The Trigger Methodscolumn refers to the number of ways that an entry can be
unlocked in that particular state.
Figure 28 Entry state management
Click on an Entry State in order to view the trigger methods included in that state.
ADDENTRY STATE
1.
Click the Add Entry Statebutton in the upper-right corner.
2. Enter the name for the entry state and a description.
3. If the entry requires two credentials from each user, click the Enable Multi-
Factor slider.
4. In Trigger Methods, use the checkboxes to enable the trigger methods for the
entry state. Definitions for the various methods are provided below.
5. Click Save.

Rev. 4.2 © Openpath 2023 48
TRIGGER METHOD DEFINITIONS
l
Mobile 1FA:An unlock request that is triggered either from a mobile device that
has no homescreen PIN-code, biometric, or other similar protection, or from a
device whose homescreen is currently not unlocked.
l
Mobile 2FA:An unlock request that is triggered from a device with PIN-code,
biometric, or other similar protection on the homescreen, and whose
homescreen is currently unlocked. Therefore in order to trigger a Mobile 2FA
unlock, a person must both be in possession of the mobile device, as well as
know or possess the PIN-code or biometric needed to unlock the device.
l
Wave:An unlock request that is triggered by passing a hand in close proximity
to, a Wave-enabled Openpath Smart Reader, and which is authenticated by the
mobile credential provisioned into Wave-enabled Openpath Mobile Access
app.
l
Auto:An unlock request that is triggered by being in close proximity to an Auto-
enabled Openpath Smart Reader, and which is authenticated by the mobile
credential provisioned into Auto-enabled Openpath Mobile Access app. This
mode is often used for elevator scenarios.
l
Remote:An unlock request that is triggered while the user is not near the entry.
l
Onsite:Opposite of Remote; an unlock request that is triggered while the user is
near the entry.
l
Near Reader:An unlock request that is considered Onsite because the mobile
device is within Bluetooth range of the entry's Openpath Reader.
l
Over BLE:A mobile unlock request that is sent over BLE (Bluetooth Low Energy)
through the Openpath Reader. Such a request is always Onsite.
l
Over WiFi:A mobile unlock request that is sent over the mobile device's WiFi
connection over the local network directly to the Openpath Access Control Unit.
Such a request may be considered Onsite or Remote depending on whether the
mobile device is in range of the entry's Reader.
l
Over Cloud:A mobile unlock request that is sent over the mobile device's WiFi or
cell/LTE connection, and routed via the Openpath cloud back to the Access
Control Unit. Such a request, if permitted, enables Remote unlock from
anywhere in the world where the mobile device has an internet connection, but
also may be considered Onsite if the mobile device is in range of the entry's
Reader.
l
Multi-Factor: An unlock request that requires two different credential types
from a single user (e.g. card + PIN, etc). When enabled, users with permissions at
Rev. 4.2 © Openpath 2023 49
the entry must present both credentials using the approved trigger methods for
each type to gain access.
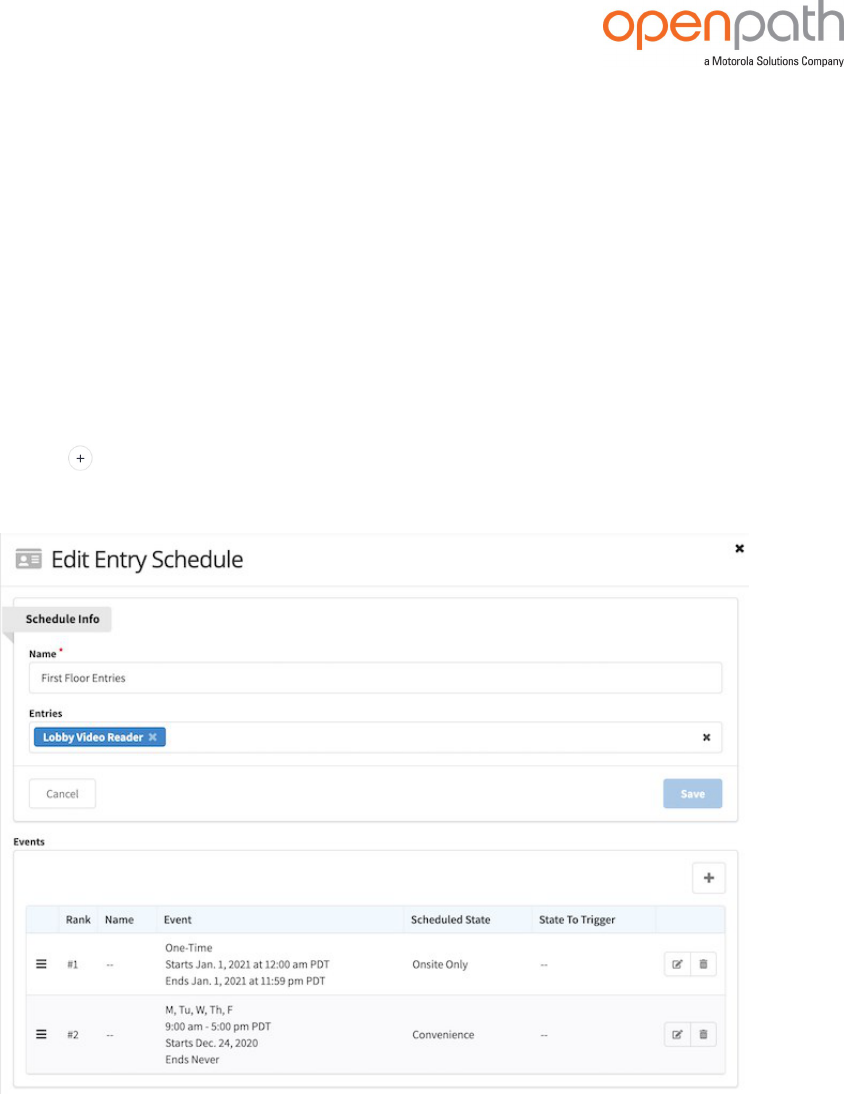
ENTRY SCHEDULES
Entry Schedules allow for entries to be in a specific state (e.g. locked, unlocked, etc)
based on date and time. For example, an entry can be set to an unlocked state
during normal business hours, Monday — Friday but remain locked (its Default Entry
State) when the Schedule is inactive.
CREATE ENTRY SCHEDULE
1.
Click the Add Entry Schedulebutton in the upper-right corner, enter a name,
and click Next.
Figure 29 Add Entry Schedule
2. Assign this Entry Schedule to entries by either typing in the names of the entries
or using the dropdown.
3. Click Add Event to create a new schedule.
a. Choose between a Repeating Eventand a One-Time Event.
b. Enter a Name (optional).

Rev. 4.2 © Openpath 2023 50
c. (Repeating Event) From the Frequency dropdown, select whether this
schedule will recur daily, weekly, monthly, or annually.
d. (Repeating Event) Select which days the schedule will occur.
e. Enter a Start and End Time.
f. Select a Time Zone.
g. Enter a Start Date and End Date.
h. Select the Scheduled State from the dropdown.
i. (Optional)Enable and set Trigger after an unlock method.
i. If enabled, the entry will not change to the scheduled state until the
first person with access triggers a door to unlock.
j. Click Save.
Rev. 4.2 © Openpath 2023 51
Figure 30 Add Event
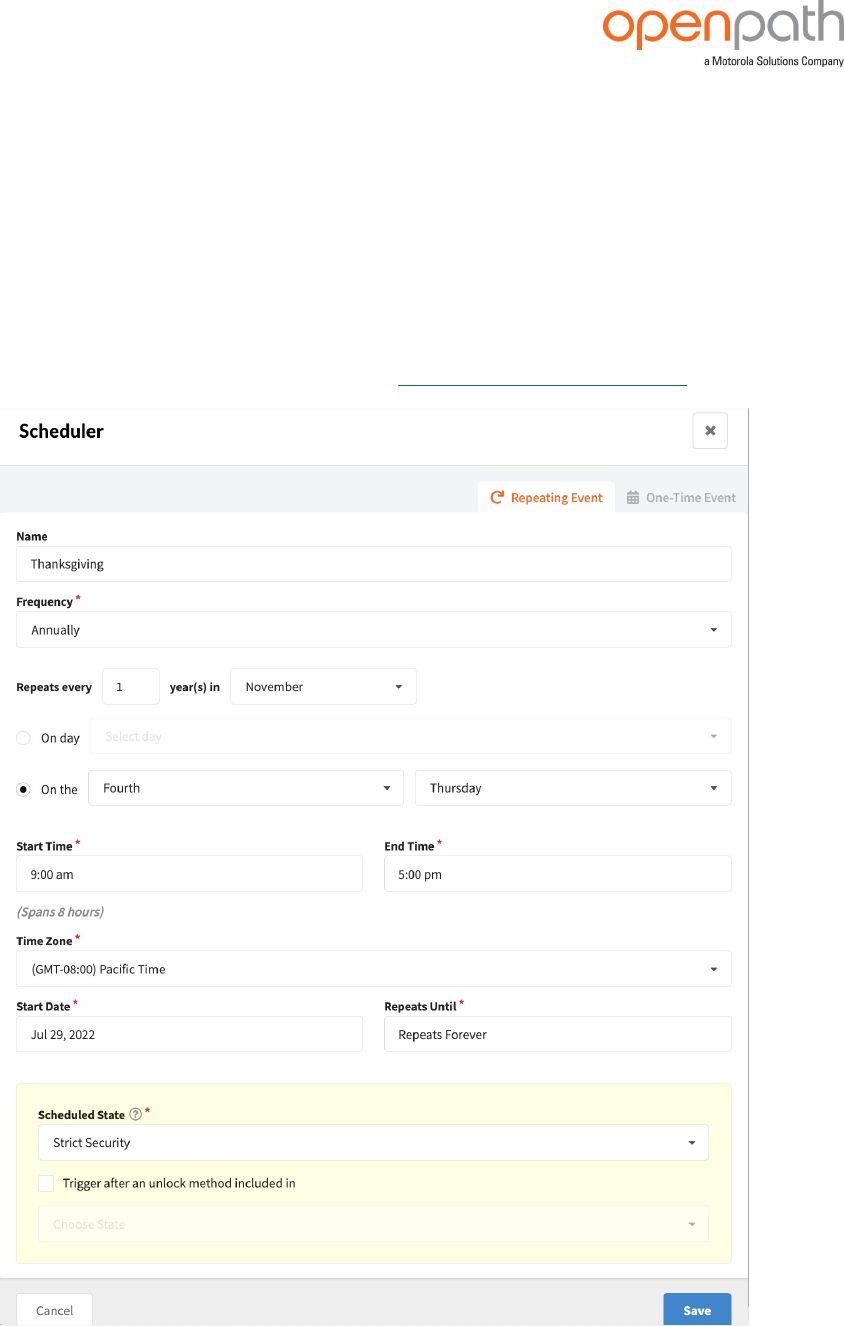
CREATE HOLIDAYSCHEDULE
1. Create an entry schedule or edit an existing one.
2. Click Create Event, then go to Repeating Event.
3. Enter a Name (optional).
4. From the Frequency dropdown select Annually.
5. Select which day the schedule will occur.
Rev. 4.2 © Openpath 2023 52
6. Enter a Start and End Time.
a. For a 24 hour schedule, enter 12:00 am for the Start Time and 11:59 pm for
the End Time.
7. Select a Time Zone.
8. Enter a Start Date and End Date (optional, the default repeats forever).
9. Select the Scheduled State from the dropdown.
10. Click Save.
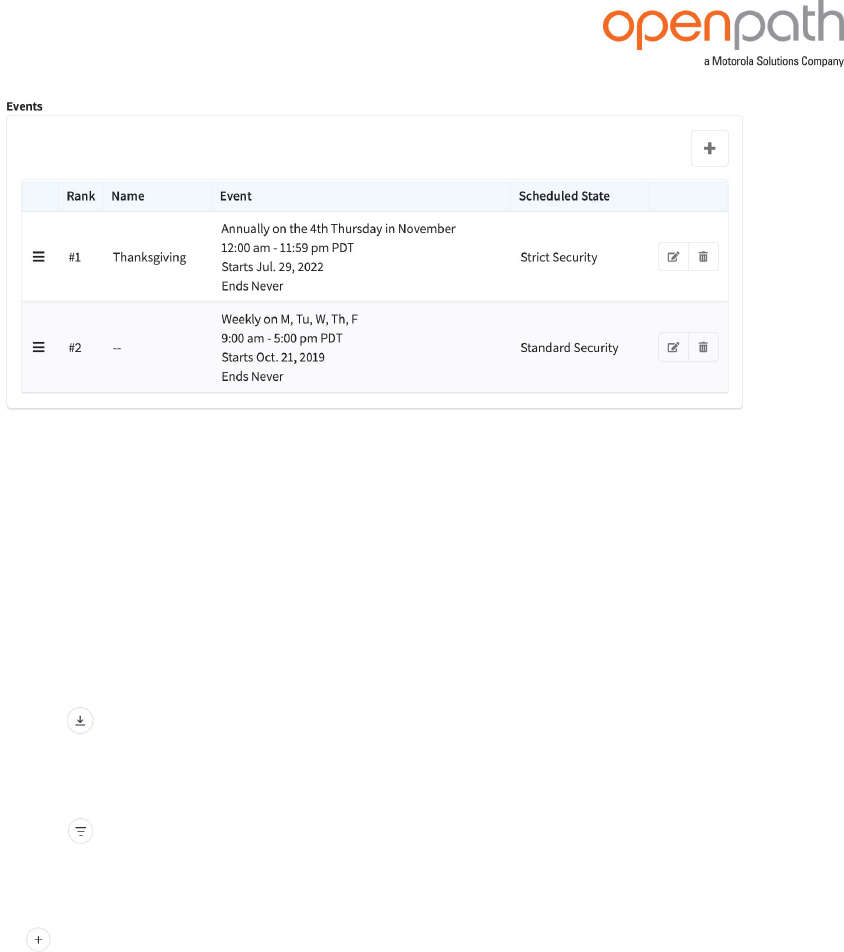
11. Click and drag to reorder your holiday entry event – the holiday should rank
higher than your normal schedule (see Figure 32 on the next page).
Figure 31 Holiday Example
Rev. 4.2 © Openpath 2023 53
Figure 32 Rank Holiday Schedule
LOCKDOWN PLANS
The Lockdown plans page is where you can view and manage lockdown plans.
EXPORT DATA TO CSV
l
Click the Export to CSV icon.
SHOW ORHIDE DATA
l
Click the Filter Column icon to show or hide data.
CREATE LOCKDOWN PLAN
1.
Click Add Lockdown Plan in the upper-right corner.
2. Give the plan a useful name and assign a Rank. The rank is important because
it determines which plans take priority in the case of triggering multiple plans
that share entries. The lower the number, the higher the rank.
3. Optionally, you can enter a time after which the plan will auto-revert using
Duration. If you do not want the lockdown plan to revert automatically, leave
this value blank.
4. Optionally, you can enable the Use standard zone configurationslider to
create a lockdown plan that includes all zones with the Lockdown - Override
Only state.
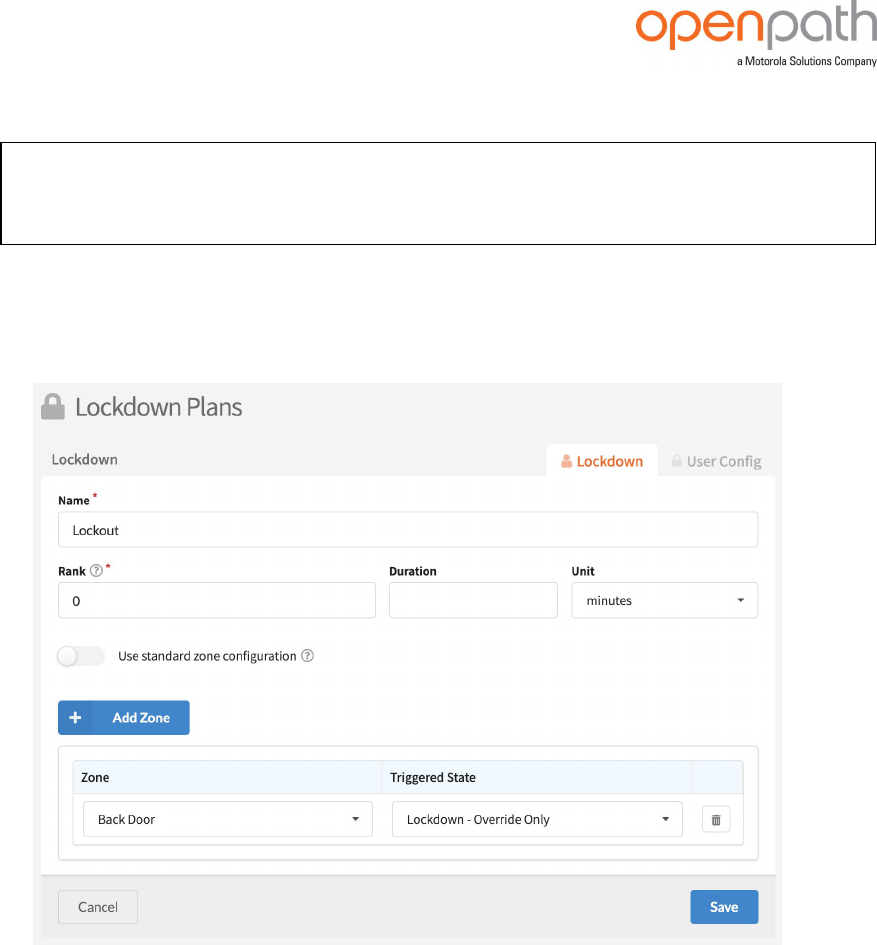
Rev. 4.2 © Openpath 2023 54
5. Click Add Zoneto select the entries the lockdown plan will impact.
Note: You cannot add zones that have been shared with you to a lockdown
plan.
6. Select the desired Entry State for the zone. For lockdown scenarios, we
recommend using Lockdown - Override Only. This means only users with
override permissions are able to unlock entries in this state.
Figure 33 Create Lockdown Plan
7. Click Save.
ASSIGN USER AND GROUP PERMISSION
1. Go to the User Config tab to select users and groups that can trigger and revert
the lockdown plan.
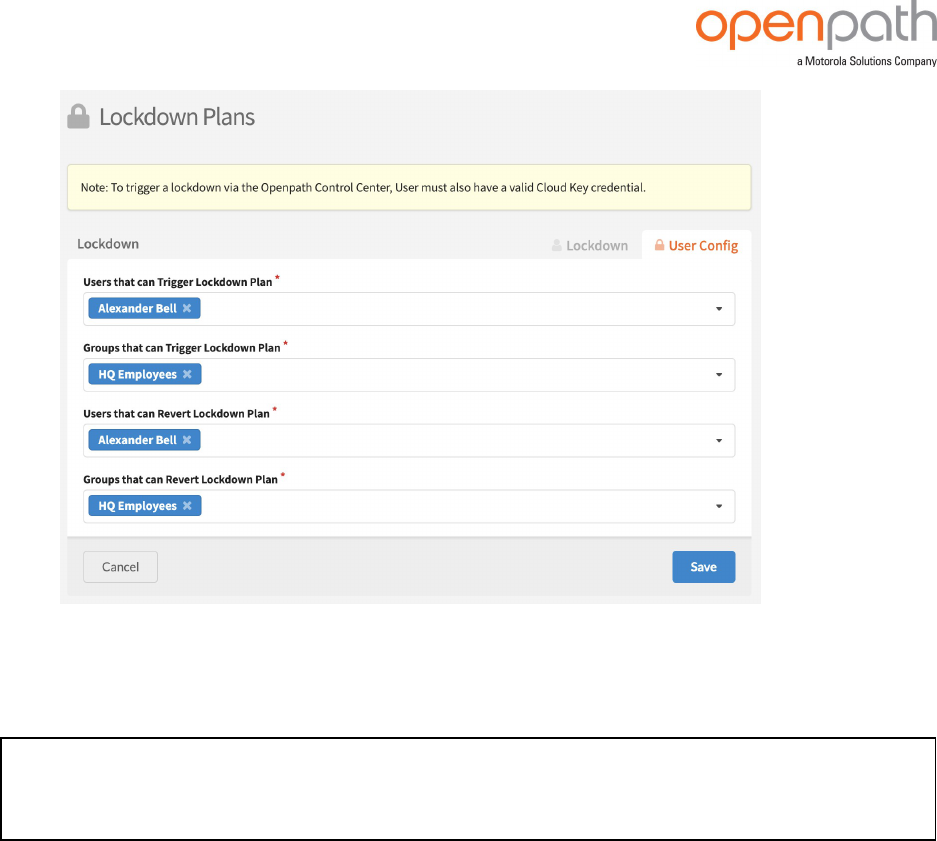
Rev. 4.2 © Openpath 2023 55
2. Click Save.
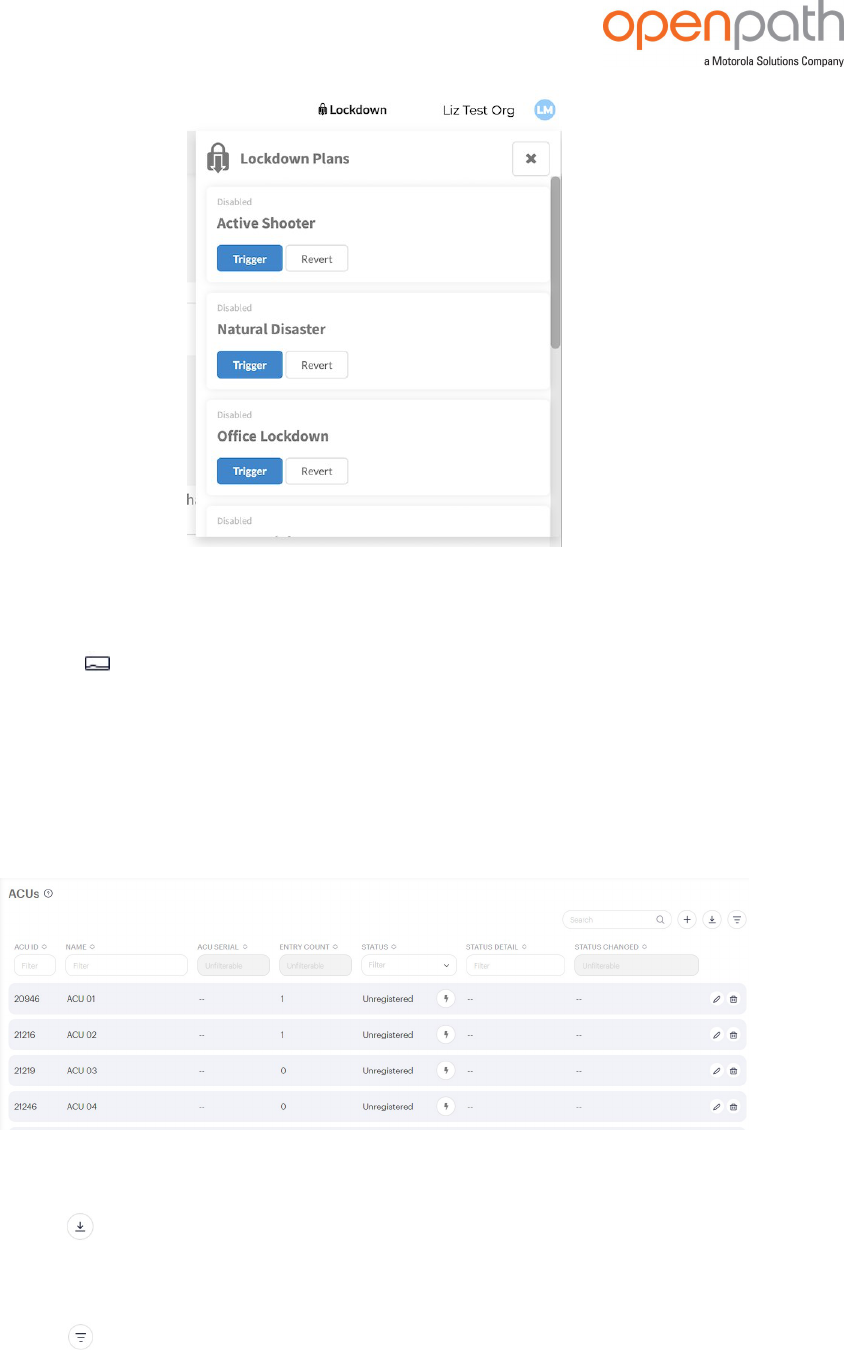
TRIGGER A LOCKDOWN PLAN
Note: You must have a Cloud Key Credential to trigger and revert lockdown plans
from the Control Center.
1. Click Lockdownfrom the top right corner.
2. Click Triggeror Reverton the desired lockdown plan.
Rev. 4.2 © Openpath 2023 56
DEVICES
You can use the Devices page to create and manage Openpath ACUs and SDCs,
readers, wireless locks, wireless lock gateways, video readers, and video intercom
readers.
ACU MANAGEMENT
The ACUs page is where you can view and manage ACUs and SDCs.
EXPORT DATATO CSV
l
Click the Export to CSV icon.
SHOW ORHIDE DATA
l
Click the Filter Column icon to show or hide data.

Rev. 4.2 © Openpath 2023 57
CREATE ACU OR SDC
Before you can provision an ACU using the Open Admin app, you must first create an
ACU or SDC in the Control Center.
ADD MULTIPLE ACUS OR SDCS USING QUICK START OPTION
1. Go to control.openpath.com/loginand log in. To access the European Partner
Center, go to control.eu.openpath.com/login.
2. Go to Administration > Quick start.
3. Enter a Site Nameand any other relevant site information.
a. In Organization Language, select the preferred language for the emails
sent by the system.
b. Click Next.
4. Enter the number of controllers located at your site:
a. Enter names for the controllers.
b. In Controller Type, select the type used:
l
First Generation - Red Board (OP-AS-01)— For first generation
Smart Hubs.
l
Single Door Controller (SDC)
l
Core Series ACU — For Core Series Smart Hubs.
c. If your ACU or SDC also connects to an expansion board, add the
appropriate types in EXPANSION BOARDS:
l
Openpath 4-Port Expansion
l
Openpath 8-Port Expansion
l
Openpath 16-Port Elevator
Tip: This configuration is most common with the Core Series Smart
Hubs.
d. Click Next.
5. Enter the number of readers connected to the controllers. Enter their names and
click Next.
6. Review your site details and click Confirm & Submit. It may take a few minutes
for setup to complete.
ADD ONE ACU OR SDC
1. Go to Devices > ACUs.
2.
To add a new ACU or SDC, click the Add ACU button in the upper-right corner.

Rev. 4.2 © Openpath 2023 58
3. Enter a name for the ACU or SDC.
4. In Controller Type, select the type used:
l
First Generation - Red Board (OP-AS-01)— For first generation Smart
Hubs.
l
Single Door Controller (SDC)
l
Core Series ACU — For Core Series Smart Hubs.
5. If your ACU or SDC also connects to an expansion board, add the appropriate
types in EXPANSION BOARDS:
l
Openpath 4-Port Expansion
l
Openpath 8-Port Expansion
l
Openpath 16-Port Elevator
Tip: This configuration is most common with the Core Series Smart Hubs.
6. Click Save.
Figure 34 Create ACU
After you add an ACU to the system, you need to register it (also known as
provisioning). For Smart Hubs, refer to the Openpath Installation Guide. For Single
Door Controllers, refer to the Openpath SDC Installation Guide.
ADD EXPANSION BOARD
You need to edit ACUs when you install additional expansion boards in existing Smart
Hubs.
Rev. 4.2 © Openpath 2023 59
1. To edit an ACU, click on the ACU from the ACUs page.
2. From the Add Expansion Boarddropdown, select and add the expansion board.
3. Click Save.
EDIT ACU PORTS
From the Edit ACU page, click on the Portstab to view and manage ACU ports:
l
In the Options column, click on the Ports icon open Port Options
l
Click on the Input Typedropdown to change a Contact Sensor, Request to Exit
input or AUX I/O to a different input type, Wiegand Device, or to a Generic input.
This is useful for creating rules. See RULES on page84.
l
You can only change the Input Type on a port that has not yet been assigned to
an entry
END OF LINE SUPERVISION
The SDC and Core Series Smart Hubs support end-of-line (EOL) supervision:
l
Click on the Cableicon to open Cable Options
l
Click on the End of Line Supervisiondropdown to select Line Shorted Detect,
Line Cut Detect, or Both
l
The setting selected must match your physical wiring configuration, see the
Openpath Installation Guidefor more information
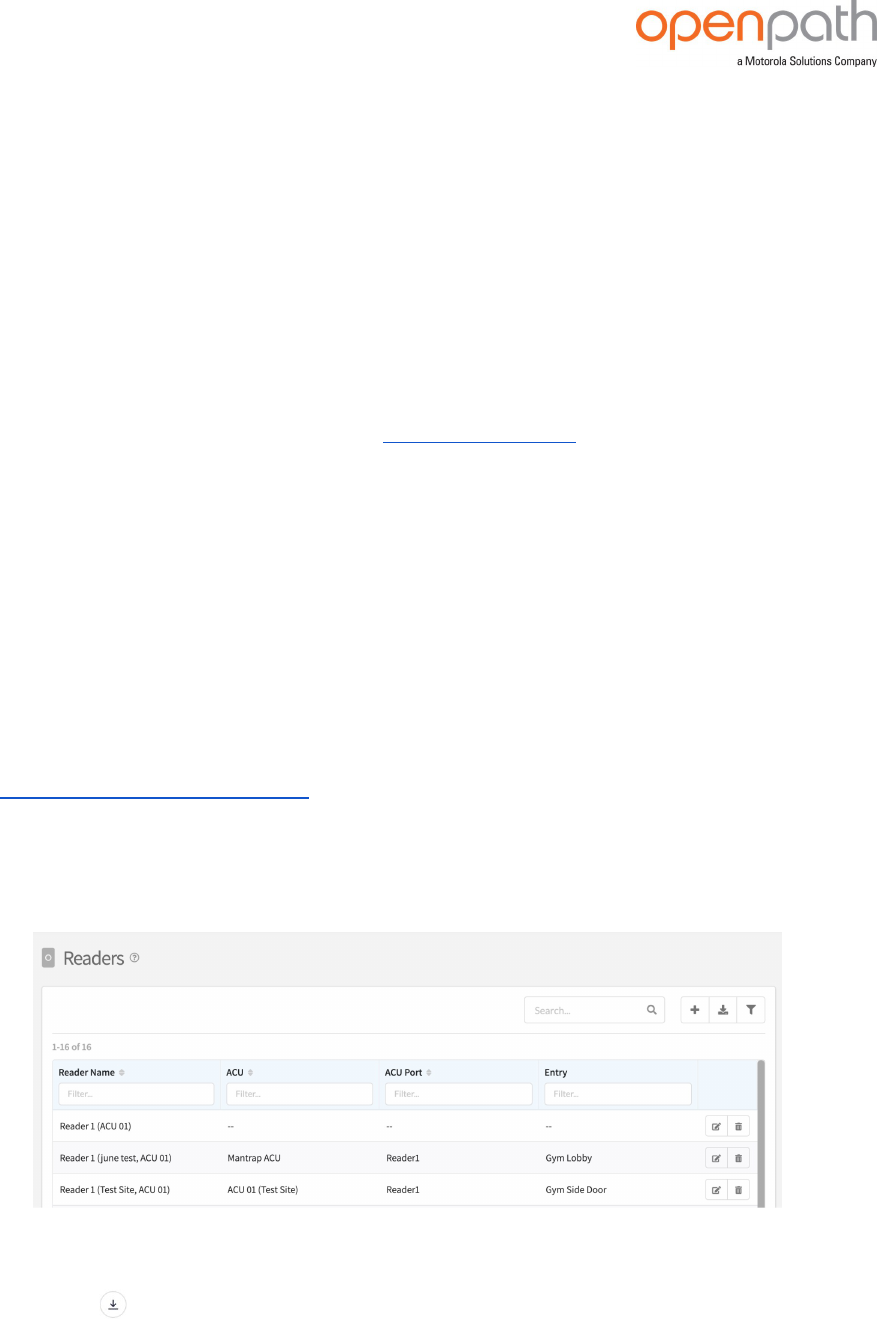
READER MANAGEMENT
The Readers page is where you can view and manage readers.
EXPORT DATA TO CSV
l
Click the Export to CSV icon.
Rev. 4.2 © Openpath 2023 60
SHOWORHIDE DATA
l
Click the Filter Column icon to show or hide data.
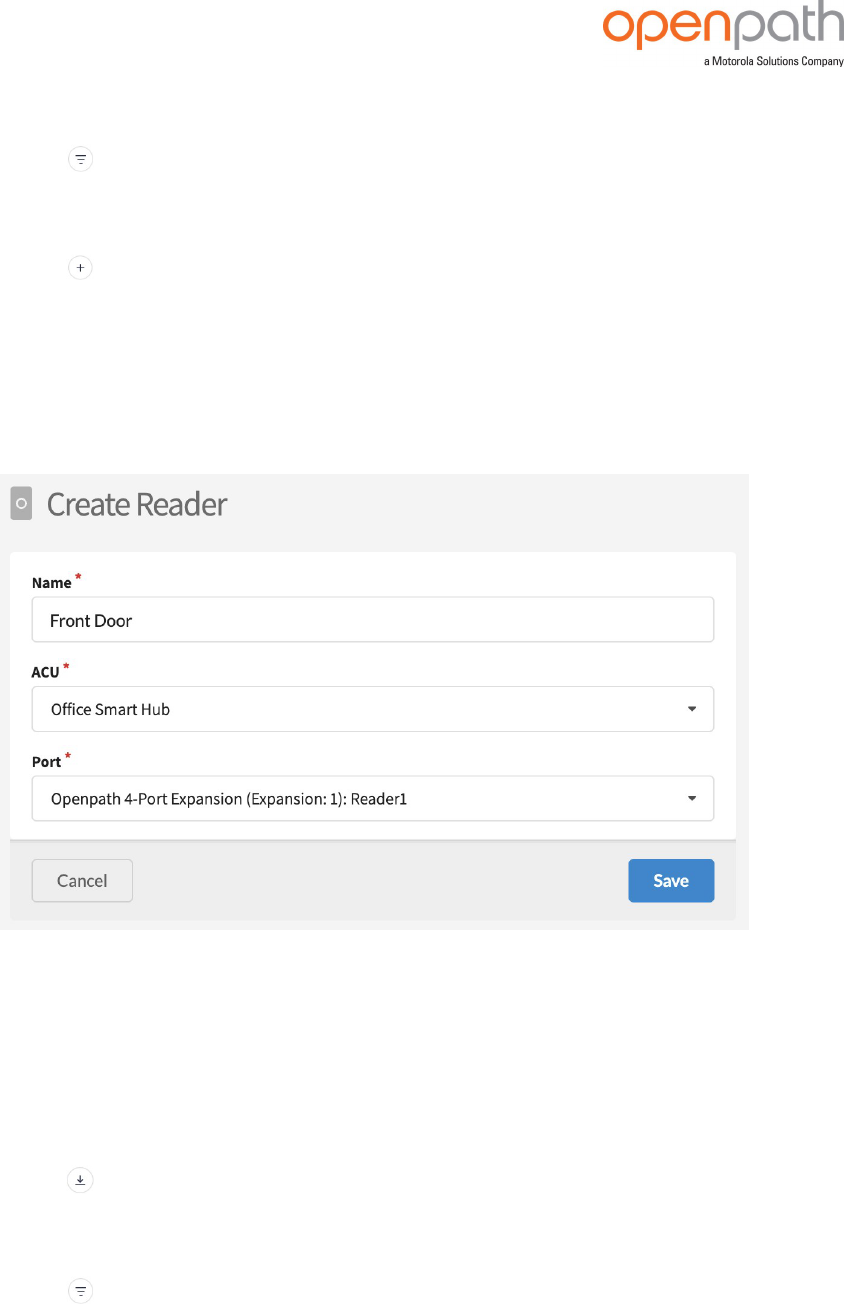
CREATEREADER
1.
Click the Add Reader button in the upper-right corner.
2. Enter a name for the reader — names are usually relevant to the location where
the reader is installed.
3. Select the ACU to which this reader belongs.
4. Select the port to which this reader is wired.
5. Click Save.
Figure 35 Create Reader
VIDEOREADER MANAGEMENT
The Video readers page is where you can view and manage video readers.
EXPORT DATA TO CSV
l
Click the Export to CSV icon.
SHOWORHIDE DATA
l
Click the Filter Column icon to show or hide data.

Rev. 4.2 © Openpath 2023 61
CREATE VIDEOREADER
ADD A VIDEO READER PROIN CONTROLCENTER
1. Go to Devices > Video readers.
2.
Click the Add Video Reader button in the upper-right corner.
3. Enter a name for the video reader.
4. If Wiegand wiring is used to connect to existing legacy systems, click the
Standalone Mode slider.
Note: Openpath licenses and internet access are not required. For more
information, see How to set up a Standalone Mode Video Reader Pro.
*
5. Click Save.
6. The Details section (read-only) will populate with info after the video reader is
provisioned.
7. In the Settings section, the Tamper Sensor setting is enabled by default.
l
When enabled, the video reader will record Tamper Detected events when
the video reader is touched or moved.
l
You can adjust the Tamper Sensor Sensitivity, lower or higher, depending
on your needs.
Note: A higher sensitivity level may produce false tamper events, for
example, when someone triggers a Touch to Unlock.
For the next steps, see:
l
Create a zone (if you don’t have one already).
l
Create an entry, selecting the Video Reader from the Controller dropdown.
Note: This is where you can configure the Video Reader’s Wiegand port as
input or output (like for Mobile Gateway).
l
Install and provision the Video Reader Pro.
*
For more information, see:
https://openpath.atlassian.net/servicedesk/customer/portal/16/article/1668284452?src=1724573529

Rev. 4.2 © Openpath 2023 62
After provisioning, return to the Control Center to finish configuring video settings or
to enable ONVIF.
CONFIGURE VIDEO SETTINGS
EDITVIDEO SETTINGS
1. Go to Devices > Video readers, and click the Video Reader you’d like to edit.
2. Click the Video tab to adjust video settings.
a. Under Video Properties, select High, Medium, or Low quality.
b. Adjust Brightness, Contrast, Saturation, and Sharpness as needed.
c. Wide Dynamic Range is disabled by default; enable it to automatically
adjust for backlighting and other extreme lighting conditions.
d. Night Mode is set to Auto by default, but you can also set it to Always on or
Always off.
e. Anti-Overexposure is enabled by default; when enabled this helps reduce
IR glare on persons and objects approaching the Video Reader.
f. Under Detection Settings, enable or disable Motion Detection and adjust
sensitivity settings.
g. In the live video feed, create privacy areas or regions of interest, if needed.
ENABLE ONVIF
Enable ONVIF if you are exporting video to a third-party VMS.
1. Toggle the Enable ONVIF slider to on.
2. Click Save.
3. Click Open Camera UI.
a. Note: For best results, use Chrome, Firefox, or Microsoft Edge.
4.
Log in using the default username and password, then go to Configurations >
Security > User accounts to change the password.
Note: The Control Center always displays the default password, even if you
change the password in the Camera UI. To reset the password back to the
default, disable ONVIF, wait 10 seconds, then enable again.
Rev. 4.2 © Openpath 2023 63
CHANGE CLOUDVIDEOSTORAGEPLAN
You can change your cloud video storage plan length, however, plans are not
retroactive. For example, if you are currently on a 30 day plan and you switch to a 180
day plan, you’ll still only have access to the past 30 days of clips (with 180 days of
storage moving forward).
1. Go to Devices > Video readers, and click the Video Reader you’d like to edit.
2. Under Cloud Video Storage, select a different Plan Length.
3. Click Save.
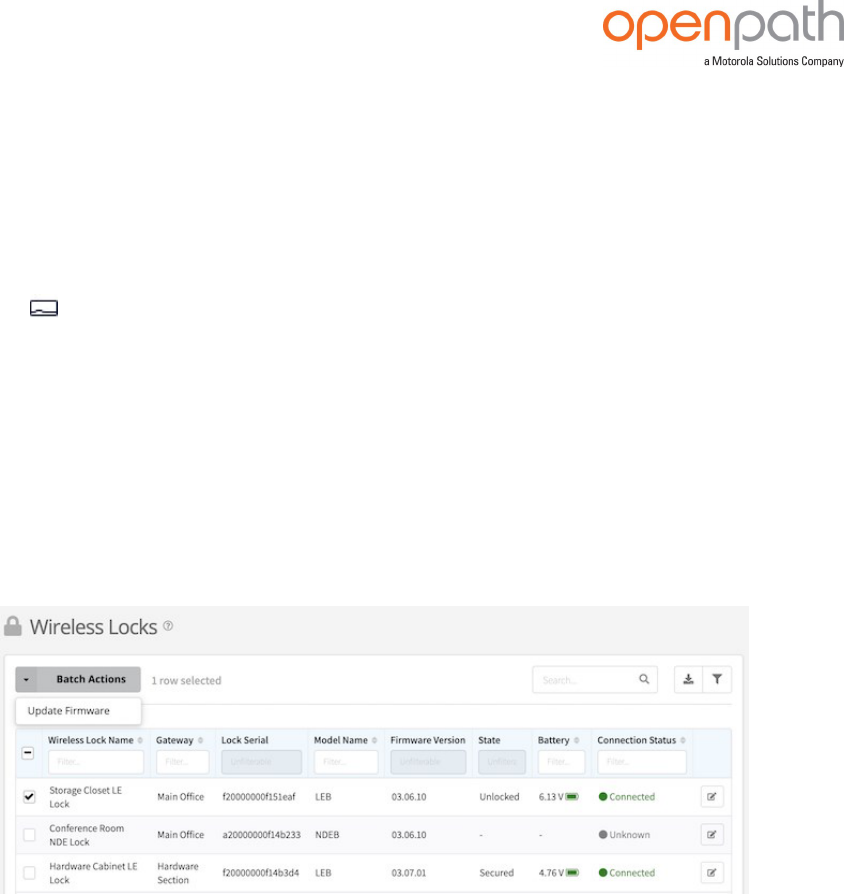
WIRELESS LOCK MANAGEMENT
If you have the Allegion integration enabled, you can view and manage wireless locks
and gateways.
From this page, you can select locks and click Batch Actionsto update firmware.
EDIT LOCK
CONFIGUREAN NDEB OR LEB LOCK
1. From Wireless locks, click on the name of the lock to edit it.
2. Under Basic Settings, you can do the following:
a. From the Power Failuredropdown, select how the lock will behave in the
event of the battery failing.
i. As Is- Lock will remain in the same state.
ii. Safe- Unlocked.
iii. Secure- Locked.
b. Enable or disable the Beeper on the lock when a credential is scanned.
c. Adjust the interior LED settings.
d. Enable or disable the Invalid Card Audit, which logs invalid credentials.

Rev. 4.2 © Openpath 2023 64
3. Under Reader Settings, choose which type of card and fob credentials may be
used at this lock.
a. For Openpath DESFire EV1, EV2, and EV3 select 14443 UID (CSN).
b. For Openpath DESFire EV3-A, select 14443 Secure Mifare.
i. Note:You cannot enable 14443 UID (CSN) and 14443 Secure
Mifare/Mifare Plus/EV1 (NOC) at the same time.
4. Under Mobile Credential, choose whether to enable mobile credentials on this
lock.
a. Adjust Communication Range to determine how close the mobile
credential needs to be to the lock before appearing as a nearby entry in
the app.
b. Adjust Performanceto determine how often the mobile app scans for
locks.
5. Click Save.
CONFIGUREA CONTROL LOCK
1. From Wireless locks, click the name of the lock to edit it .
2. Under Basic Settings, you can do the following:
a. Enable or disable the Beeper on the lock when a credential is scanned.
b. Enable or disable the Invalid Card Audit, which logs invalid credentials.
3. Reader Settings cannot be edited on Control locks; high frequency cards and
fobs are enabled by default.
4. Under Mobile Credential, choose whether to enable mobile credentials on this
lock.
5. Adjust Communication Range to determine how close the mobile credential
needs to be to the lock before appearing as a nearby entry in the app.
6. Adjust Performanceto determine how often the mobile app scans for locks.
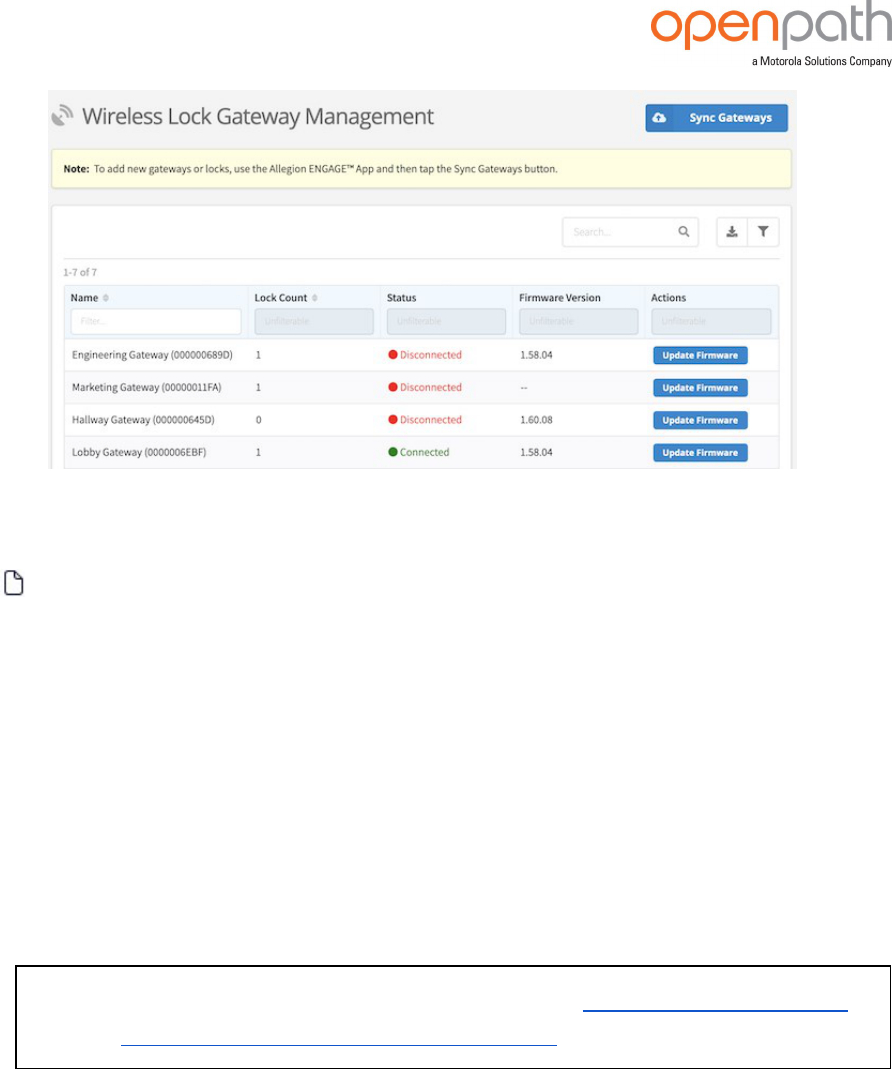
WIRELESS LOCK GATEWAY MANAGEMENT
The Wireless lock gateways page shows you the list of gateways synced using the
Allegion ENGAGE™ app. From here, you can Sync Gatewaysand Update Firmware.
Rev. 4.2 © Openpath 2023 65
REPORTS
The Reports page is where you can view user, entry, and Openpath Control Center
activity.
Openpath Control Center offers a wide variety of report types:
l
Activity logs— Displays a list of all unlock requests and hardware-related
events across your Openpath access control system.
l
User activity (by entry), User activity summary, Entry activity (by user), and
Entry activity summary— Displays user activity and entry activity in helpful
charts and diagrams.
l
Visual activity report — Displays video snapshots of entry events, which are
filtered by user, site, entry, and time.
Note: Before using this report, you must set up the Cisco Meraki integration
or have VIDEOREADER MANAGEMENT on page60 installed.
l
Entry access audit— Displays the users that have access to any given entry.
l
User access audit — Displays all entries that a selected user has accessed.
l
Portal audit report— Displays a log of the changes made in the Control Center
or through the Openpath API.
l
Credentials— Displays all credentials within your organization, filtered based on
credential type.

Rev. 4.2 © Openpath 2023 66
l
Scheduled reports — Displays reports scheduled for specified time periods and
data categories and includes the history of report requests An Openpath
Premium or Enterprise plan is required.
GENERATEA REPORT
1.
Go to Reports and select the report type.
2. Select a time period for the report.
3. (Activity Logs only) Select Report Delivery:
a. Deliver to Browser— When using this method, do not refresh or close the
browser tab. Reports may take a few minutes to generate. Not
recommended for large datasets.
b. Deliver via Email— Useful for large datasets, select this method to run the
report in the background and receive an email when the report is done.
You can deliver the report to multiple email addresses.
4. Click Search.
5. To download a report, click Export to CSV.
SCHEDULE A REPORT (PREMIUM AND ENTERPRISE PLANS ONLY)
1.
Go to Reports > Scheduled reports.
2.
Click Add Scheduled Report in the upper-right corner.
3. Enter a name for the scheduled report, then select the type of report (currently
only Activity Logs is supported).
4. Select a time period for the report and configure report settings.
5. Enter email addresses to send the reports to and select a Frequency.
6. Click Save.
VIEW REPORTHISTORY (PREMIUM AND ENTERPRISE PLANS ONLY)
1.
Go to Reports > Scheduled reports.
2. Go to the Request History tab.
3. Previously generated scheduled reports will appear here. A scheduled report will
expire after 30 days. Click Download to download a CSV file of the report.
OPENPATH APP MARKETPLACE
Note: Depending on how your account is configured, you may need your
integrator to help set up App marketplace apps.

Rev. 4.2 © Openpath 2023 67
Apps are programmatic links to third-party software and services, that let you sync
users and add functionality to OpenpathControl Centerand other systems that you
use.
l
Get apps is where you can add and configure apps for your system. Click an
app to learn more about setup and configuration.
l
My apps is where you can view your installed apps. Click an app to edit or
configure settings.
Identity Management / HR Softwareapps let you add and sync users from identity
providers you already use. Currently, Openpath integrates with Google Workspace™
productivity and collaboration tools, and Microsoft Azure Active Directory, OneLogin
Trusted Experience Platform™, Okta, and Workday® Human Capital Management
applications.
GOOGLE WORKSPACE
Note: To enable this feature, you must have administrative privileges in your
Google Workspace account:
l
Directory User Read-Only:
https://www.googleapis.com/auth/admin.directory.user.readonly
l
Directory Group Read-Only:
https://www.googleapis.com/auth/admin.directory.group.readonly
SETUPTHE INTEGRATION
1.
Go to App marketplace > Get apps, click the Essential User Management or
Premiere User Management tile, and click + Get App.
2.
Go to App marketplace > My apps, and click Google Workspace.
3. Google will prompt you to sign in. Sign in with your Google account and allow
Openpath to access your users and groups.
4. After signing in, you'll be directed back to Openpath Control Center where you
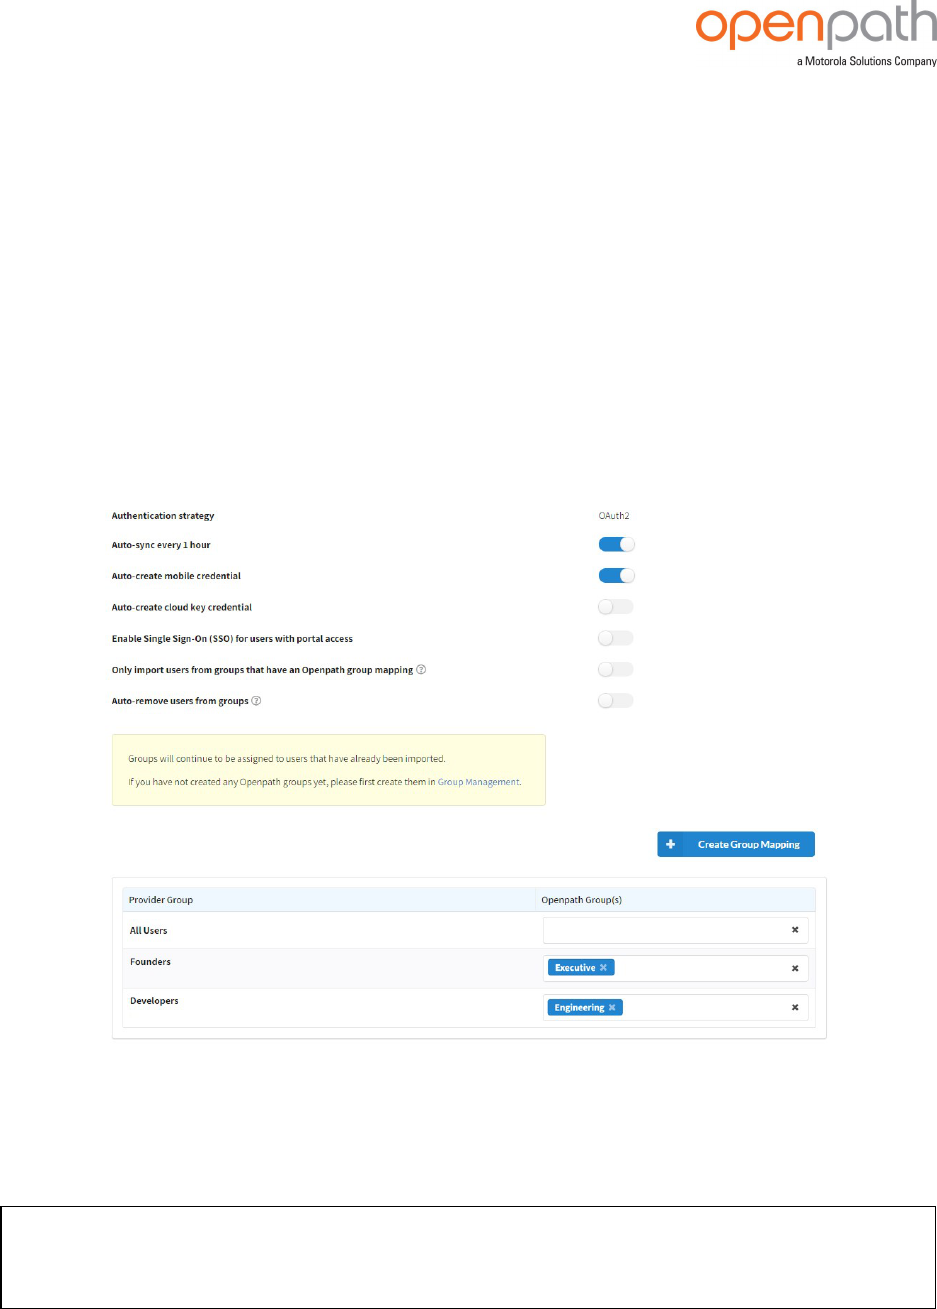
can enable the following settings:
l
Auto-sync every 1 houror Auto-sync every 15 minutes— Syncs
Openpath Control Center with the identity provider system, once every
hour or once every 15 minutes, depending on your subscription. See
Administration > Account for subscription details.
Rev. 4.2 © Openpath 2023 68
l
Auto-create mobile credential— Creates a mobile credential for every
user.
l
Auto-create cloud key credential— Creates a cloud key credential for
every user.
l
Enable Single Sign-On (SSO) for users with portal access— This will let
users log into the Control Center with their Google credentials.
l
Only import users from groups that have an Openpath group
mapping— If enabled, no users are imported from the identity provider if
they are not assigned to an Openpath group.
l
Auto-remove users from groups— Removes users from Openpath
groups if they no longer exist in the identity provider's groups.
Figure 36 Sync settings
To map a specific group from the identity provider to Openpath Control Center, click
+ Create Group Mapping.
Note: Complete this step if you enabled the Only import users from groups that
have an Openpath group mapping setting.

Rev. 4.2 © Openpath 2023 69
a. Select the group from the identity provider.
b. Select the group from Openpath Control Center.
c. Click + Create Group Mapping.
d. Repeat for all the groups that need to be mapped.
Figure 37 Group mapping
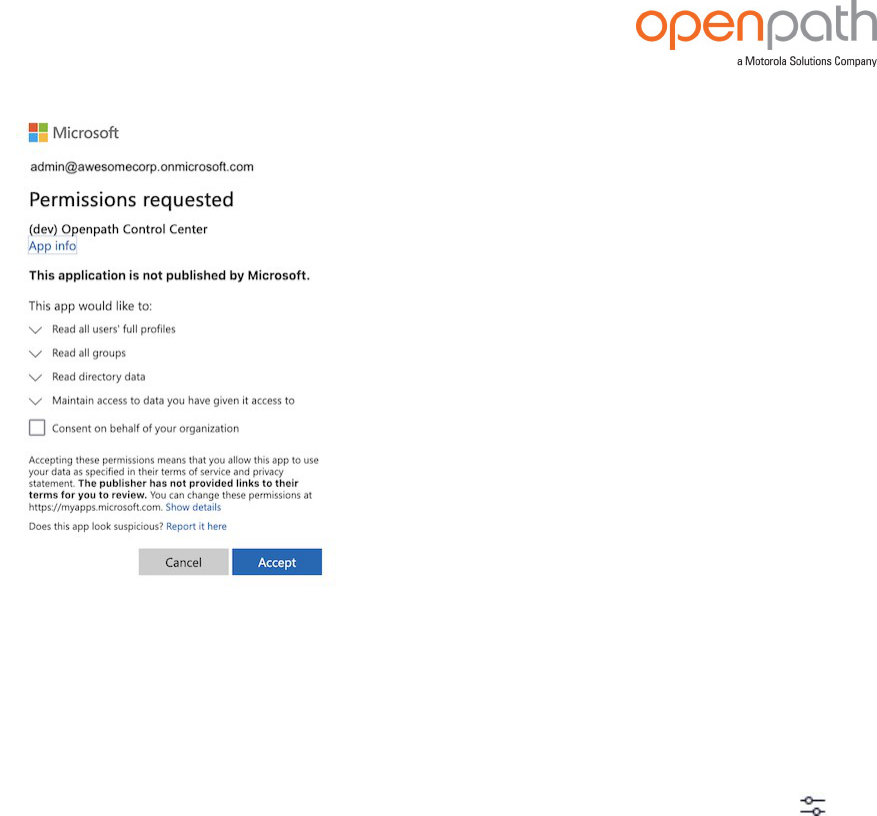
MICROSOFT AZURE ACTIVE DIRECTORY
Note: To enable this feature, you must have the Application Administrator role.
SETUPTHEINTEGRATION
1.
Go to App marketplace > Get apps, click the Essential User Management or
Premiere User Management tile, and click + Get App.
2.
Go to App marketplace > My apps, and click Microsoft Azure AD or
Microsoft Azure AD Advanced.
3. Microsoft will prompt you to sign in. Sign in with your Azure AD account and
allow Openpath to access your users and groups.
Note: Openpath can only read data from your Azure account; it cannot write
data or make any changes within Azure. The token Openpath uses only has
read permissions for users, groups, and directory data in Azure.
Rev. 4.2 © Openpath 2023 70
4. After signing in, you'll be directed back to Openpath where you can enable the
following settings:
l
Auto-sync every 1 houror Auto-sync every 15 minutes— Syncs
Openpath Control Center with the identity provider system, once every
hour or once every 15 minutes, depending on your subscription. See
Administration > Account for subscription details.
l
Auto-create mobile credential— Creates a mobile credential for every
user.
l
Auto-create cloud key credential— Creates a cloud key credential for
every user.
l
Enable Single Sign-On (SSO) for users with portal access— This will let
users log into the Control Center with their Azure credentials.
l
Only import users from groups that have an Openpath group
mapping— If enabled, no users are imported from the identity provider if
they are not assigned to an Openpath group.
l
Auto-remove users from groups— Removes users from Openpath
groups if they no longer exist in the identity provider's groups.
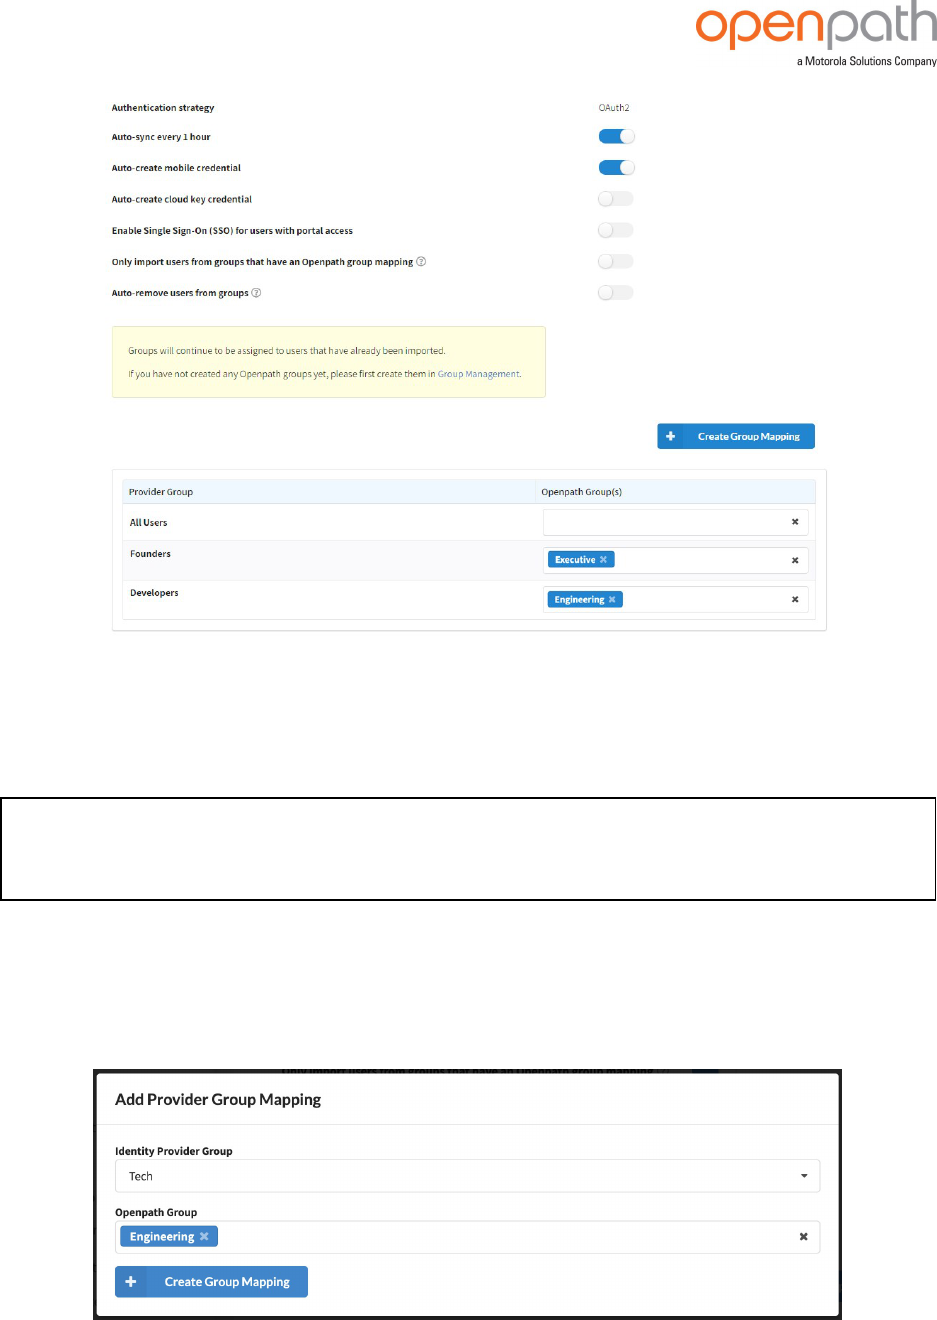
Rev. 4.2 © Openpath 2023 71
Figure 38 Sync settings
To map a specific group from the identity provider to Openpath Control Center, click
+ Create Group Mapping.
Note: Complete this step if you enabled the Only import users from groups that
have an Openpath group mapping setting.
a. Select the group from the identity provider.
b. Select the group from Openpath Control Center.
c. Click + Create Group Mapping.
d. Repeat for all the groups that need to be mapped.
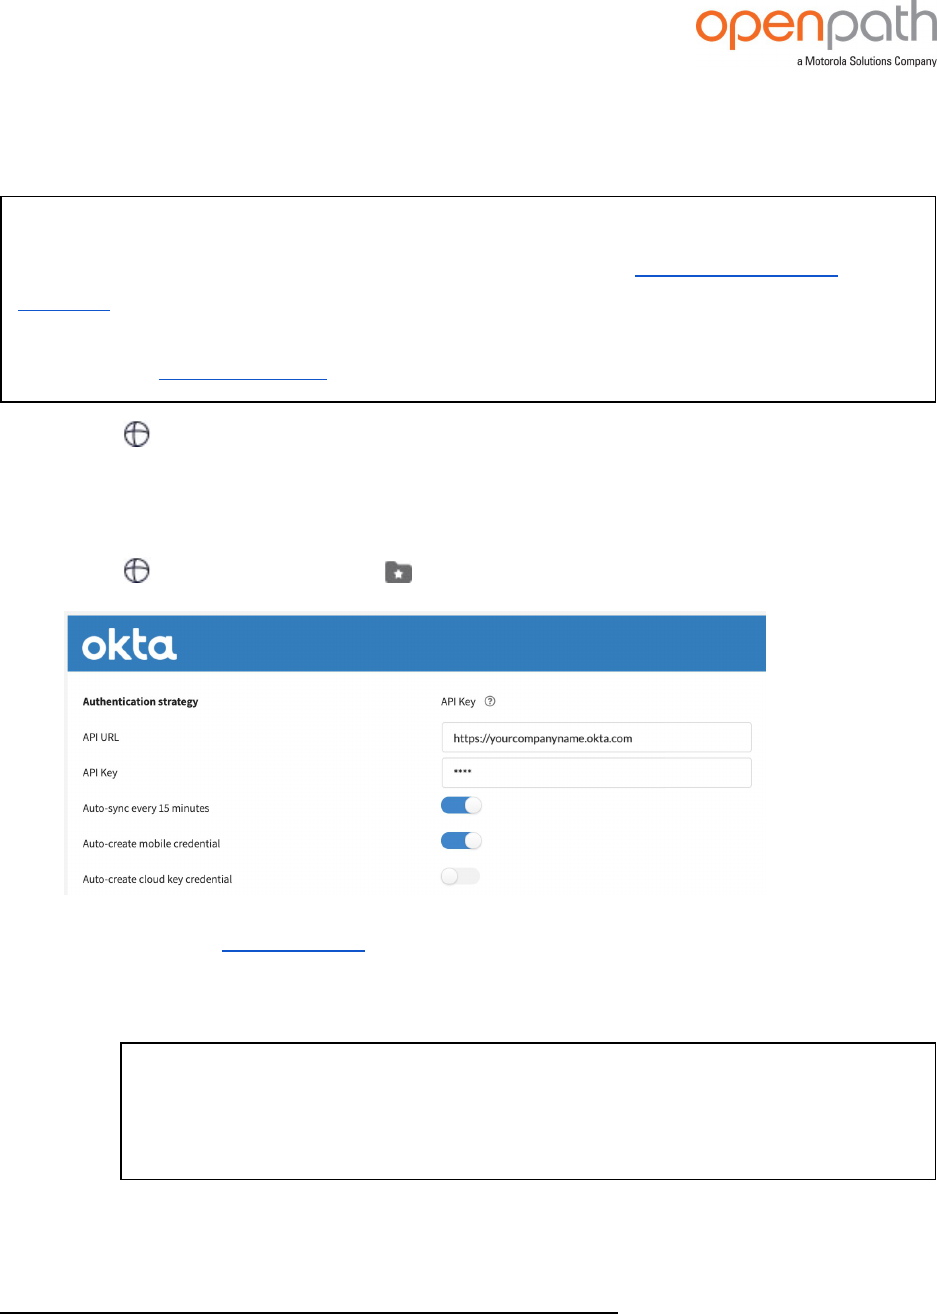
Rev. 4.2 © Openpath 2023 72
Figure 39 Group mapping
OKTA
Note: To enable the Okta identity provider integration, you must have admin
privileges in your Okta account. We recommend using a dedicated service
account
*
that uses only the Group role with the permissions that the Openpath
integration requires to synchronize your users and groups. You'll also need to
generate an API Key (Token)* for authentication.
1.
Go to App marketplace > Get apps.
a. Find the Okta tile and click the + Get App button.
b. In the window popup, select License in Item Class, your Organization, and
a License Term. Click Submit.
2.
Go to App marketplace > My apps.
a. Enter the Okta domain*for your organization in API URL(for example,
https://yourcompanyname.okta.com).
b. Enter the API Key.
Note: After you save the API key, Openpath does not use, or otherwise
expose, the API Key anywhere except when using it to call Okta to
synchronize users and groups.
*
For more information, see Okta documentation: https://developer.okta.com/docs/guides/create-an-
api-token/overview/#token-best-practice-service-account

Rev. 4.2 © Openpath 2023 73
4. After saving the API key, you can enable the following settings:
l
Auto-sync every 1 houror Auto-sync every 15 minutes— Syncs
Openpath Control Center with the identity provider system, once every
hour or once every 15 minutes, depending on your subscription. See
Administration > Account for subscription details.
l
Auto-create mobile credential— Creates a mobile credential for every
user.
l
Auto-create cloud key credential— Creates a cloud key credential for
every user.
l
Only import users from groups that have an Openpath group
mapping— If enabled, no users are imported from the identity provider if
they are not assigned to an Openpath group.
l
Auto-remove users from groups— Removes users from Openpath
groups if they no longer exist in the identity provider's groups.
5. To let Super Admin users log in to the Control Center with their Okta credentials,
click the toggle next toEnable Single Sign-On (SSO) with portal access.
6. To let users log in to the Openpath app using Okta credentials, click the toggle
next toEnable Single Sign-On (SSO) for mobile app.
Figure 40 Enable SSO
7. To let users log into the Control Center from the Okta portal, click the toggle next
to Allow IDP-Initiated SSO.
8. Fill out the required fields: SAML SSO URL, SAML Issuer, and SAML Certificate.
You'll find this information in Okta.
a. Log into Okta and click on Admin.
b. Go to Applications and click on your Openpath application.
c. If you haven't already added Openpath, first click Add Application, then
search for and add the Openpath Security application.
d. Click Sign On.
e. In the Settings box, click View Setup Instructions.
f. Copy SAML SSO URL, SAML Issuer, and SAML Certificatefrom the Okta
portal into their corresponding locations in the Openpath portal.
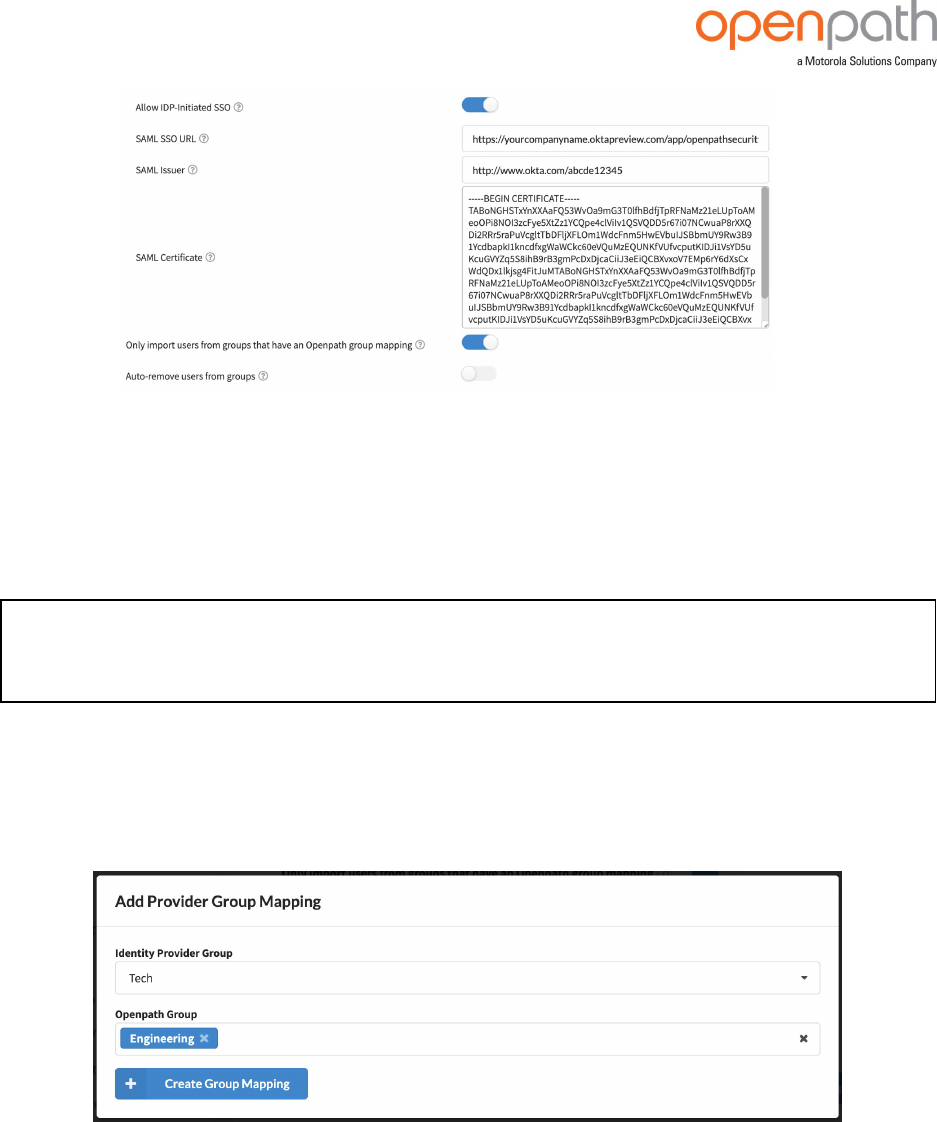
Rev. 4.2 © Openpath 2023 74
Figure 41 SSO required information
To map a specific group from the identity provider to Openpath Control Center, click
+ Create Group Mapping.
Note: Complete this step if you enabled the Only import users from groups that
have an Openpath group mapping setting.
a. Select the group from the identity provider.
b. Select the group from Openpath Control Center.
c. Click + Create Group Mapping.
d. Repeat for all the groups that need to be mapped.
Figure 42 Group mapping
ONELOGIN
You can integrate the OneLogin Trusted Experience Platform™ with Openpath Control
Center to import and sync users automatically.

Rev. 4.2 © Openpath 2023 75
Note: To enable the OneLogin identity provider integration, you must have admin
privileges in your OneLogin account.
1. Go to control.openpath.com/loginand log in. To access the European Partner
Center, go to control.eu.openpath.com/login.
2.
In App marketplace > Get apps, click the OneLogin tile.
3. Enter the Subdomainfor your OneLogin account (for example,
yourcompanyname.onelogin.com).
4. Click Get API credentials to go to the OneLogin page, and click New Credential
on the APIAccess page.
5. Enter a name for the credential, select Read Users, and click Save.
For more information, refer to Working with API Credentials in OneLogin
*
.
6. Copy and paste the Client IDand Client Secretto Openpath Control Center
and click Save.
7. Enable the following settings:
l
Auto-sync every 1 houror Auto-sync every 15 minutes— Syncs
Openpath Control Center with the identity provider system, once every
hour or once every 15 minutes, depending on your subscription. See
Administration > Account for subscription details.
l
Auto-create mobile credential— Creates a mobile credential for every
user.
l
Auto-create cloud key credential— Creates a cloud key credential for
every user.
8. Click the toggle next to Enable Single Sign-On (SSO) with portal access to let
users log in to Openpath Control Center with their OneLogin credentials.
l
Copy and paste your SSO Client ID, which you can find by connecting an
OIDC-enabled app to OneLogin*.
9. Enable the following settings:
l
Only import users from groups that have an Openpath group
mapping— If enabled, no users are imported from the identity provider if
they are not assigned to an Openpath group.
*
For more information, refer to OneLogin documentation: https://developers.onelogin.com/api-
docs/1/getting-started/working-with-api-credentials
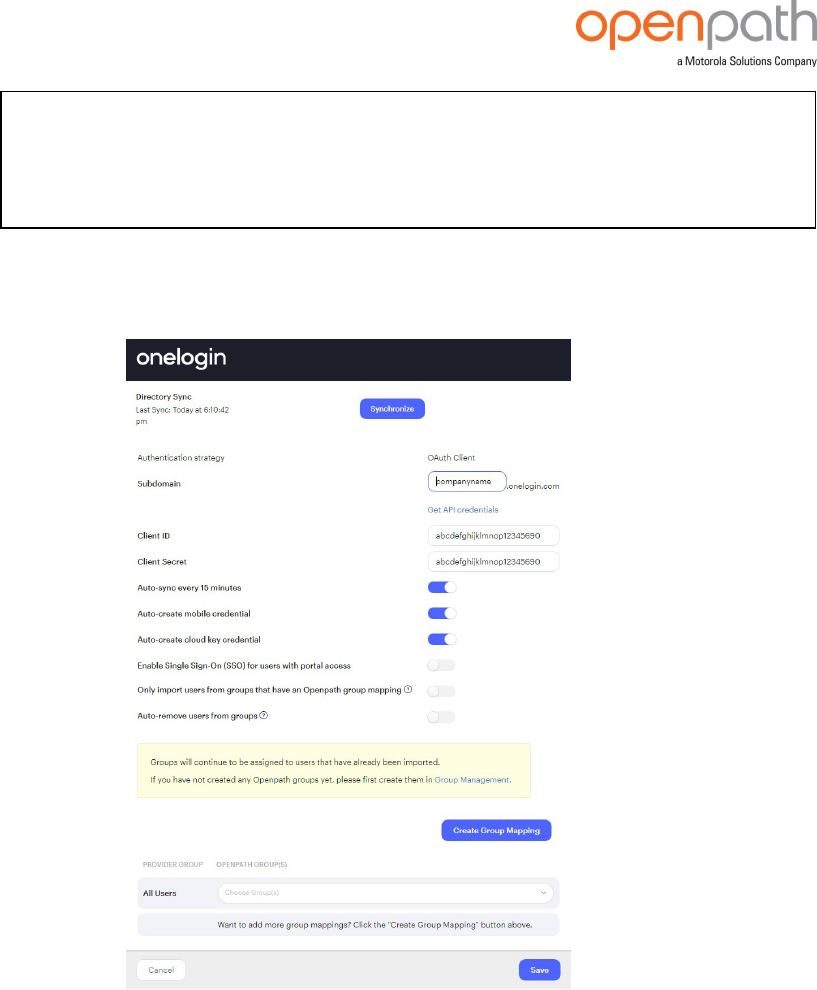
Rev. 4.2 © Openpath 2023 76
Note: After saving the integration and enabling it using your OneLogin
API credentials, you can select OneLogin groups to map to Openpath
groups. Or, you can map All Users to Openpath groups.
l
Auto-remove users from groups— Removes users from Openpath
groups if they no longer exist in the identity provider's groups.
Figure 43 Sync settings
12. (After saving API credentials) To map a specific group from OneLogin to
Openpath (required if you enabled Only import users from groups that have
an Openpath group mapping), click +Create Group Mapping.
a. Select the group from OneLogin.
b. Select the group from Openpath.
c. Click +Create Group Mapping.
13. Repeat step 12 until all groups that need to be mapped have been created.
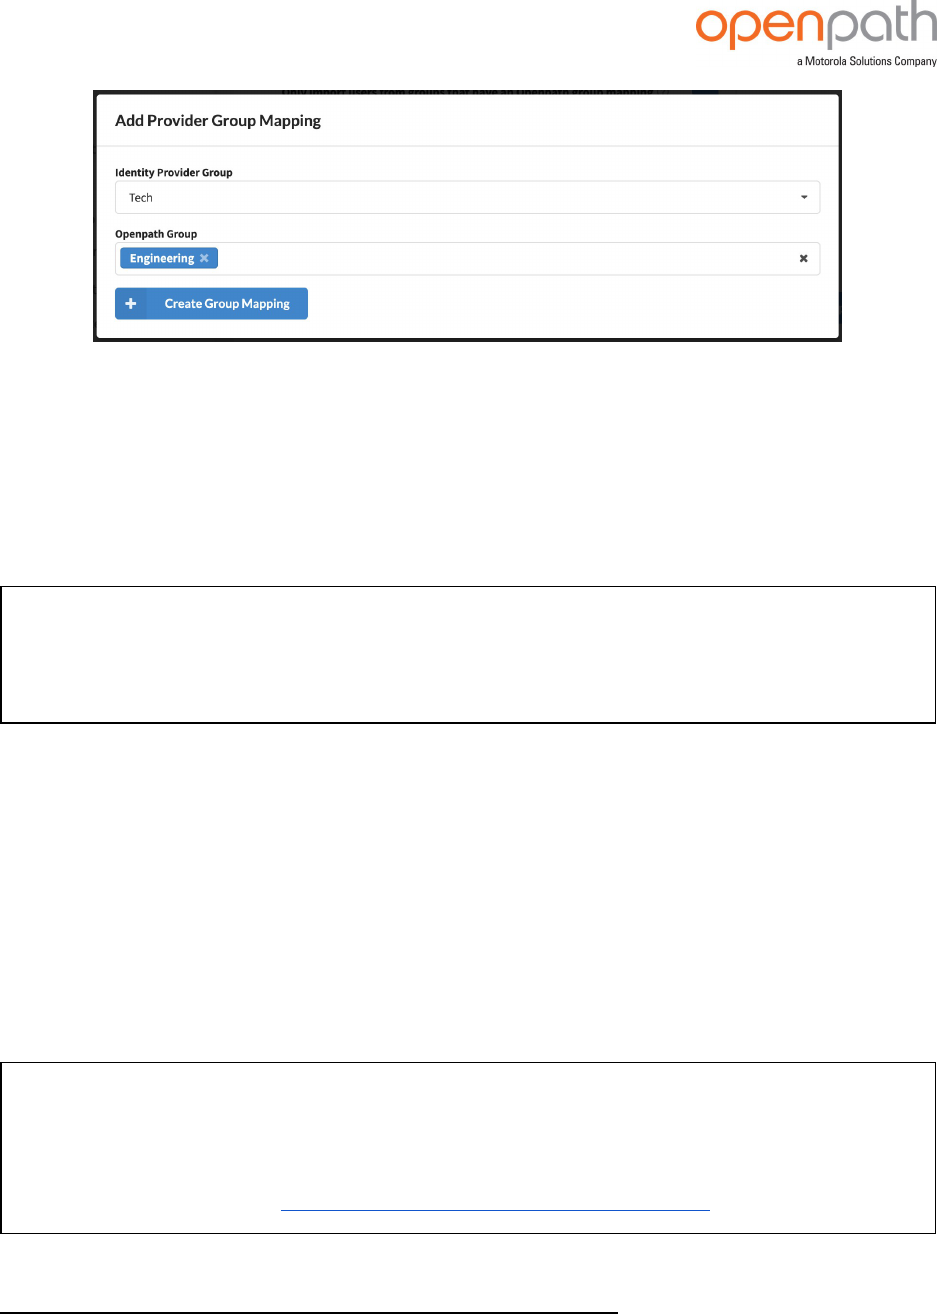
Rev. 4.2 © Openpath 2023 77
Figure 44 Group mapping
SINGLE SIGN-ON
Google G Suite, Microsoft Azure Active Directory, Okta, and OneLogin integrations
support Single Sign-On (SSO). If enabled, users with portal access can log into the
Control Center with their identity provider credentials.
Note: Openpath requires that you keep at least one Openpath-native
administrative account in case there are ever any issues connecting to your
identity provider.
MANUALLY SYNC
After setting up an identity provider integration, you now have an option to Manually
Sync. You can perform this action at any time by clicking the Synchronize button on
the app's settings page.
WORKDAY REPORTS
You can integrate Workday® Human Capital Management reports with Openpath
Control Center to import and sync users and access groups, automatically.
Note: Workday Web Service API v39.1 or newer is required. In addition, you must
have admin privileges in your Workday account to configure custom reports.
Custom reports must be configured before you start this procedure. For more
information, refer to the Openpath and Workday support article
1
.
1
For more information, see:
https://openpath.atlassian.net/servicedesk/customer/portal/15/article/1836056610.

Rev. 4.2 © Openpath 2023 78
1. Go to control.openpath.com/loginand log in. To access the European Partner
Center, go to control.eu.openpath.com/login.
2.
Go to App marketplace > Get apps.
a. Click the Workday or Workday Advanced tile, depending on your
subscription.
b. Click + Get App in the upper-right corner.
c. Choose the appropriate license for your organization.
d. Click Submit.
3. Enter the Workday account details.
l
Report URL — The URL of your Workday custom report
1
for users.
Note: In the Workday application, go to CR - OpenPath Data Interface
and click the ... Actions menu. Select Web Service > View URLs and
right-click on JSON to select Copy URL.
l
Report Username — The username.
l
Report Password — The password.
l
(Optional) Groups URL — The URL of your Workday custom report
2
for
access groups.
Note: In the Workday application, go to View Custom Report
OpenPath - Group Names and click the ... Actions menu. Select Web
Service > View URLs and right-click on JSON to select Copy URL.
4. Manually trigger the first sync.
l
Click the Synchronize button to display the active users and access
groups on the Users page.
1
For more information, see:
https://openpath.atlassian.net/servicedesk/customer/portal/15/article/1835991069.
2
For more information, see:
https://openpath.atlassian.net/servicedesk/customer/portal/15/article/1836056666.
Rev. 4.2 © Openpath 2023 79
Note: With the Workday Advanced package subscription, you can
enable alerts for sync failures. For more information, see the Identity
Provider toggle in ALERTS on page86.
5. Enable the following settings, as needed.
l
Auto-sync every 1 houror Auto-sync every 15 minutes— Syncs
Openpath Control Center with the identity provider system, once every
hour or once every 15 minutes, depending on your subscription. See
Administration > Account for subscription details.
l
Auto-create mobile credential— Creates a mobile credential for every
user.
l
Auto-create cloud key credential— Creates a cloud key credential for
every user.
l
Sync Person Id — Syncs the employee ID from the identity provider
system.
l
Sync Department — Syncs the department from the identity provider
system.
l
Sync Job Title — Syncs the job title from the identity provider system.
l
Only import users from groups that have an Openpath group
mapping— If enabled, no users are imported from the identity provider if
they are not assigned to an Openpath group.
l
Auto-remove users from groups— Removes users from Openpath
groups if they no longer exist in the identity provider's groups.
6. 1. To map a specific group from the identity provider to Openpath Control Center,
click + Create Group Mapping.
Note: Complete this step if you enabled the Only import users from groups
that have an Openpath group mapping setting.
a. Select the group from the identity provider.
b. Select the group from Openpath Control Center.
c. Click + Create Group Mapping.
d. Repeat for all the groups that need to be mapped.
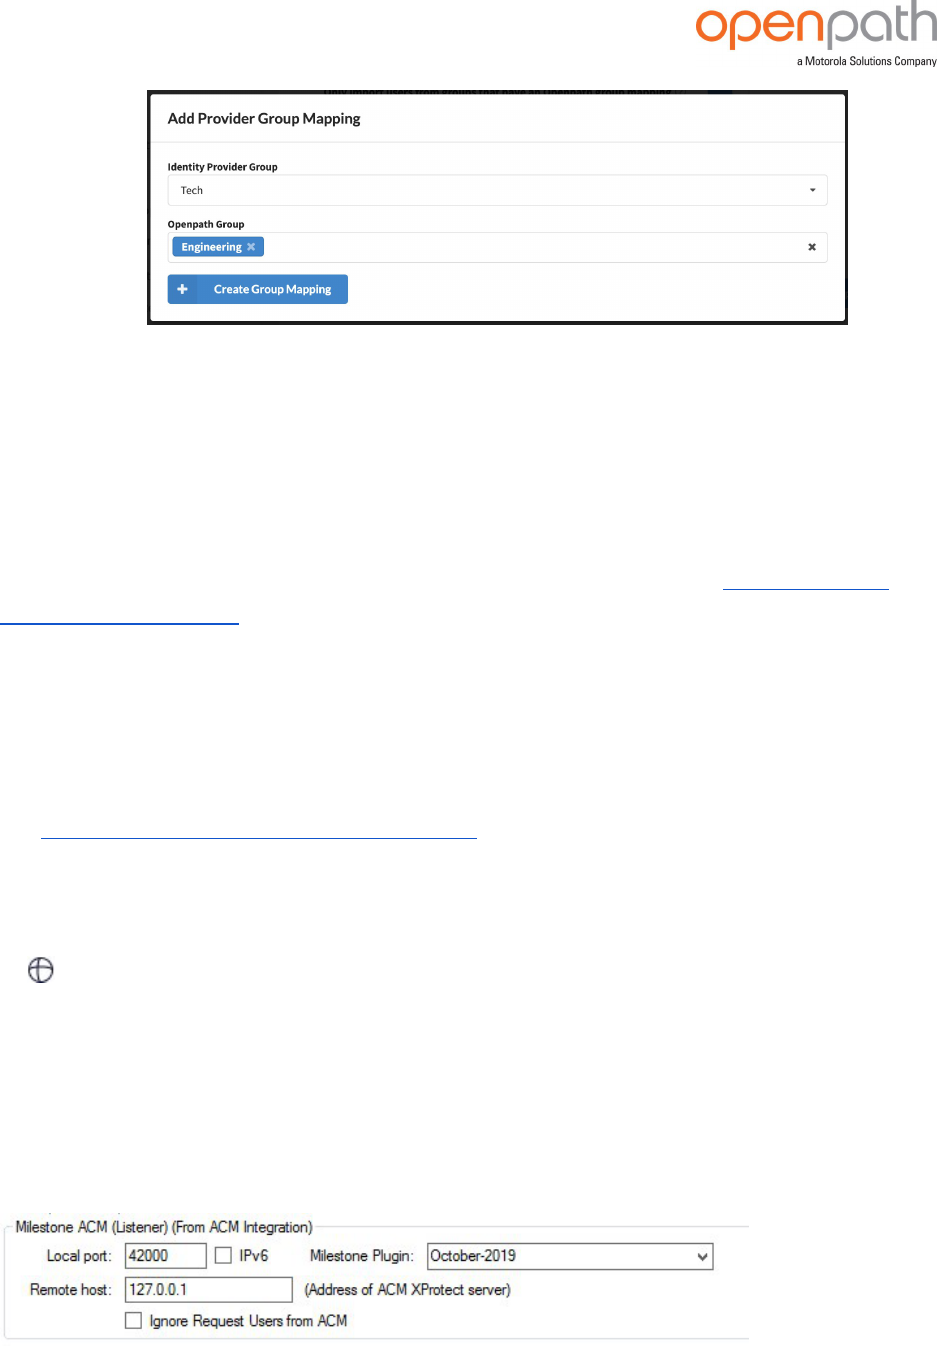
Rev. 4.2 © Openpath 2023 80
Figure 45 Group mapping
CAMIO
The Camio integration links Openpath Entry events and users with videos in Camio. To
enable this integration, you create Outbound Webhooks that send data to Camio,
designate a user with read-only portal access that translates UserIds to names, then
input Org and Entry information into the Camio portal. Refer to the Openpath and
Camio support article.
RHOMBUS
The Rhombus integrations links Openpath entry events and users with videos in
Rhobmus. To enable this integration, designate a user with read-only portal access
and use those credentials to enable the integration in the Rhombus console. Refer to
the Openpath and Rhombus support article.
MILESTONE
To set up the Milestone VMS integration, you'll need to log into the Control Center, go
to App marketplace > Get apps and click on the Milestone tile. Download and
install Microsoft .NET 4.8, ACX, and Milestone Plugin.
To set up the Openpath integration on the Milestone server:
1. Run the Openpath_ACX_Plugin exe.
2. Find the Openpath_ACX exe and run as administrator.
3. Change the following settings under Milestone Configuration:
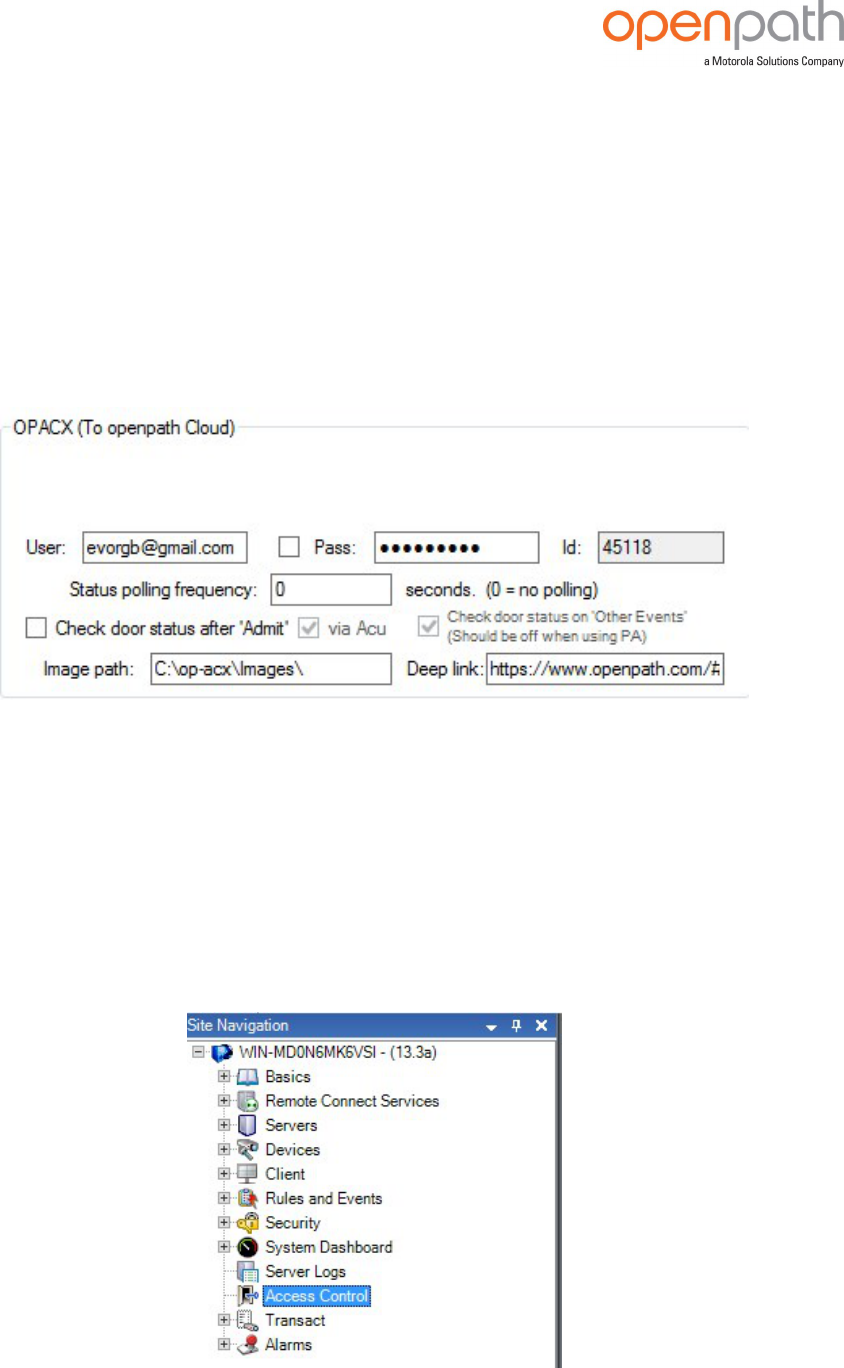
Rev. 4.2 © Openpath 2023 81
Figure 46 Milestone Configuration
l
Local port is required, and it must match the port defined in the Milestone
Access Control settings.
l
Remote host is required, and it must be the IP address of the machine that is
running the event server.
l
Milestone plugin has two settings, October-2019 or Before October-2019—select
the appropriate version for your setup.
4. Change the following settings under Openpath Configuration:
Figure 47 Openpath Configuration
l
User and Pass is required. Enter the login credentials of an Openpath Super
Admin user. Openpath recommends creating a dedicated user for this purpose.
5. Click Savethen Close.
Milestone Management Client Configuration:
1. Go to Site Navigation.
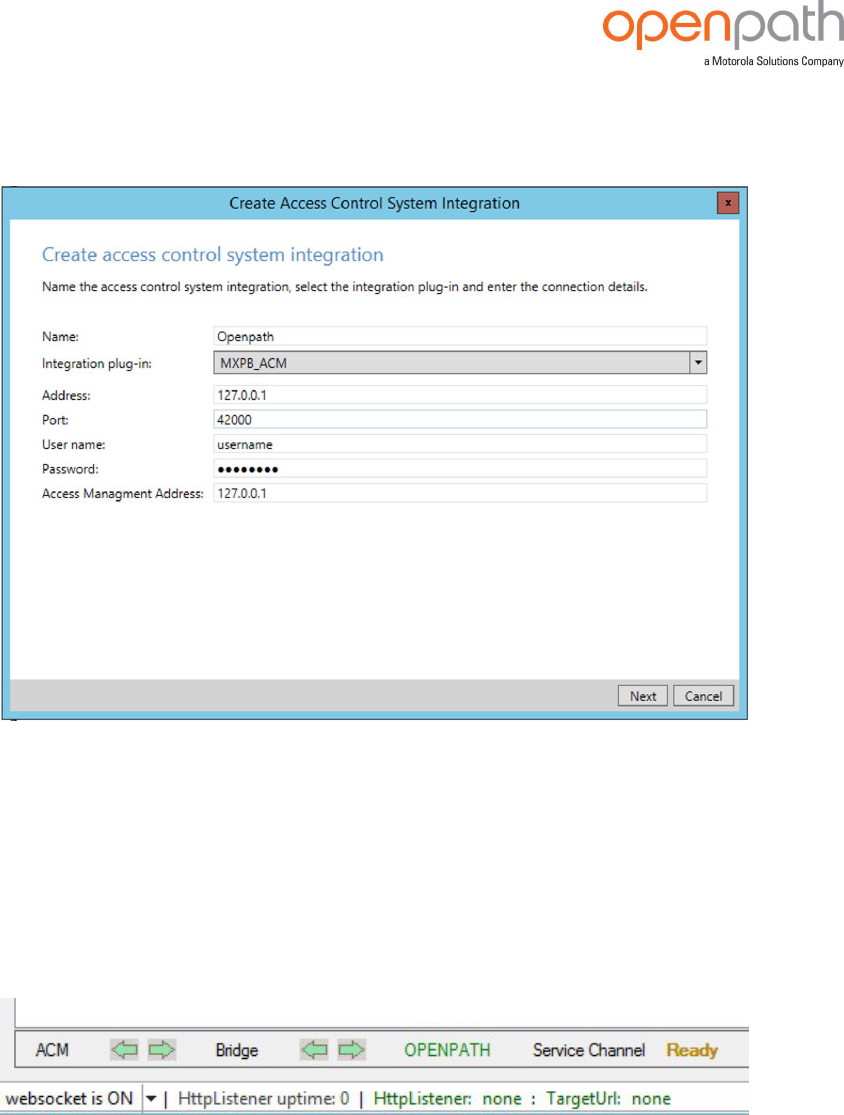
Rev. 4.2 © Openpath 2023 82
Figure 48 Site Navigation
2. Right-click on Access Controland click Create New.
Figure 49 Create Access Control System Integration
Note: Leave User name and Password as the default. Ensure the Port field matches
the ACX Plugin.
3. Click Nextand follow the prompts to tie cameras to doors.
4. Restart Milestone Event Server, then open Openpath_ACX exe and confirm
everything is connected:
Figure 50 Confirm connection
5. Open XProtect Client. There should be an Access Control tab in the client now,
and you can add information to live views as well.
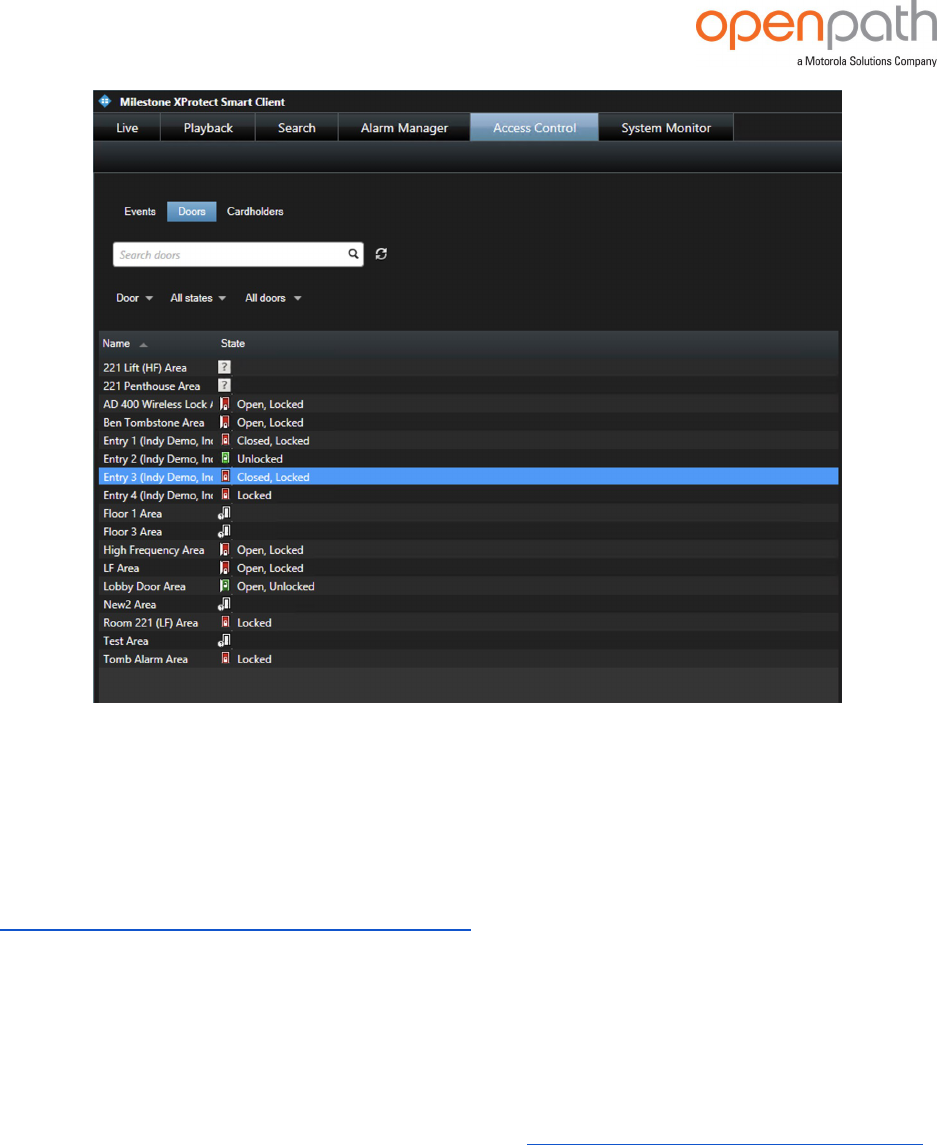
Rev. 4.2 © Openpath 2023 83
Figure 51 Access Control tab
CISCO MERAKI
You can integrate Cisco Meraki to view video snapshots within the Control Center and
enable the Visual Activity Report under REPORTS . To set up this integration, refer to the
Openpath and Cisco Meraki support article.
ENVOY
If you use Envoy for your visitor management system, Openpath can automatically
assign access to Envoy visitors. You do this by creating an "Envoy Bot" in the Openpath
Control Center that will generate guest access links for visitors in the Envoy system
that can be shared by email or SMS. Refer to the Openpath and Envoy support article.

Rev. 4.2 © Openpath 2023 84
SLACK
The Openpath and Slack
*
integration works by defining commands that you type into
Slack that unlock individual entries. Refer to the Openpath and Slack support article.
ALLEGION
The Openpath and Allegion integration works by connecting the Allegion Schlage®
NDE and LE wireless locks via the ENGAGE™ technology.
ZAPIER
You can integrate Openpath with Zapier to trigger Zaps when new users are created,
as well as automatically generate Guest Access Links, Credentials, and Users when
Zaps are triggered.
To enable the integration, log into Zapier, then click this link:
https://zapier.com/developer/public-
invite/3857/9330f625fabe427520bf9ba8a21d1ea5/
WEBHOOKS
The Webhooks page provides information on setting up webhooks for users and
unlock events.
CONFIGURATIONS
RULES
A rule lets you create conditional rules that trigger actions based on Openpath
events.
CREATE ANEW RULE
1. Go to control.openpath.com/loginand log in. To access the European Partner
Center, go to control.eu.openpath.com/login.
2.
Go to Configurations > Rules and click the Add Rule button in the upper-
right corner.
*
Slack is a trademark and service mark of Slack Technologies, Inc., registered in the U.S. and in other
countries.

Rev. 4.2 © Openpath 2023 85
3. Enter a name and description, then select a Trigger Type from the dropdown:
a. Input triggers include events like input state changes.
b. Entry triggers include events like entry unlocks, ajar doors, and unlock
failures.
c. The Reader trigger includes the Reader Fault State Changed event, which
lets you monitor and take action when a reader loses or regains power .
d. The Relay trigger includes the Relay Fault State Changed event, which lets
you monitor and take action when a relay is short or over current.
e. Lockdown triggers include lockdown plan triggers and reverts, as well as
trigger and revert authorizations.
For an example of a Lockdown type rule created using rules, refer to How
do I set up a mantrap using the Rules Engine?
f. Video Reader triggers include Tamper and Motion detection events
specific to the Video Reader.
g. Event Forwardertriggers include events from the previous categories, as
well as billing activity, user creation and deletion, and identity provider
sync issues.
To learn more, refer to How to create Event Forwarder rules in Openpath.
4. If you selected an Event Forwarder trigger, enter the Target URL, otherwise, use
the graphical interface to set Conditions, Schedules, and Actions.
5. (Optional) To limit when this rule will occur, use Conditions. The types of
Conditions available depend on the Trigger Type you selected:
a. If Trigger Type is Input, choose from Input State, ACU Port Filter, or ACU
Filter.
b. If Trigger Type is Entry, choose from Entry Filter, Zone Filter, or Site Filter.
c. If Trigger Type is Readeror Relay, choose from ACU Port Filter or ACU Filter.
d. If Trigger Type is Lockdown, choose from Lockdown Plan Filter or User Filter.
6. (Optional) To apply a time constraint on this rule, choose from a One-Time
Schedule Event or a Repeating Schedule Event, then enter date and time
information.
7. To specify what the rule will do once triggered, select an Action Type:
a. For Relayactions, you'll need to provide the ACU Relay Port Number To
Trigger:
l
Single Door Controller: 1 or 2
l
4 Door Controller: 1, 2, 3, or 4

Rev. 4.2 © Openpath 2023 86
l
Core Series expansion boards: (Expansion number x 10000) + Relay
Number
o
Auxiliary relays are (Expansion number x 10000) + (Max Port
Number + AUX number), so AUX Relay 2 on expansion board 3
which is an 8-Port Board would be 30010
l
You can also find these port IDs using the API
b. For Notificationactions, enter the Subject and Body of the notification and
the recipients' email or phone number.
Note: Enter phone numbers using the following format: +15556667777
(no hyphens and a +1 before the number)
c. For Webhookactions, enter the URL and specify the HTTP method (GET or
POST).
d. For Lockdownactions, specify the Lockdown Plan and select whether to
Trigger or Revert the plan.
8. To create custom or more complex rules, select the Use JSON Editorcheckbox.
For an example of a rule created using the JSON editor, refer to How do I push
Openpath events to Slack?
9. Click Save.
Note: The Basic package only includes the graphical interface for Input trigger
types, but you can still use the JSON editor to create other rules.
ALERTS
Receive alerts by email or SMS to keep better track of your Openpath system.
1. Go to control.openpath.com/loginand log in. To access the European Partner
Center, go to control.eu.openpath.com/login.
2.
Go to Configurations > Alerts.
3. Configure alerts to receive email or SMS(US mobile numbers only) warnings
regarding:
l
Billing —Invalid payments, expired terms, and/or your account being
frozen.
l
Entry Ajar —An entry entering or leaving the ajar alarm state, such as
when the contact sensor reports the door being open longer than the set

Rev. 4.2 © Openpath 2023 87
duration.
Note: To receive this alert, you must also enable the Ajar Feature in
CONTACT SENSOR on page42 settings on the entry.
l
Entry Authentication Failure —An entry unlock request failing due to an
invalid credential being used (e.g. a card with a number or CSN unknown
to the ACU)
l
Entry Authorization Failure —An entry unlock request failing due to a user
not having access to that entry, using the wrong trigger method, or
making an unlock request outside of associated schedules
l
Entry Unlock Failure —An entry unlock request failing during the physical
unlock phase, either due to a hardware issue or a failed webhook API call
l
Entry Forced Open— An entry opening without first unlocking through the
Openpath system or triggering the REX.
Note: To receive this alert, you must also enable the Forced-Open
Detection feature in CONTACT SENSOR on page42 settings on the entry.
l
Entry Anti-Passback Breach— A user attempting to re-enter a defined
Anti-Passback Area without first exiting and vice versa.
l
Lockdown Plan Triggered/Reverted— Receive notifications for every
Lockdown Plan trigger/revert. If a Lockdown Plan contains entries from two
Smart Hubs, you'll receive two notifications for every trigger/revert of that
plan. See LOCKDOWN PLANS on page53.
l
Generic Input State Changed— Receive notifications when a Generic
Input changes state.
l
REX State Changed— Receive notifications when a REX (Request to Exit)
input changes state.
l
Contact Sensor State Changed— Receive notifications when a Contact
Sensor input changes state.
l
Identity Provider— For Advanced package subscriptions only. Receive
notifications when synchronization fails for an identity provider. For more
information, see OPENPATH APP MARKETPLACE on page66.
l
ACU Online Status Changed— Receive notifications when an ACU goes
offline or comes back online.
l
Tamper Detector State Changed— Receive notifications when an ACU's
tamper detector reports a change.

Rev. 4.2 © Openpath 2023 88
l
Relay Fault State Changed— Receive notifications when a Relay port
reports a change in fault state.
l
Reader Fault State Changed— Receive notifications when a Reader port
reports a change in fault state.
l
Input EOL State Changed— Receive notifications when any input (Generic
Input, REX, or Contact Sensor) changes End-Of-Line Supervision (EOL)
state.
l
Occupancy Management— Receive notifications when the configured
occupancy limit is exceeded within an Anti-Passback Area.
l
Motion Detected — Receive notifications when a Video Reader detects
motion.
l
Video Reader Tamper Detected — Receive notifications when a Video
Reader detects tampering.
l
The following alerts are available with the ALLEGION on page84
integration:
o
3rd Party Device Communication Lost — Receive notifications when
a device loses communication with the Openpath system.
o
3rd Party Device Battery Low/Critical — Receive notifications when
a device battery is in a low/critical state.
o
3rd Party Device Error Detected — Receive notifications when a
device encounters an internal error.
o
3rd Party Device Tamper Detected — Receive notifications when a
device detects tampering.
4. Enter the email addresses and/or US-based phone numbers that you want to
receive alerts.
Note: Enter phone numbers using the following format:+15556667777 (no
hyphens and a +1 before the number).
Note: If the alert is enabled, but no email addresses or phone numbers are
specified, the alert will be sent to all Super Admins’ emails within the org.
5. Click Save.
MOBILE APP
The Mobile app page is where you can enable Badge View and customize your
organization's badge design.
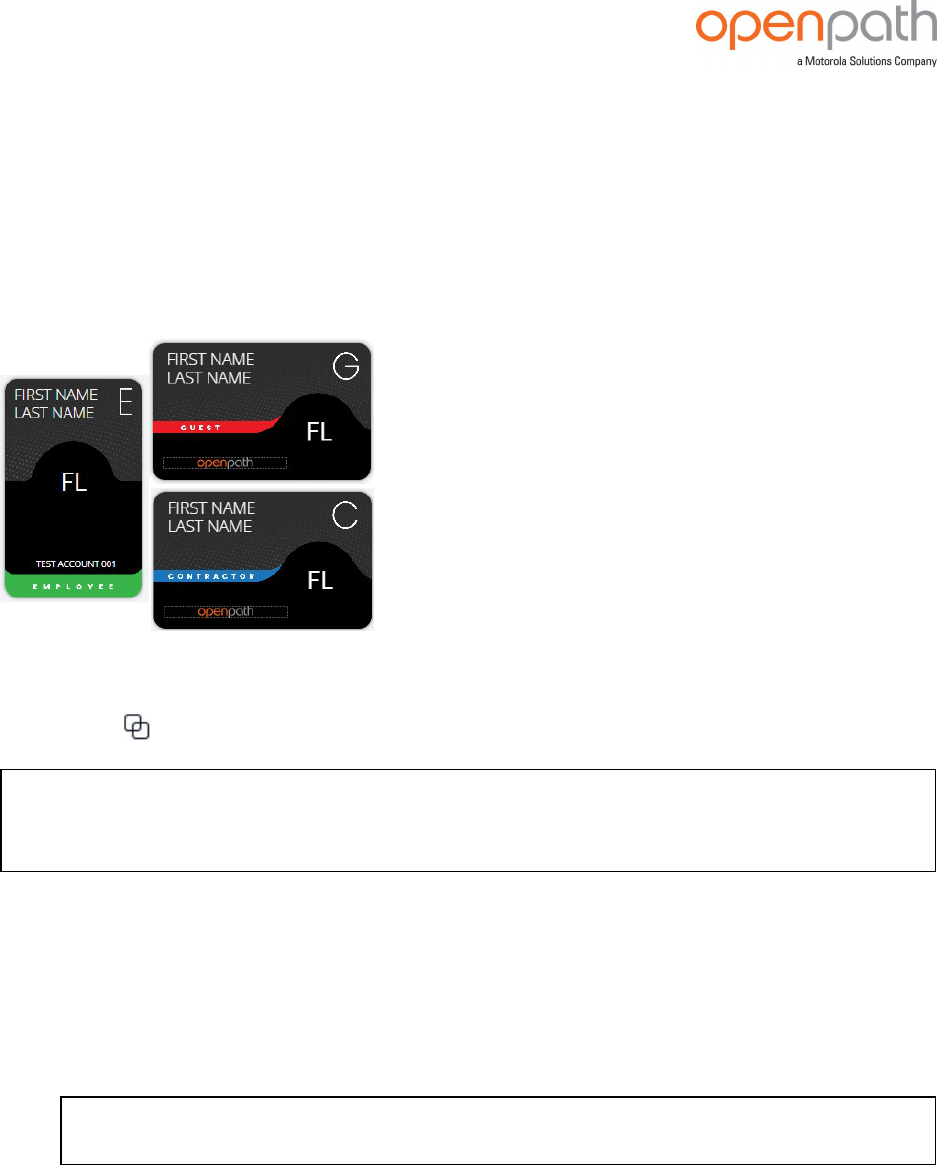
Rev. 4.2 © Openpath 2023 89
BADGE VIEW
Badge View is a simplified UI for the Openpath mobile app. With Badge View enabled,
users will see a digital ID badge with their name, photo, and other organizational
information on their home screen of the Openpath app. If they are in proximity of a
reader, the entry will appear below their badge. Users can also view a list of all entries
they have access to by tapping View All.
ENABLE BADGE VIEW
l
Go to Configurations > Mobile app and toggle Enable Badge View.
Note: Users may need to update their Openpath app to the latest version in order
to see the badge in their app.
CUSTOMIZE BADGE DESIGN
1. Click the Badge UItab to customize the look and feel of the digital badge.
2. 1. On the Nametab, adjust the size, position, and text formatting.
2. On the Phototab, adjust the position of the user's photo and select a color for
the photo's border.
Note: A user without a photo will instead display their initials.
3. On the Logotab:
l
Click Select Logoto upload an image.
l
Click Replace Logoto replace an existing one, or remove the image to use
text instead.

Rev. 4.2 © Openpath 2023 90
Note: You cannot edit the Text settings if an image is selected.
4. On the Backgroundtab:
l
Click Select Imageto use your own background image.
l
To use a solid color background instead, click the color tile in
Background Color to select a color using the color picker (see example
below), or click the arrows to enter your color in the HEX, RGBA, or HSLA
color model.
5. On the Select Imagetab, click the slider to enable the optional External ID field,
and adjust the size, position, and text formatting.
6. On the Custom Field 1or Custom Field 2 tabs, adjust the size, position, and text
formatting.
Note: Custom fields are only available on the Premium plan and can be
edited under Users >Custom fields.
7. Click Saveto publish your changes.
TIPS FOR BADGE DESIGN
l
You can enable or disable any of the fields using the Enabledsliders.
l
You can customize the placement of any field by adjusting the Positionsettings,
increasing or decreasing the Center X (px) and Center Y (px) coordinates as
desired.

Rev. 4.2 © Openpath 2023 91
o
Dimensional coordinates are based on the default badge size of 300 x
188px. If you're trying to center a field, try inputting Center X (px): 150 and
Center Y (px): 94.
l
For text fields, you can customize the font family, size, weight, line height,
alignment, color, case (lower, UPPER, or Capitalize Each Word). You can also
choose whether first and last name appear on two lines or one.
l
At any point you can click Restore defaultswithin a tab to revert changes made
to that particular field. Clicking Restore defaultswill only affect the current field
you are customizing.
BADGE TEMPLATES
The Badge templates page lets you design and format badges to print on your
Openpath key cards. You can design multiple templates, including landscape and
portrait styles, or select from several default templates for contractors, employees,
and visitors.
CREATE A BADGE TEMPLATE
1.
Go to Configurations > Badge templates.
2.
Click Add Template in the upper-right corner.
3. On the Settingstab, select a Base Template (see the Preview on the right) and
enter a name in Template Name.
Tip: To use the default template without customizing further, click Saveand
proceed to printing your badges.
l
To set the template as the default for the organization, click the Org
Default slider.
4. 1. On the Nametab, adjust the size, position, and text formatting.
2. On the Phototab, adjust the position of the user's photo and select a color for
the photo's border.
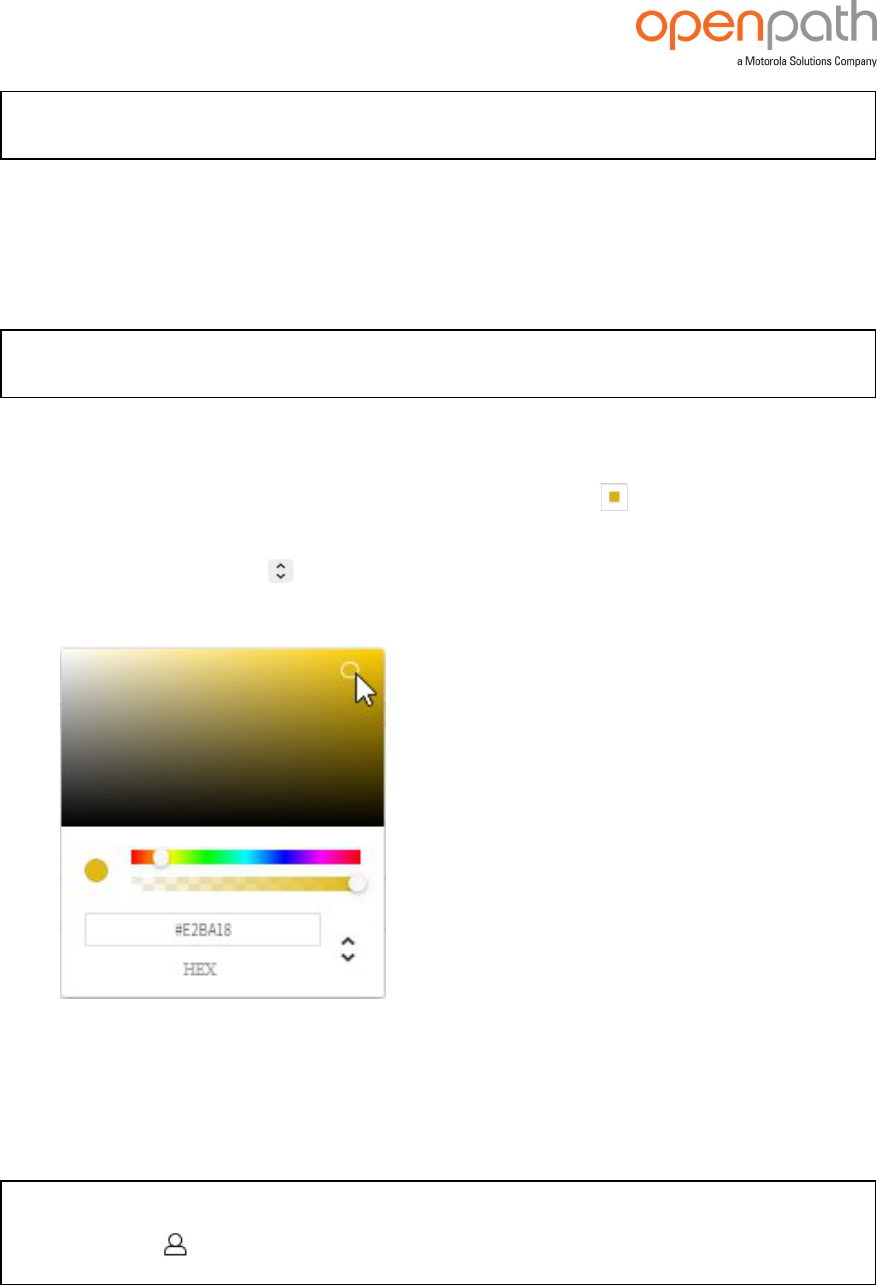
Rev. 4.2 © Openpath 2023 92
Note: A user without a photo will instead display their initials.
3. On the Logotab:
l
Click Select Logoto upload an image.
l
Click Replace Logoto replace an existing one, or remove the image to use
text instead.
Note: You cannot edit the Text settings if an image is selected.
4. On the Backgroundtab:
l
Click Select Imageto use your own background image.
l
To use a solid color background instead, click the color tile in
Background Color to select a color using the color picker (see example
below), or click the arrows to enter your color in the HEX, RGBA, or HSLA
color model.
5. On the Select Imagetab, click the slider to enable the optional External ID field,
and adjust the size, position, and text formatting.
6. On the Custom Field 1or Custom Field 2 tabs, adjust the size, position, and text
formatting.
Note: Custom fields are only available on the Premium plan and can be
edited under Users >Custom fields.
7. Click Saveto publish your changes.

Rev. 4.2 © Openpath 2023 93
PRINT A BADGE
1.
From Configurations > Badge templates:
a. Click on the template you'd like to print.
b. In the Preview section, select the name of the user whose badge you want
to print.
c. Click Print Badge.
d. Select the badge printer from the browser's print utility, or close and save
the high res image to print via a different method.
2.
From Users > Users:
a. Click on the name of the user whose card credential you want to print.
b. On the Credentials tab, click the Printicon next to the card credential.
Note: If you don't see the Print icon, click the Edit icon next to the card,
assign a Badge Template, then click Save.
c. Select the badge printer from the browser's print utility, or close and save
the high res image to print via a different method
PRINTING TIPS
l
Badge templates should work with any printer, but you may need to adjust print
settings for your printer.
o
For the Evolis Primacy card printer, we recommend printing at 96 DPI at
100% scale.
o
If using a high definition printer, you may need to adjust the scale of the
image in the printer settings.
l
Openpath badge templates are designed for use with Openpath key cards,
which are 3.37 x 2.125 in. Printing on different size cards may result in the image
looking distorted.
l
If using the Safari application program, you may need to enable popups in
order for the print utility to open.
ADMINISTRATION
The Administration page is where you can define organization details and set up
billing information.

Rev. 4.2 © Openpath 2023 94
ACCOUNT
The Account page is where you can define organization details and set up billing
information. This is where you can review and accept the Terms of Service.
In the Info section, you can change your Organization Name and provide an Accounts
Payable Email.
SECURITY SETTINGS
In the Security Settings section, click Change Settingsto adjust timeout settings and
view or edit access to your account.
l
Offline Timeout Setting.This setting is the time (in days) that an ACU can be
offline before the token will expire. After this time, credentials may not
authenticate properly. The maximum value for this setting is 30 days.
l
Suspend Idle Users Timeout Setting.This setting will suspend users who have
not unlocked an entry within the set time duration. The minimum duration is the
Offline Timeout Setting plus 7 days. Leave the setting blank to never suspend
users.
Note: Users with portal access will never be suspended.
l
Allow your parent org to have VIEW access to this organization. You will see
this option if your integrator is configured as a parent org. This setting is enabled
by default. You may disable it at anytime to prevent your parent org from
viewing your organization.
l
Allow Openpath Support to have VIEW access to this organization. This
setting is enabled by default. You may disable it at anytime to prevent
Openpath Support from viewing your organization.
l
Allow Openpath Support to have EDIT access to this organization. This setting
cannot be enabled; you must escalate changes to Openpath Support or
Engineering.
l
Allow Openpath Support to have UNLOCK access to this organization. This
setting cannot be enabled; you must escalate changes to Openpath Support or
Engineering.
l
Enable remote unlock by default for new users.
Note: Existing users are not impacted by changes to this setting.
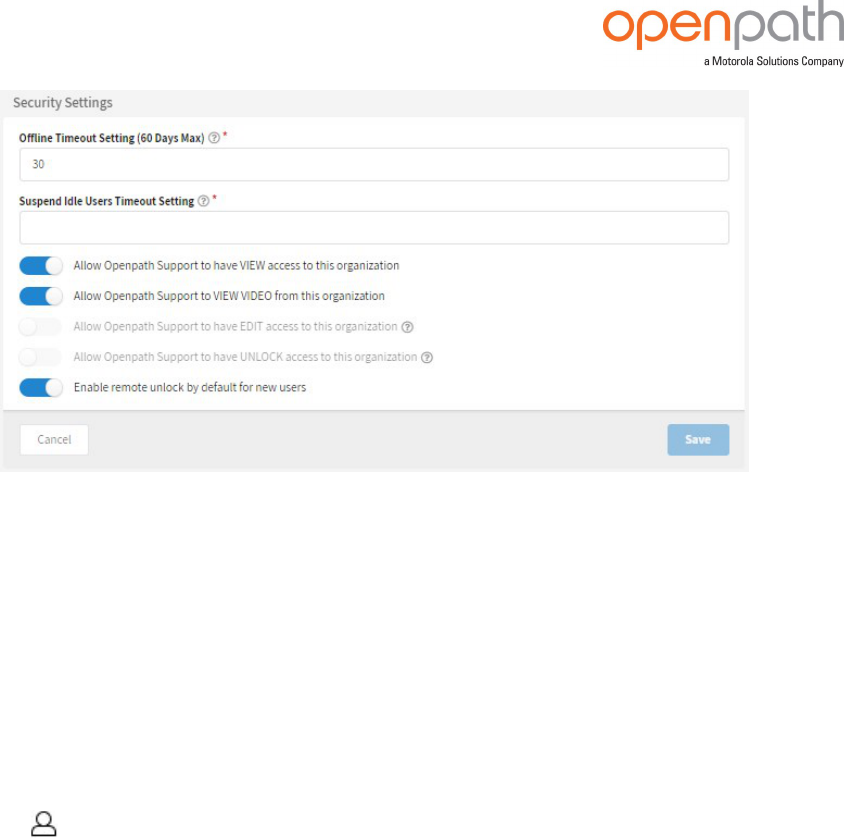
Rev. 4.2 © Openpath 2023 95
Figure 52 Security Settings
QUICK START
Use the Quick start page to set up a site with ACUs and readers all on one page. This
is useful if you're already familiar with setting up Openpath sites and hardware.
MY PROFILE
You can view and edit your profile as follows.
1.
Go to in the upper-right corner of the Control Center.
2. Click My profile.
You can edit your email and name (but not if you were imported from an
identity provider), change your password, and configure Multi-Factor
Authentication (MFA) by adding an MFA Device such as Google Authenticator™
mobile app. This gives you an extra layer of security when logging into the
Control Center.
CONFIGURING OPENPATH CONTROL CENTER WITH
LEGACY SYSTEMS
You can configure Openpath Control Center to support existing legacy access control
systems. In this setup, Openpath Smart Readers replace the legacy Wiegand readers
and Openpath Smart Hub ACUs are installed between the Smart Readers and the
legacy panel, with the Wiegand ports configured as outputs to the legacy panel. In
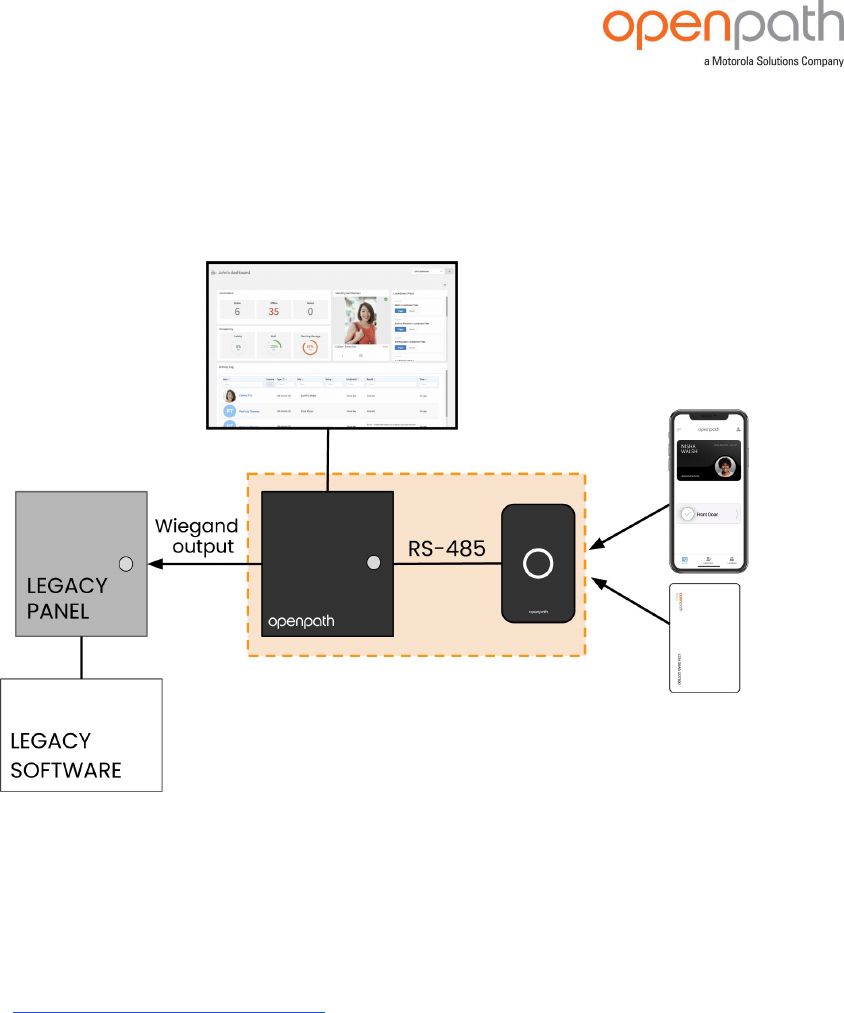
Rev. 4.2 © Openpath 2023 96
this setup, the legacy panel makes the access control decisions while the Openpath
hardware allows the use of Openpath credentials (including mobile and Cloud Key
credentials).
Figure 53 Mobile Gateway diagram
If you're supporting a legacy system, there are a few items you need to configure in
the Control Center:
l
Under Entry settings, configure the Wiegand Device to Output (Gateway)mode.
See WIEGAND DEVICE on page45.
l
If you want credential data to pass directly through to the legacy panel (without
being authenticated by the Smart Hub ACU), enable Gateway Credential Pass-
Through.
l
If you want users who make authenticated unlock requests with valid Openpath
credentials but do not have dedicated Use for Gateway Wiegand IDs to be sent
to the legacy panel, define a Default Gateway Card Number that will be sent
instead.
l
If you want to send individual user credentials to the legacy panel (instead of
setting up a Default Gateway Card Number for the entry) you can create a
Wiegand card credential (physical card not required) for the user and enable

Rev. 4.2 © Openpath 2023 97
Use for Gateway. This way, that card number will be sent to the legacy panel
whenever the user makes an authorized unlock request using any of the user's
valid Openpath credentials. This is useful if you want to use one-to-one
credential mapping for accurate user-level reporting within the legacy system.
See ADD A WIEGAND CREDENTIAL.
REGULATORY
All national and local electrical codes apply.
UL 294
The following performance levels are defined for Openpath hardware, as per UL 294:
Attack: Level I
Endurance: Level I
Line Security: Level I
Standby: Level I
CAN/ULC 60839-11-1-16 GRADE 1
For C-UL Listed applications, the unit shall be installed in accordance with Part 1 of the
Canadian Electrical Code.
FCC
This device complies with part 15 of the FCC Rules. Operation is subject to the
following two conditions: (1) This device may not cause harmful interference, and (2)
this device must accept any interference received, including interference that may
cause undesired operation. To comply with FCC RF exposure compliance
requirements, a separation distance of at least 20 cm should be maintained between
the antenna of Openpath Smart Reader(s) and persons during operation.
NOTE: This equipment has been tested and found to comply with the limits for a Class
A digital device, pursuant to part 15 of the FCC Rules. These limits are designed to
provide reasonable protection against harmful interference when the equipment is
operated in a commercial environment. This equipment generates, uses, and can
radiate radio frequency energy and, if not installed and used in accordance with the
instruction manual, may cause harmful interference to radio communications.
Operation of this equipment in a residential area is likely to cause harmful

Rev. 4.2 © Openpath 2023 98
interference in which case the User will be required to correct the interference at his
own expense.
IEC 62368-1
l
This equipment is intended only for use in a restricted access area.
l
Securely fasten the equipment according to LifeSafety Power mounting
instructions. See FlexPower Vantage Standard Power System - Installation
Manual
1
.
l
PROTECTIVE EARTHING: For safety, the Smart Hub must only be plugged into a
grounded 3-prong outlet, wired with a minimum of 16 gauge wire to ground.
RF RADIATION HAZARD WARNING
To ensure compliance with FCC and Industry Canada RF exposure requirements, this
device must be installed in a location where the antennas of the device will have a
minimum distance of at least 20 cm from all persons. Using higher gain antennas
and types of antennas not certified for use with this product is not allowed. The device
shall not be co-located with another transmitter.
Installez l'appareil en veillant à conserver une distance d'au moins 20 cm entre les
éléments rayonnants et les personnes. Cet avertissement de sécurité est conforme
aux limites d'exposition définies par la norme CNR-102 at relative aux fréquences
radio.
INDUSTRY CANADA NOTICE AND MARKING
Under Industry Canada regulations, this radio transmitter may only operate using an
antenna of a type and maximum (or lesser) gain approved for the transmitter by
Industry Canada. To reduce potential radio interference to other Users, the antenna
type and its gain should be so chosen that the equivalent isotropically radiated
power (e.i.r.p.) is not more than that necessary for successful communication.
Conformément à la réglementation d'Industrie Canada, le présent émetteur radio
peut fonctionner avec une antenne d'un type et d'un gain maximal (ou inférieur)
approuvé pour l'émetteur par Industrie Canada. Dans le but de réduire les risques de
brouillage radioélectrique à l'intention des autres utilisateurs, il faut choisir le type
d'antenne et son gain de sorte que la puissance isotrope rayonnée équivalente
1
See https://lifesafetypower.com/docs/im_fpv-standard.pdf.

Rev. 4.2 © Openpath 2023 99
(p.i.r.e.) ne dépasse pas l'intensité nécessaire à l'établissement d'une communication
satisfaisante.
This device complies with Industry Canada licence-exempt RSS standard(s).
Operation is subject to the following two conditions: (1) this device may not cause
interference, and (2) this device must accept any interference, including interference
that may cause undesired operation of the device.
Le présent appareil est conforme aux CNR d'Industrie Canada applicables aux
appareils radio exempts de licence. L'exploitation est autorisée aux deux conditions
suivantes : (1) l'appareil ne doit pas produire de brouillage, et (2) l'utilisateur de
l'appareil doit accepter tout brouillage radioélectrique subi, même si le brouillage est
susceptible d'en compromettre le fonctionnement.
