
ADP, the ADP logo, and Always Designing for People are trademarks of ADP, Inc.
ADP Security Management Services - Getting Started Guide for Security Administrators
Contents
Getting Started with Security Management Service .................................................................................................................................................................. 4
Setting Up Your Organization .................................................................................................................................................................................................................................... 4
Setting Up Your Security Master .............................................................................................................................................................................................................................. 4
Password Requirements .............................................................................................................................................................................................................................................. 4
Suspension and Deletion of User Accounts ........................................................................................................................................................................................................... 5
New Security Requirements ............................................................................................................................................................................................................................... 6
Easy Self-Reactivation for Employees Suspended for Inactivity ............................................................................................................................................................ 6
Deletion of User Accounts ................................................................................................................................................................................................................................... 6
People - Manage Users ....................................................................................................................................................................................................................... 7
Adding a New User ........................................................................................................................................................................................................................................................ 7
Viewing User Information............................................................................................................................................................................................................................................ 8
Updating User Information .......................................................................................................................................................................................................................................... 8
Suspending/Activating a User ................................................................................................................................................................................................................................... 9
Deleting a User............................................................................................................................................................................................................................................................. 10
People - Resetting Password & Admin Access........................................................................................................................................................................... 13
Resetting a Password ................................................................................................................................................................................................................................................ 13
Administrator Access ................................................................................................................................................................................................................................................ 14
Issuing Admin Access ................................................................................................................................................................................................................................................. 14
People - Personal Registration Codes .......................................................................................................................................................................................... 16
Updating Email Address and Mobile Phone Number ......................................................................................................................................................................................... 16
Issuing Codes to Users ............................................................................................................................................................................................................................................... 17
Issuing Personal Registration Code to Screen.................................................................................................................................................................................................... 17
Issuing Codes to Unlock Registration.................................................................................................................................................................................................................... 17
People - User Security Roles .......................................................................................................................................................................................................... 19
Assigning User Security Role .................................................................................................................................................................................................................................. 19
Removing Administrator Role ................................................................................................................................................................................................................................. 19
About User Security Roles ....................................................................................................................................................................................................................................... 19
People - Service Profiles ................................................................................................................................................................................................................ 22
Assigning a Service Profile ...................................................................................................................................................................................................................................... 22
Removing a Service Profile ...................................................................................................................................................................................................................................... 22

Getting Started with the ADP Security Management Service
ADP, the ADP logo, and Always Designing for People are trademarks of ADP, Inc
About Profiles .............................................................................................................................................................................................................................................................. 22
People - Managing Applicants (If Applicable) ............................................................................................................................................................................ 24
Selecting Applicants .................................................................................................................................................................................................................................................. 24
Viewing/Updating Applicant Information ........................................................................................................................................................................................................... 25
Suspending an Applicant .......................................................................................................................................................................................................................................... 25
Activating an Applicant ............................................................................................................................................................................................................................................ 25
Deleting an Applicant ................................................................................................................................................................................................................................................ 25
Setup - Managing Your Organization........................................................................................................................................................................................... 27
Viewing Your Organization’s Information ........................................................................................................................................................................................................... 27
Updating Your Organization’s Information .......................................................................................................................................................................................................... 27
Configurable User ID Options for Your Employees............................................................................................................................................................................................ 27
Selecting the User ID Format ........................................................................................................................................................................................................................... 28
Allowing Employees to Change their User ID .............................................................................................................................................................................................. 28
Managing Mobile Access for Users......................................................................................................................................................................................................................... 28
Customizing Your Support Contact Information ............................................................................................................................................................................................... 29
Adding Your Organizational Branding .................................................................................................................................................................................................................. 29
Automatic Removal of Administrator/Practitioner Access............................................................................................................................................................................ 30
Setting up the Employee Registration Process ......................................................................................................................................................................... 31
Personal Registration Codes (Recommended) .................................................................................................................................................................................................... 31
Organizational Registration Code .......................................................................................................................................................................................................................... 31
Viewing the Identity Verification Options for Employee Registration ...................................................................................................................................................... 31
Issuing Personal Registration Codes ..................................................................................................................................................................................................................... 32
Option 1 – Automatically issue codes to new associates (New) ........................................................................................................................................................... 32
Option 2 – Administrators to issue codes to users (Current Process) ................................................................................................................................................. 32
Setting Up the Organizational Registration Code............................................................................................................................................................................................. 32
Additional Verification Options.............................................................................................................................................................................................................................. 33
Mobile Registration with ADP Mobile App .......................................................................................................................................................................................................... 33
Setup - Service Profiles .................................................................................................................................................................................................................. 35
Adding a Service Profile ............................................................................................................................................................................................................................................ 35
Updating a Service Profile ........................................................................................................................................................................................................................................ 35
Deleting a Service Profile ......................................................................................................................................................................................................................................... 35
Delegations - For Customers ......................................................................................................................................................................................................... 36
Adding a Third Party Provider .......................................................................................................................................................................................................................... 36
Assigning Delegated Service Profiles to Third Party Provider .............................................................................................................................................................. 37
Removing Delegated Service Profiles from Third Party Provider ......................................................................................................................................................... 37
Delegation - For Providers ............................................................................................................................................................................................................. 38

Getting Started with the ADP Security Management Service
ADP, the ADP logo, and Always Designing for People are trademarks of ADP, Inc
Removing Delegated Profiles ........................................................................................................................................................................................................................... 38
Removing the Delegation with the Customer ............................................................................................................................................................................................. 38
Myself - Updating Your Contact Information ............................................................................................................................................................................. 39
Changing Your Email Address........................................................................................................................................................................................................................... 39
Activating Your Email Address ........................................................................................................................................................................................................................ 39
Changing Your Contact Phone Numbers ....................................................................................................................................................................................................... 39
Activating Your Mobile Phone Number ......................................................................................................................................................................................................... 39
Requesting a New Activation Code................................................................................................................................................................................................................ 40
About Activating Your Contact Information ............................................................................................................................................................................................... 40
About Text Messaging ........................................................................................................................................................................................................................................ 40
Frequently Asked Questions ............................................................................................................................................................................................................................ 41
Myself - Updating Your Login Information ................................................................................................................................................................................. 42
About Your Security Information .................................................................................................................................................................................................................... 42
Changing Your Password ................................................................................................................................................................................................................................... 42
Changing Your Security Questions and Answers ....................................................................................................................................................................................... 42
Changing Your User ID (If Available) .............................................................................................................................................................................................................. 42
Changing Your Voice PIN (If Available) ......................................................................................................................................................................................................... 43
Myself - Viewing Your Services .................................................................................................................................................................................................... 44
Viewing and Adding a Service ................................................................................................................................................................................................................................. 44
Deleting a Service ....................................................................................................................................................................................................................................................... 44
Reports – Run and View Reports to View Information............................................................................................................................................................. 45
Types of Reports ......................................................................................................................................................................................................................................................... 45
Running a Report ......................................................................................................................................................................................................................................................... 46
Viewing a Report Output .......................................................................................................................................................................................................................................... 46
Refreshing a Report.................................................................................................................................................................................................................................................... 46
Cancelling a Report ..................................................................................................................................................................................................................................................... 46
Viewing a Historic Report Output ......................................................................................................................................................................................................................... 46
Deleting a Report ........................................................................................................................................................................................................................................................ 47
Reports Frequently Asked Questions...................................................................................................................................................................................................................... 47

Getting Started with the ADP Security Management Service
ADP, the ADP logo, and Always Designing for People are trademarks of ADP, Inc
Getting Started with Security Management Service
ADP Security Management Service provides functions to manage users' privileges to access the ADP services your
organization has purchased.
Log on to your ADP service and use the menu option to navigate to the ADP Security Management Service. Alternately, go to
https://netsecure.adp.com and log on as an administrator.
Setting Up Your Organization
To set up your organization in ADP Security Management Service, your ADP representative will need the following
information:
• Organization’s name, address, and phone number
• Company codes - Your ADP representative may already know these based on sales orders.
• Client ID - This is a short, unique identifier for your organization. The client ID is limited to 10 characters. For example, if
your organization is My Client ID Products, Inc., your client ID could be MyclientID.
• Organizational Registration Code (if needed) - Your self-service users will use this code to register for ADP services. The
complete organizational registration code consists of your Client ID and the code you establish for example, MyclientID-
1945Alabama.
• Identity verification information - This is the personal information that you want your employees to enter when they
register for ADP services.
Note: This information may be requested based on your organization’s use of ADP services.
Setting Up Your Security Master
After your ADP representative sets up your organization in ADP Security Management Service, he or she will set up your
organization’s security master. The security master has the highest level of security authorization in your organization. The
security master works closely with your ADP representative in the setting up of security for your organization and is
responsible for maintaining this security moving forward.
Depending on the size and organization of your organization, the security master may need to set up additional users in
security roles to share security responsibilities. The users the security master selects to receive these responsibilities must be
people in your organization who can have access to sensitive organization and user information.
The user designated as the security master must provide the following information:
• First name and last name
• Email address
• Work telephone number (optional)
• Work address, if different from the main organization’s address
After your ADP representative enters this information in ADP Security Management Service, the security master will receive a
confirmation email, which contains the user ID, access code, URL, and instructions to register for administrator access. Your
security master uses this information to register and log on to ADP Security Management Service and other ADP services.
Password Requirements
The password standard presented in this document applies to the user authentication controls for ADP services that are
integrated with the ADP Security Management Service.
The following are the rules to which a user’s password must conform:

Getting Started with the ADP Security Management Service
ADP, the ADP logo, and Always Designing for People are trademarks of ADP, Inc
• Length – passwords must be a minimum of eight (8) characters and maximum of sixty four (64) characters
• Composition – passwords must include one (1) or more characters from two (2) classes:
o English uppercase or lowercase letters (e.g., A,B,C,...Z or a,b,c,....z)
o Westernized Arabic numerals (e.g., 0,1,2,...9)
• Use of mixed case and special characters is permitted but not required. All special characters on the keyboard are
accepted
• Repeated characters – passwords cannot contain more than three (3) repeated characters
• Sequential characters – passwords cannot contain more than three (3) sequential ascending or descending characters
• Passwords cannot contain the user’s user ID, last name regardless of case or social security number
• Password history – passwords cannot be identical to the four (4) previous used passwords
• Passwords are case-sensitive
Password Security
Passwords are classified as ADP internal confidential information and are treated accordingly:
• Temporary passwords are required to be changed immediately upon or during first use
• Passwords are masked by default
• Passwords cannot be transmitted in clear text and are never sent in the same transmissions as a user’s user ID
• Passwords are stored encrypted using industry standard cryptographic mechanisms
• Password aging – passwords expire every 180 days
• A user must prove his identity before he can reset his own password
• Prior to reset, identity and access level are validated by ADP designated access control authority.
Account Locking Policy for Login Failures
During login, when an employee or practitioner user fails to enter the correct password three times in a row, his account is
locked for five minutes. This is a time-based lock that is cleared when the five minutes have passed. When an administrator or
practitioner fails to enter the correct password four times in a row, his account is locked until a (typically higher-level) security
administrator or master resets his password.
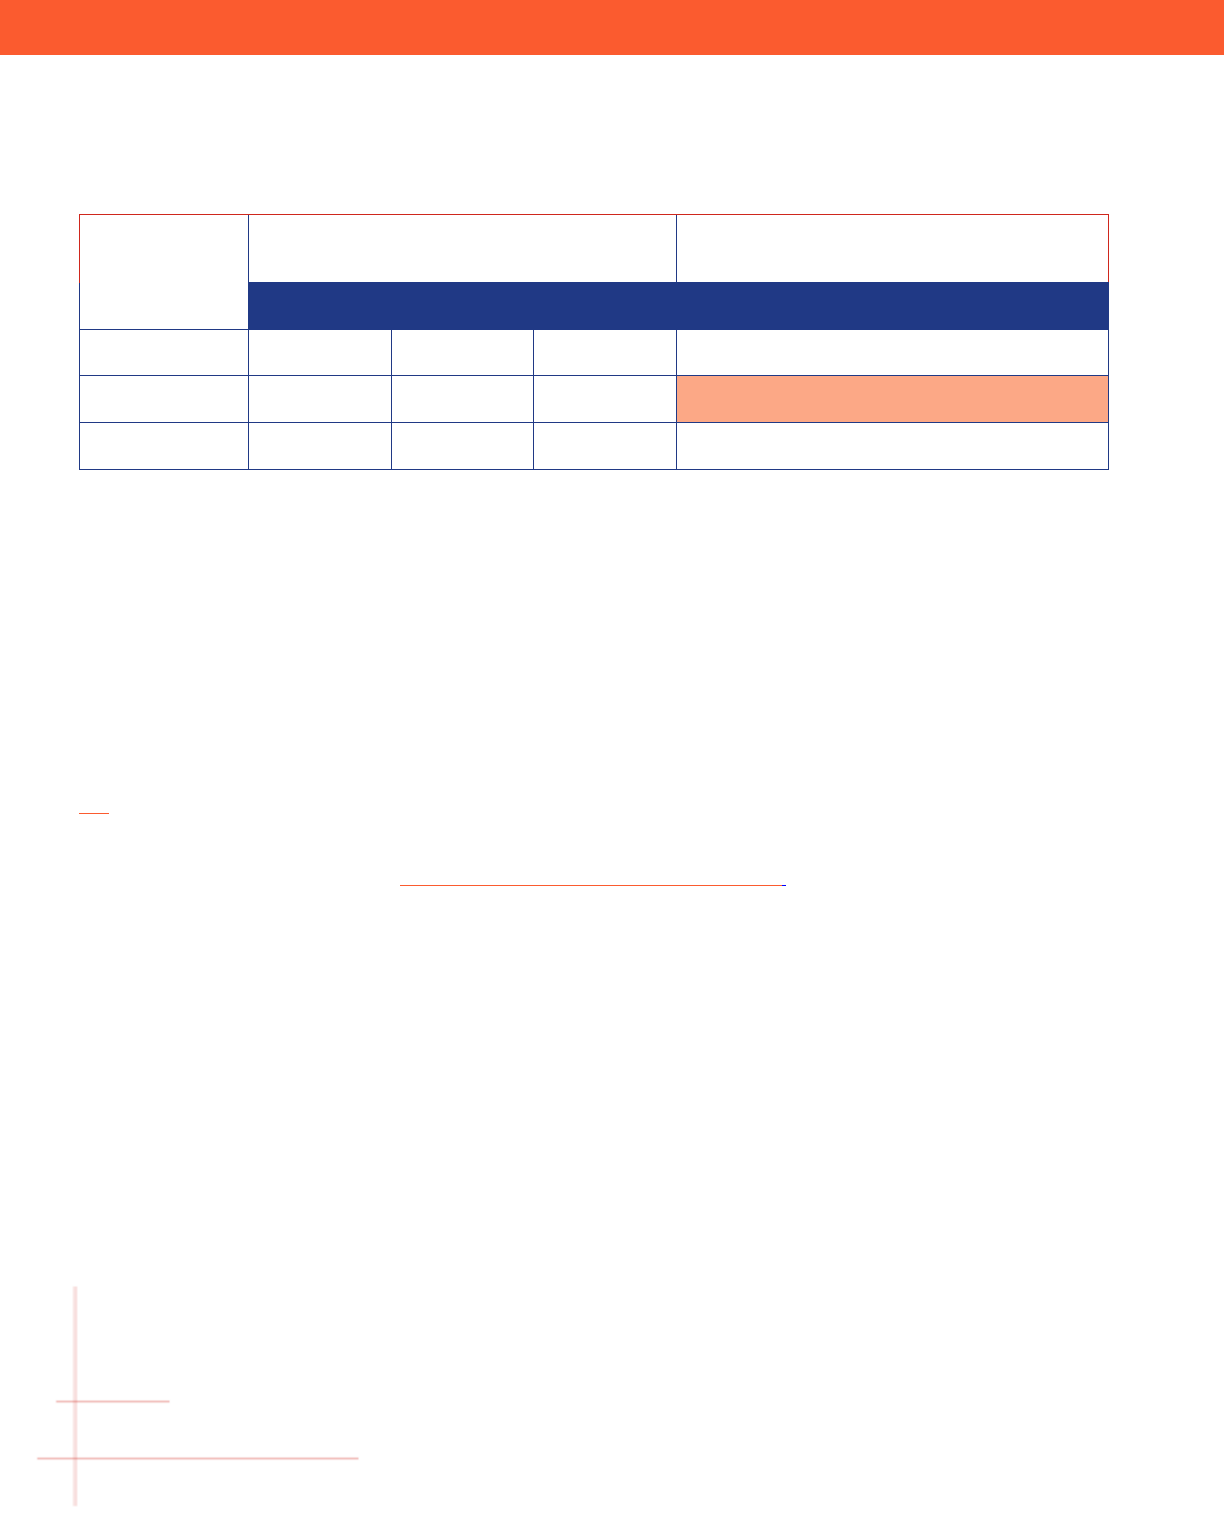
Suspension and Deletion of User Accounts
ADP is committed to protecting your employees and their personally identifiable information linked to their ADP service
account. To reduce the risk of fraudulent access, ADP's suspension policy applies to accounts that remain inactive for extended
periods of time.
Getting Started with the ADP Security Management Service
ADP, the ADP logo, and Always Designing for People are trademarks of ADP, Inc
This type of user
Will be suspended if they fail to log in within the
following number of days after this event:
Will be deleted if the account has not been reactivated
within the following number of days of:
Creation
Last Login
Password Reset
Suspension
Applicant
480
480
30
180
Self Service User
480
480
30
180
Administrator
15
365
15
180
New Security Requirements
• New administrators must log on to their account within 15 days or their account will be suspended. The administrator
enrollment email has been updated to communicate this requirement to newly created administrators.
• Employees who have their passwords reset must use the temporary password within 30 days or their account will be
suspended. Administrators must use the temporary password within 15 days or their account will be suspended. The
temporary password email has been updated to communicate this requirement to users who receive a temporary
password.
Easy Self-Reactivation for Employees Suspended for Inactivity
To help reduce calls for support to your administrators, ADP offers an easy self-reactivation option to your employees
suspended for inactivity. When a suspended user logs on to access their ADP service account, the user is presented with the
link to reset their password and reactivate their account. Users who successfully reset their password will have their accounts
reactivated and can log on to with their user ID and the new password. Users who are unable to complete the process,
administrators, and employees suspended by administrators for various reasons must contact your administrator to activate
their ADP service account. Refer to the Suspension Reactivation Quick Reference Card to view the steps of this process.
Note: The account suspension policy does not apply to users suspended by their administrators.
Deletion of User Accounts
Suspended user accounts that have not been activated within a certain time frame will be deleted. Once deleted, user accounts
cannot be restored. If required, the user must register and set up a new ADP service account to access the services available to
your organization.
As a usability feature, users who have their accounts scheduled for deletion will receive an alert email (from
SecurityServices_NoRe[email protected]m) 30 days and 15 days prior to scheduled deletion.
• Employees suspended for inactivity will be able to use the link in the email to complete a quick verification to activate
their account.
• Administrators/practitioner users and employees suspended by their administrators must contact their organization's
administrator.
You can run the User Information, Self Service User Status, and/or the Admin User Status reports to review the details and
reason for the status changes.

Getting Started with the ADP Security Management Service
ADP, the ADP logo, and Always Designing for People are trademarks of ADP, Inc
People - Manage Users
Go to People > Manage Users page to perform tasks to manage your organization’s users.
Adding a New User
You can add new security administrators, user masters, user administrators, product users, and self-service users (if available
to your organization). Your security masters and security administrators can add other users for your organization. This task
does not apply to user masters, user administrators, product users, and self-service users.
Starting Point: Manage Users
1. Click on the Add New (+) icon.
2. Enter user information.
3. Click Continue.
4. Select the user type.
5. Select the user role.
6. Click Next.
7. Assign the service profiles to allow access to ADP services, if required. To do this later, refer to Assigning a
Service Profile.
8. Click Next.
9. Review the user information and update the email address, if required.
10. Click Done.
User Roles That Can Add New Users
The following table lists the user roles that are authorized to add other users:
User Role
Can Add New
Security Master
Security administrator, user master, user administrator, product user,
and self-service user (if available to your organization).
Security Administrator
User master, user administrator, product user, and self-service user (if
available to your organization).
User Master, User Administrator, Product User,
and Self-Service User
This task does not apply.

Getting Started with the ADP Security Management Service
ADP, the ADP logo, and Always Designing for People are trademarks of ADP, Inc
Viewing User Information
Security masters, security administrators, user masters, and user administrators can view information of other users in your
organization. This task does not apply to product users and self-service users. Refer to User Roles That Can View User
Information.
Starting Point: Manage Users
1. Select the user.
2. Click the user's name.
3. Do any of the following:
Go To The
To
Contact Information page
View the user’s phone number, email, and business address.
Access Information page
View the user's last login date, registration date, and current status.
Identity Information page
Security masters can view the user's identity information. This task does
not apply to other user roles.
User Roles That Can View User Information
The following table lists the user roles that are authorized to view user information of other users:
User Role
Can View User Information Of
Security Masters, Security
Administrator, User Master, User
Administrator
Security master, security administrator, user master, user administrator, product
user, and self-service user.
Product User and Self-Service User
This task does not apply.
Updating User Information
Security masters, security administrators, user masters, and user administrators can update the information of other users in
your organization. This task does not apply to product users and self-service users.
Refer to User Roles That Can Update User Information.

Getting Started with the ADP Security Management Service
ADP, the ADP logo, and Always Designing for People are trademarks of ADP, Inc
Starting Point: Manage Users
1. Select the user.
2. Click the user's name.
3. Update the user information, as required.
4. Click Save.
User Roles That Can Update User Information
The following table lists the user roles that are authorized to update user information of other users:
User Role
Can Update User Information Of
Security Master
Security administrator, user master, user administrator, product user, and self-service user.
Security Administrator
User master, user administrator, product user, and self-service user.
User Master and User
Administrator
Self-service user.
Note: User administrator can only update the user status.
Product User and Self-
Service User
This task does not apply.
Suspending/Activating a User
For information on the suspension deletion policy, refer to the “Suspension and Deletion of User Accounts” section in this
document.
Security masters, security administrators, user masters, and user administrators can view the suspension/re-activation
information of users and can suspend/activate users in your organization.
Starting Point: Manage Users
1. Select the user.
2. Click on the user's name.
3. Click on the Access Information tab.
4. In the Status field, select Activate/Suspended, as required.
5. Click Save.
User Roles That Can Suspend/Activate Users
The following table lists the user roles that are authorized to suspend/activate other users:

Getting Started with the ADP Security Management Service
ADP, the ADP logo, and Always Designing for People are trademarks of ADP, Inc
User Role
Can Suspend/Activate
Security Master
Security administrator, user master, user administrator, product user, and self-
service user.
Security Administrator
User master, user administrator, product user, and self-service user.
User Master and User Administrator
Self-service user.
Product User and Self-Service User
This task does not apply.
Deleting a User
For information on the user roles you can delete, refer to Access to Delete Users.
Important: This task cannot be undone. Once deleted, users cannot log in to access their pay statements, benefits, human
resources etc.
Starting Point: Manage Users
1. Select the user.
2. Click on the user's name.
3. View the user information and click Delete.
4. Click Yes.
Important: The user and user's information will be deleted permanently from your organization’s records.
User Roles That Can Delete Users
The following table lists the user roles that are authorized to delete other users:
User Role
Can Delete Users
Security Master
Security administrator, user master, user administrator, product user, and self-service user.
Security Administrator
User master, user administrator, product user, and self-service user.
User Master, User
Administrator, Product User,
and Self-Service User
This task does not apply.

Getting Started with the ADP Security Management Service
ADP, the ADP logo, and Always Designing for People are trademarks of ADP, Inc
Deleting Dual Access Users
Dual access users can access ADP services in two ways: through a link on your organization's web site (federation does not
require an ADP user ID and password) and from the ADP service web site when they log in with their ADP user ID and
password.
If you perform the Delete User task on dual access users, the users cannot access their ADP service with their user ID and
password. Users will continue to access ADP services from your organization's web site.
Deleting Federated Users
Federated users access ADP services from a link on your organization's web site (does not require user ID and password). For
this reason, you cannot delete federated only users.
Frequently Asked Questions
You can find information to frequently asked questions to support your users:
1. A user can't log on to access ADP Services. What should I do?
First, check the status of the user in the Status column. If the status is suspended, you should contact your
organization's security master or your ADP representative to see why the user has been suspended. If you need
to, you can reactivate the user. If the user has not been suspended (status is Active), contact your ADP
representative for assistance.
2. A user does not remember the user ID. What should I do?
Employees and administrators can retrieve their user ID by using the “Forgot Your User ID” link on your ADP
services login page. If the user is unable to self-retrieve the user ID, you can find the user and view the user ID
listed in the search results area. Be sure to verify the identity of the user before providing the user ID to the user.
Refer to Viewing User Information.
3. A user does not remember the password. What should I do?
Employees and administrators can reset their password by using the “Forgot Your Password” link on your ADP
services login page. If the user is unable to self-reset the password, you can support the user. Refer to Resetting
a Password.
4. Does the use of Personal Registration Code eliminate the need to include the user's Social Security number (SSN)
in the organization’s information sent to ADP?
No. For a user to take full advantage of the personal registration code, their Social Security number (SSN) must
be included in the information your organization sends to ADP. If your organization does not include the user’s
SSN, the user will have limited access to ADP services. Contact your ADP representative for more information.
5. How can security masters use the user's identity information displayed on the Manage Users > Identity
Information page?
Security masters can view the user's Social Security number (SSN/ EIN / ITIN), Employee ID/Associate ID, and the
date of birth. Security masters can view the different ADP services that send the user's identity information
along with the dates when the information was first received and last modified.

Getting Started with the ADP Security Management Service
ADP, the ADP logo, and Always Designing for People are trademarks of ADP, Inc
Security masters can use this information to identify and update an incorrect user information in your
organization’s records. Security masters can contact employees who were unable to verify their identity due to
incorrect user information in the organization’s records and encourage them to complete the registration process
to access your ADP services. If your organization does not have a security master, contact your ADP
representative to assign an administrator to this user security role.

Getting Started with the ADP Security Management Service
ADP, the ADP logo, and Always Designing for People are trademarks of ADP, Inc
People - Resetting Password & Admin Access
For information on the password policy, refer to the “Password Requirements and Security” section in this document.
Resetting a Password
Starting Point: People > Password & Admin Access
1. Search for the user.
2. Click on the user’s name and confirm the identity of the user.
3. Click Reset Password.
4. Select the email address or mobile phone number to send the temporary password.
You can confirm or change the user's email address or mobile phone number, if required. Depending on your user
role, the ability to modify the email address may vary. Refer to User Roles That Can Reset User Password.
5. Click Continue.
An email with the temporary password will be sent to the user and a success message displays on the page.
User Roles That Can Reset User Password
The following table lists the user roles that are authorized to reset passwords for other users:
User Role
Can Reset Password For
Security Master
Security master, security administrator, user master, user administrator, product user, and
self-service user.
Note: Security master can update the contact email address or mobile phone number to send
the temporary password.
Security Administrator
User master, user administrator, product user, and self-service user.
Note: Security administrator can update the contact email address or mobile phone number
to send the temporary password.
User Master
User administrator, product user, and self-service user.
Note: User master can update the contact email address or mobile phone number of self-
service user to send the temporary password.
User Administrator
Product user and self-service user.
Note: User administrator cannot update the contact email address or mobile phone number
of users.
Product User
This task does not apply.

Getting Started with the ADP Security Management Service
ADP, the ADP logo, and Always Designing for People are trademarks of ADP, Inc
Self Service User
This task does not apply.
Administrator Access
Users with security responsibilities will require administrator access. Administrator access provides broader access to ADP
services to manage your organization’s services and to support your users. Administrators (practitioners) can now securely
access ADP services with administrator access from any computer (trusted or shared) and on any supported browser.
ADP is committed to protecting your organization’s information from fraudulent access by enhancing the security of
administrator accounts. As part of continuous improvement, each administrator’s log on will be evaluated in real-time against
their previous successful logins to assess the risk of potential fraudulent access.
When the login is associated with an elevated risk, administrators will be prompted to verify their identity by providing one or
more of the following:
• An activation code sent to the email address on the account
• An activation code sent to the mobile phone number on the account, when available
• Answer security question(s) previously set up to protect the account
This usability enhancement will improve the login experience for administrators by reducing the disruption at login, increasing
the security of the account, and standardizing challenge-response for additional verification, when required and based on the
perceived risk.
Refer to the “New Administrator Access Quick Reference Card” available on the administrator Home Page > Resources section.
Issuing Admin Access
Starting Point: Password & Admin Access
1. Search for the user.
2. Click on the user name.
3. Verify the identity of the user.
4. Click Issue Admin Access.
5. Select the email address to send an email with instructions.
Note: You can confirm or change the user's email address, if required. Depending on your user role, the ability to
modify the email address may vary. Refer to User Roles That Can Issue Admin Access.
6 Click Continue.
Note: An email with instructions will be sent to the user and a success message displays on the page.

Getting Started with the ADP Security Management Service
ADP, the ADP logo, and Always Designing for People are trademarks of ADP, Inc
User Roles That Can Issue Admin Access
The following table lists the user roles that are authorized to issue administrator access to other users:
User Role
Can Issue Admin Access For
Security Master
Security master, security administrator, user master, user administrator, product user, and
self service user.
Note: Security master can update the contact email address to send the email with
instructions.
Security Administrator
User master, user administrator, product user, and self service user.
Note: Security administrator can update the contact email address to send the email with
instructions.
User Master
User administrator, product user, and self service user.
Note: User master can update the contact email address for self service users.
User Administrator
Product user and self service user.
Note: User administrator cannot update the contact email address of users.
Product User, Self Service
User
This task does not apply.

Getting Started with the ADP Security Management Service
ADP, the ADP logo, and Always Designing for People are trademarks of ADP, Inc
People - Personal Registration Codes
Personal registration codes are randomly generated and distributed to users by email in a secure and separate communication.
Users enter the personal registration code during registration to access ADP services. A personal registration code expires
once used or within 15 days, whichever is earlier. If it has been lost or compromised, you can reissue the personal registration
code.
Administrators with security master, security administrator, and user master security roles can go to People > Personal
Registration Codes to issue and manage personal registration codes for your unregistered associates. This task cannot be
performed by user administrators and product users.
Use one or more search options available on the page to find the list of unregistered users.
Select the Email Status
• All
• With Unique Email
Address
• With Non-Unique Email
Address
• Without Email Address
Select the Code Status
• All
• With Active Code
• With Expired Code
• None
Select the Lock Status
• All
• Locked
• Temporarily Locked
• Unlocked
Select the Employment
Status
• All
• Active
• Separated
Updating Email Address
Find users without an email address or with non-unique email address. To update the user’s record, enter a unique email
address for each user and click Save.
Starting Point: Personal Registration Codes
1. Find the user.
2. Enter a unique work/personal email address.
3. Click Save.

Getting Started with the ADP Security Management Service
ADP, the ADP logo, and Always Designing for People are trademarks of ADP, Inc
Issuing Codes to Users
Personal registration codes can only be issued to users with unique work/personal email addresses within your organization.
Administrator issued personal registration codes are valid for 15 days from the date of issue.
Note: Only users with a unique email address in your organization will receive an email from ADP
(SecurityServices_NoRe[email protected]).
Starting Point: Personal Registration Codes
1. Use the search options on the page to find the users.
2. Select to view the list or users with either the Work Email or the Personal Email.
3. Select one or more users.
You can also “Select all…users” to include all users in the search results.
4. Do one of the following:
• When viewing the Work Email, Mobile Number, select Issue Codes > Work Email Address.
• When viewing the Personal Email, select Issue Codes > Personal Email Address.
Issuing Personal Registration Code to Screen
Occasionally you may encounter users without an email address or users who have difficulty receiving the email with the
registration code due to issues with their email such as incorrect email etc.
Starting Point: Personal Registration Codes
1. In the Email Status field, select Without Email Address.
2. Click Search.
3. Select the user.
4. Click View Codes on Screen.
Important: Distribute the personal registration code (displayed on the screen) to the specific user for whom it has been issued
in a separate and secure internal communication along with the registration URL. As a security measure, codes will be hidden
(but remain active) when you navigate away from the page.
Issuing Codes to Unlock Registration
Users who enter incorrect identity information during registration will fail the registration process. If your users repeatedly
attempt to register with incorrect identification, they will be locked out of the registration and require assistance from their
administrator.
Once locked, users must be issued a personal registration code by an administrator to complete the registration. Use the
Locked Status search option to find users with locked status and issue a personal registration code to unlock the registration.
Starting Point: Personal Registration Codes
1. In the Locked Status field, select Locked.
2. Click Search.

Getting Started with the ADP Security Management Service
ADP, the ADP logo, and Always Designing for People are trademarks of ADP, Inc
3. In the search results, click to select the check box to select one or more users.
Security Tip: Be sure to verify the identity of the user requesting assistance before you issue a personal registration
code. On the People > Personal Registration Codes page, find the user and hover-over the user’s name to view some
identity information that you can use for verification.
4. Click Issue Code > Work Email or Personal Email.
Issuing Access for Terminated Federated-SSO Only Employees
In some cases, terminated employees may need to access pay statements, W2s, and other sensitive employee information. If a
Federated SSO-only client wants terminated employees to have access to sensitive information without issuing a Personal
Registration Code for a new account, a security master or security administrator can update the user’s profile settings.
Starting Point: Setup > Profile
1. Go to the Identity Verification Options tab.
2. Select Personal Registration Code.
3. Scroll to the bottom and ensure the Enforce newly registering employees to enter a Personal Registration Code
box is unchecked.
4. Go to the Personal Registration Code tab.
5. Ensure the Issue Codes to Terminated Employees box is unchecked.
Terminated Federated SSO-only employees can access their information at the ADP Welcome Page and follow the prompts.

Getting Started with the ADP Security Management Service
ADP, the ADP logo, and Always Designing for People are trademarks of ADP, Inc
People - User Security Roles
Go to People > User Security Roles to manage your user’s security role assignments.
Assigning User Security Role
Security masters, security administrators, and user masters can assign user security roles. This task does not apply to user
administrators, product users, and self service users. Assigning an administrator role will prompt to select the email address to
send instructions to get started.
Starting Point: User Security Roles
1. Select the user.
2. Click to select the user role to assign to the selected user.
3. Click Save.
4. If prompted, click Yes to assign service profiles.
5. To assign service profiles later, refer to Assigning a Service Profile.
6. If prompted, select the email address to send an email with instructions.
Note: You can confirm or change the user's email address, if required. Depending on your user role, the ability to
modify the email address may vary.
7. Click Save.
Removing Administrator Role
Starting Point: User Security Roles
1. Select the user.
2. Click to assign the self service user role.
3. Click Save.
4. Click Yes to remove administrator access and service profiles.
Note: To remove service profiles later, refer to Removing a Service Profile.
About User Security Roles
There are six security roles available, each with varying levels of responsibility/access. The self service user has the lowest
level of responsibility (does not requires administrator access) while the security master has the highest level of responsibility.
Security Master
A security master is a highly trusted user who has complete access to all the ADP services your organization uses. Security
masters requires administrator access.
User in this role can do the following:
• Create new security administrator.
• Reset password and issue administrator access to security masters.

Getting Started with the ADP Security Management Service
ADP, the ADP logo, and Always Designing for People are trademarks of ADP, Inc
• Perform all the tasks of the security administrator.
• Maintain users in other security roles.
Note: If your organization does not have a security master and needs to establish security administrators, contact your ADP
representative.
Security Administrator
A security administrator is a highly trusted user who has complete access to all the ADP services your organization uses. A
security administrator requires administrator access.
User in this role can do the following:
• Create new user administrators, user masters, and product users.
• Create self service users who require early access to your ADP services (if available to your organization based on your
ADP services).
• Assign security roles of product user, user master or user administrator to users.
• Perform security tasks such as reset passwords, issue/reissue administrator access.
• Issue/reissue personal registration code (if available to your organization).
• Manage access to ADP services for user masters, user administrators, product users, and self service users.
• Run status reports
• If applicable, perform applicant maintenance tasks e.g., reset passwords, suspend, activate, and/or delete applicants.
User Master
A user master requires administrator access. User in this role can do the following:
• Assign the user administrator role and product user role.
• Perform all user administrator tasks.
• Issue/reissue personal registration code (if available to your organization).
• Modify self service users’ information.
User Administrator
A user administrator requires administrator access. User in this role can do the following:
• Search for users and applicants (if available to your organization).
• View user information.
• Perform security tasks such as reset password and issue administrator access for product users.
• Suspend or activate self service users.
• If applicable, perform applicant maintenance tasks e.g., reset passwords, suspend, and/or activate applicants.
Product User
A product user requires administrator access. User in this role can do the following:
• Administer ADP services e.g., payroll, human resources, or benefits.
• Access and update personal account information.
Note: User cannot perform security administrative functions e.g., reset passwords, issue administrator access.

Getting Started with the ADP Security Management Service
ADP, the ADP logo, and Always Designing for People are trademarks of ADP, Inc
Employee Self Service User
Certain ADP services offer employees access to their own personal information (such as pay statements or medical benefits)
via self service functionality.
User in this role can do the following:
• Receive a registration code from your organization.
• Use the registration code to create user ID and password to access your ADP services.
• Access and update personal account information.
Note: User does not need administrator access.
User Roles That Can Assign Security Roles
The following table lists the user roles that are authorized to assign other user security roles:
User Role
Can Assign The Role Of
Security Master
Security administrator, user master, user administrator, product user, and self service
user.
Note: Security master can update the contact email address to send the email with
instructions, if required.
Security Administrator
User master, user administrator, product user, and self service user.
Note: Security administrator can update the contact email address or mobile phone
number of self service user.
User Master
User administrator, product user, and self service user.
User Administrator, Product
User, Self Service User
This task does not apply.

Getting Started with the ADP Security Management Service
ADP, the ADP logo, and Always Designing for People are trademarks of ADP, Inc
People - Service Profiles
Go to People > Service Profiles to manage your user’s service profile assignments.
Assigning a Service Profile
Security masters and security administrators can assign/ remove profiles to your users. This task does not apply to user
masters and user administrators.
Starting Point: Service Profiles
1. Select the user.
2. Click on the user's name.
3. Click to select the profiles and move them to the Selected Service Profiles list.
4. Click Save.
Removing a Service Profile
Starting Point: Service Profiles
1. Select the user.
2. Click on the user's name.
3. Click to select the profiles and move them to the Available Service Profiles list.
4. Click Save.
About Profiles
Profiles control the user's access in the ADP services your organization has purchased. You can assign one or more profiles to
your users. Use Ctrl+click to select multiple profiles to assign from the Available Profiles list or remove from the Selected
Profiles list.

Getting Started with the ADP Security Management Service
ADP, the ADP logo, and Always Designing for People are trademarks of ADP, Inc
User Roles That Can Assign/Remove Service Profiles
The following table lists the user roles that are authorized to assign/remove profile for other users:
User Role
Can Assign/Remove Profiles For
Security Master
Security administrator, user master, user administrator, product user, and
self service user.
Security Administrator
User master, user administrator, product user, and self service user.
User Master, User Administrator, Product
User, Self Service User
This task does not apply.

Getting Started with the ADP Security Management Service
ADP, the ADP logo, and Always Designing for People are trademarks of ADP, Inc
People - Managing Applicants (If Applicable)
Go to People > Manage Users menu and use the search options to find and manage your applicants.
Important: If your organization uses ADP Workforce Now Talent Management service, then candidates must register to apply
for career opportunities. This candidate is also known as the applicant. Applicant maintenance tasks can be performed if your
organization uses ADP Workforce Now Talent Management service and your applicant’s information is available to ADP.
During the registration process, applicants do the following:
1. Enters their first name, last name, and an email address (must be unique within your organization).
2. Create the user ID and password for their account.
3. Select three security questions and enter three different security answers to protect their information.
4. Review and confirm the information to create their account.
Note: Once registered, applicants receive a confirmation email with details to access their account. Applicants can use the
“Forgot your password?” and “Forgot your user ID?” links on your login page to reset their forgotten password and to retrieve
their lost user ID.
If applicant information is available for your organization, your security masters, security administrators, user masters, and
user administrators can find applicants from the Manage Users menu by selecting “applicants” in the user type.
If applicant information is not available for your organization, the option to find applicants will not be available to your
organization’s administrators.
Selecting Applicants
To narrow your search for applicants, you can enter the applicant's name, email address, and/or the user ID. Use the procedure
below to find all the applicants in your organization.
Starting Point: Manage Users
1. In the User Type list, select Applicants.
2. Click Search.
3. If you want to work with only one applicant, click on the name. The applicant is selected and you can continue with the
action you want to perform.

Getting Started with the ADP Security Management Service
ADP, the ADP logo, and Always Designing for People are trademarks of ADP, Inc
Viewing/Updating Applicant Information
Security masters, security administrators, user masters, and user administrators can view and update the information of the
applicants in your organization.
Starting Point: Manage Users
1. Select an applicant.
2. Click on the applicant's name.
3. View the applicant information.
4. Update the status and/or notes, as required.
5. Click Save.
Suspending an Applicant
Security masters, security administrators, user masters, and user administrators can change status and update notes for the
applicants in your organization. Once suspended, applicants cannot log in to access your ADP services. When required, your
organization’s administrators can activate applicants to allow access.
Starting Point: Manage Users
1. Select an applicant.
2. Click on the applicant's name.
3. In the User Status field, click Suspended.
4. In the Notes field, enter additional information for suspending the applicant.
5. Click Save.
Activating an Applicant
Security masters, security administrators, user masters, and user administrators can change status and update notes for the
applicants in your organization. Once activated, applicants can log in with their current password.
Starting Point: Manage Users
1. Select an applicant.
2. Click on the applicant's name.
3. In the User Status field, click Active.
4. In the Notes field, enter additional information for activating the applicant.
5. Click Save.
Deleting an Applicant
Security masters and security administrators can delete the applicants in your organization. Once deleted, applicant
information will be permanently removed from your organization’s records. Applicants cannot log in or access your
organization’s ADP services. This action cannot be undone.

Getting Started with the ADP Security Management Service
ADP, the ADP logo, and Always Designing for People are trademarks of ADP, Inc
Starting Point: Manage Users
1. Select an applicant
2. Click on the applicant's name.
3. Click Delete.
4. On the prompt confirmation window, click Yes.

Getting Started with the ADP Security Management Service
ADP, the ADP logo, and Always Designing for People are trademarks of ADP, Inc
Setup - Managing Your Organization
Go to the Setup menu to perform tasks to manage your organization’s settings for the ADP services available to you.
Viewing Your Organization’s Information
Security masters, security administrators, user masters, and user administrators can view your organization’s information. This
task does not apply to product users and self service users.
Starting Point: Setup > Profile
1. Do any of the following:
Go To The
To
Contact Information page
View your organization’s address, web site address (URL), contact email of your
administrator, and contact phone numbers.
Settings page
View the organizational registration code, mobile access for users, mobile PIN login,
and your organization’s logo.
Identity Verification
Options page
View your organization's identity verification information. Refer to the Frequently
Asked Questions for additional information.
Updating Your Organization’s Information
Security masters and security administrators can update the organization’s information and settings for your organization’s
users. This task is not available to user masters, user administrators, product users, and self service users.
Starting Point: Setup > Profile
1. Update your organization’s information e.g., organization’s address, web site address (URL), contact email of your
administrator, contact phone numbers.
2. Click Save.
3. Click Settings tab.
4. Update the organizational registration code, mobile access for users, mobile PIN login, and your organization’s logo.
5. Click Save.
Configurable User ID Options for Your Employees
In this release, your organization can configure the user ID formats and control the availability of the change user ID feature for
your employee users. The configurable user ID and change user ID features are not applicable for administrators/practitioners.

Getting Started with the ADP Security Management Service
ADP, the ADP logo, and Always Designing for People are trademarks of ADP, Inc
Selecting the User ID Format
Previously, your organization's employee users had their user IDs assigned to them during registration. As part of a pilot
program, few ADP services offered employees the option to create their user ID. With this release, your administrators can
configure the user ID options for your organization's newly registering employees.
Your administrators with a security master or security administrator user role, can manage this setting for newly registering
employees on ADP Security Management Service. On the Setup > Profile > Settings page, based on your organization's policies,
you can configure the user ID format to allow users to either create their user ID or be assigned a system-generated user ID in
the format "jdoe@xyz".
Note: Employee users who have the option to create their user ID are more likely to remember their user ID to log on to their
accounts, when they need them. This can help to reduce calls to administrators from employees requiring support due to
forgotten user IDs. Previously registered employees are not impacted by this feature.
Allowing Employees to Change their User ID
With this release, the change user ID option will be enabled for all your employee users. Registered employees can change their
user ID on ADP Security Management Service from the Myself > Security page. Users can change their user IDs once in every
24 hours, however, users will not be able to recover or reuse their previous user IDs. After successfully changing their user ID,
employee users can log on with the newly created user ID and their current password to access their ADP account.
The user ID format that was in effect for your organization prior to this release will influence the extent of change that can be
allowed for a user:
Users who previously had the option to create their user ID during registration can change their complete user ID (for example,
change "johndoe26@gmail.com" to "SandraSmith5555@myemail.com")
Users who previously had the system-assigned user ID format will be able to change the name component of their user ID (for
example, change "jdoe@clientID" to "johndoe2126@clientID").
Your administrators with a security master or security administrator user role can enable/disable this setting for your
organization on ADP Security Management Service from the Setup >Profile > Settings page.
Note: In this release, your organization can configure the user ID formats and control the availability of the change user ID
feature for your employee users. The features are not applicable for administrators/practitioners.
Managing Mobile Access for Users
Security masters and security administrators can configure your mobile access based on the ADP services your organization
has purchased. This task is not available to user masters, user administrators, product users, and self service users. Based on
your organization’s policies, you can control the mobile access available to your employees. For example, your organization can
decide that your employees can view the pay statements from their mobile device. However, mobile access to benefits, etc.,
should not be available.
Note: The availability of mobile access may vary based on the ADP services your organization is using. Contact your ADP
representative for more information.
Starting Point: Setup > Profile
1. Click Settings tab.
2. Do any of the following:

Getting Started with the ADP Security Management Service
ADP, the ADP logo, and Always Designing for People are trademarks of ADP, Inc
To
Do This
Enable Mobile Access
Select the ADP services that users can access on their mobile device and move it to
the Enabled list.
Disable Mobile Access
Select the ADP services) that is enabled for users to access on their mobile device
and move it to the Disabled list.
3. Click Save.
Customizing Your Support Contact Information
Your organization can include the name, phone number, email address, URL etc., of the person or group that your users can
contact for support. This information will be included in the error messages that displays to users unable to complete their
tasks. It will also be included in the email messages sent to your users.
Customized messages are defined by language. For example, for Canadian clients who also have users who receive emails in
French, they are advised to come up with and define the message in Canadian French as well.
Your security master or security administrator will need to contact your ADP representative to have this option established for
your organization. Availability may vary based on the ADP services your organization is using. Once set, your security masters,
security administrators, can view the customized support contact information.
Note: Customized messaging is optional. If a custom message is not set up at all or for a given language, users will receive a
default message or its translated version, according to the language.
Starting Point: Setup > Profile
1. Click the Settings tab.
2. Scroll down to view the Custom Support message.
Adding Your Organizational Branding
Your security masters and security administrators can add your organization’s logo to identify your organization. Your
organization’s logo displays to your new employees during the registration process. Registered users view your organization’s
logo when they log in to access ADP's Security Management Service web site.
Note: The branding option you select applies to all users in the organization. If the branding preference is not selected or your
organization’s logo is removed, the ADP default logo will be displayed. You can also replace your current logo by uploading your
new logo.
The logo you select must meet the following specifications:

Getting Started with the ADP Security Management Service
ADP, the ADP logo, and Always Designing for People are trademarks of ADP, Inc
• Be a file in a supported format - Window's Bitmap (*.BMP), CompuServe GIF (*.GIF), JPEG image (*.JPG), or Portable
Network Graphics (*.PNG).
• Have a resolution that is less than the maximum width of 150 pixels and maximum height of 45 pixels.
• Not exceed 30KB in size.
Starting Point: Setup > Profile > Settings
1. Click on the Custom Logo link.
2. Click Browse.
3. Select the logo that represents your organization to your self-service users and administrators.
4. Click Upload.
Automatic Removal of Administrator/Practitioner Access
Availability: One-Time Opt-In to enable this setting with employment status changes
If your organization uses ADP's services to manage the employment status of your users, a new security setting is available to protect your
organization's information from your administrators in the event of a change in their employment status. On the Setup > Profile > Admin
Access page, your security master or security administrator can opt-in to automatically remove administrator/practitioner access from a
user's account and assign the employee-level access to the user. This security setting protects your organization's account from being
accessed by users who no longer require access to your organization's and other employees' information after an employment status change
(termination, retirement, leave of absence, etc.).
Important: To take advantage of this feature, your administrator must select this option for your organization prior to changing the
employment status in your ADP service. This change becomes effective immediately and can be updated at any time.

Getting Started with the ADP Security Management Service
ADP, the ADP logo, and Always Designing for People are trademarks of ADP, Inc
Setting up the Employee Registration Process
Your organization can set up the employee registration process for your unregistered users and select to use personal
registration codes, which are more secure, or the organizational registration code. Your organization’s users complete the
registration process to get their user ID and select a unique password to access ADP services. Depending on your
organization’s set up, ADP may assign the user ID or your users may be able to create their user ID. Once registered, users
cannot change their user ID. For security reasons, ADP will prompt users to change their passwords before it expires.
Refer to the “Self Service Registration Quick Reference card” available on the administrator Home Page > Resources section.
Personal Registration Codes (Recommended)
Personal registration codes offer the most secure method to control access to your organization’s ADP services and several
security advantages. They are:
• Randomly generated alphanumeric codes (for example, 9a7b632f)
• Uniquely associated to the individuals to whom they are issued
• Not freely available; you must issue them to your users/new hires
• Set to expire in 15 days or as soon as they are used, but can be reissued easily by an administrator
• Distributed securely in an email from ADP (SecurityServices_NoR[email protected]) to the unique email address on file or
provided by your administrator in a separate communication
Organizational Registration Code
An organizational registration code consists of your client ID, a hyphen, and a code that you choose. For example, if your client
ID is MyClientID and the code you choose is Alabama2235, users would enter MyClientID-Alabama2235 during registration.
For your organization’s protection, you MUST take the following precautions:
• Set up your organizational registration code to be meaningful and difficult to guess.
For example, “MyClientID-UniqueAlphanumericCode” where the numbers and letters can represent a significant
event, location, name, or some information known only within your organization.
• Treat the code as a confidential asset and do not distribute it to anyone outside of your organization.
o Distribute the organizational registration code to your new hires in a welcome packet or custom email.
o If necessary, display the organizational registration code on your secure intranet portal—not the public
internet.
• Assign an Employee/Associate ID during the hiring process and require your users to enter the Employee/Associate
ID during registration.
• Change the organizational registration code every three months.
Viewing the Identity Verification Options for Employee Registration
Your security masters and security administrators can go to Setup > Profile > Identity Verification Options to view your
organization’s identity verification options. This task does not apply to users with user master, user administrator, and product
user security roles. If changes are needed, contact your ADP representative for assistance.

Getting Started with the ADP Security Management Service
ADP, the ADP logo, and Always Designing for People are trademarks of ADP, Inc
Note: New employees will be asked for this information during registration and when they add additional ADP services.
Existing users may be asked for this information when they add additional ADP services.
Your security master or security administrator can request that ADP change the identity verification elements for your users.
Working with your ADP representative, you can choose the identity information that users must enter in order to register and
gain access to their ADP service. The information that you can select depends on the ADP services that your organization uses.
Starting Point: Setup > Profile
1. Click Identity Verification Options tab.
2. View your organization's identity verification options.
Issuing Personal Registration Codes
Personal registration codes offer the most secure method to control access to your organization’s ADP services. Your
organization can use one of the two options:
Option 1 – Automatically issue codes to new associates (New)
To support your administrators and simplify the process of issuing these codes, ADP is pleased to offer the ability to
automatically issue Personal Registration Codes to your new associates. On the Setup > Profile > Personal Registration Code
page, security masters and security administrators can select this option and the time frame to issue the codes i.e., have the
codes issued immediately after the new associate’s data has been entered in the ADP service or send it up to 30 days later. Once
set up, new associates with a unique email address on file will receive an email with the personal registration code that is valid
for 15 days. As always, administrators can view the code status and reissue codes from the People > Personal Registration Code
page.
Administrators can support users with non-unique email addresses by viewing the codes and share it with the specific user in a
separate communication.
Important: To take advantage of this feature, your security master/administrator must select this option for your organization
and include unique work/personal email addresses for your new associates in your ADP service.
Option 2 – Administrators to issue codes to users (Current Process)
Administrators with security master, security administrator, and user master security roles can go to People > Personal
Registration Codes to issue and manage personal registration codes for your unregistered associates. This task cannot be
performed by user administrators and product users. Refer to People - Personal Registration Codes for the options available.
Setting Up the Organizational Registration Code
Security master or security administrator must establish the organizational registration code for your organization. Your
organizational registration code consists of your client ID and the code you enter separated by a hyphen e.g., your client ID-
your code.
Note: If your organization uses personal registration code as the identity verification option for self-service registration, users
will not need the organizational registration code.
Go to Setup > Profile > Settings and set up the organizational registration code. The new code becomes effective
immediately and must be updated regularly to prevent misuse.
Additional Verification with Organizational Registration Code

Getting Started with the ADP Security Management Service
ADP, the ADP logo, and Always Designing for People are trademarks of ADP, Inc
As part of ADP’s commitment to help safeguard your users from fraud due to identity theft, identity verification options based
solely on the Social Security number, without an Employee ID or Associate ID, will now require additional verification.
Additional Verification Options
Depending on your organization's verification setting, for additional verification, users may be required to enter a code sent to
their unique email or mobile phone number on file.
Important: If your organization requires users to provide either an Associate ID or Employee ID during registration, additional
verification is optional.
Enforcing Email Confirmation
This form of verification requires a registering user to enter a code sent to their email or mobile phone number on file to
confirm their access to the email/phone and prove their identity. For a user to use this form of verification, their email or mobile
phone number must be unique within your organization.
To identify the users who share email addresses, run the Associate Information Report with the additional fields of work email
and personal email selected. For your unregistered users, unique email addresses and mobile phone numbers must be included in
the user information shared with ADP or can be updated on the Personal Registration Code page.
Note: If your identity verification option includes either an Employee ID or Associate ID, you can also take advantage of this
additional verification. Contact your ADP representative for assistance. Users whose emails or mobile phone number are shared
within your organization must contact their administrator to request a personal registration code and enter the administrator-
issued code. In addition, email uniqueness will be enforced when you manage your users and when your users update their
contact information.
Selecting the Option to Enter Information
Your employees enter their information (First name, Last name, Social Security number (USA only) and date of birth) and
continue with the new registration experience.
Please refer to the New Employee Registration Quick Reference Card for details.
Mobile Registration with ADP Mobile App
If your organization’s ADP services are mobile enabled, your employees can download the ADP Mobile app on their smart mobile
device and complete the registration process on their mobile device.
Availability: One-Time Opt-In to Enforce the Use of a Registration code for Mobile Registration
Now more than ever, your employees may have concerns about fraudsters stealing their personal identifiable information (PII)
and committing identity theft. Understandably, your employees may be looking for ways to protect their PII data with more
security for registration on the mobile device using the ADP Mobile App.
By default, employees have an option to register on the ADP Mobile app without using a registration code and this option has
caused concerns. Please know that acting on feedback from organizations like yours, a new option to enforce the use of
registration code on the mobile registration process is now available.
Important: Your administrator can contact your ADP service representative to opt-in and enforce stricter controls on
registration.
Sample Letter to Encourage Registration

Getting Started with the ADP Security Management Service
ADP, the ADP logo, and Always Designing for People are trademarks of ADP, Inc
A letter to encourage employee registration is available on the Homepage > Resources section. Customize this letter based on
the ADP services your organization has purchased. Include the organizational registration code, the URL to your ADP service
web site, and provide it to your self-service users (employees, consultants, or contractors). Users use this information to self-
register and access ADP services. Refer to Employee Registration process.

Getting Started with the ADP Security Management Service
ADP, the ADP logo, and Always Designing for People are trademarks of ADP, Inc
Setup - Service Profiles
Go to the Setup > Services menu to manage access to your ADP services.
Profiles control user access to ADP services. After you set up authorization codes and profiles, you can assign a profile to a
user to define their access to ADP services.
Adding a Service Profile
Security masters and security administrators can add service profiles for your organization. This task is not available to user
masters, user administrators, product users, and self service users.
Starting Point: Setup > Service Profiles
1. Click on the service name.
2. Click (+) to add a new profile.
3. Enter the profile name.
4. Select the role to be associated with the profile.
5. Select the authorization codes to be available for this profile (if applicable)
6. Click Save.
Updating a Service Profile
Security masters and security administrators can update existing service profiles for your organization. This task is not
available to user masters, user administrators, product users, and self service users.
Starting Point: Setup > Service Profiles
1. Click on the service name.
2. Click on the profile name.
3. Update the profile name and/or the authorization codes (if applicable).
4. Click Save.
Deleting a Service Profile
Security masters and security administrators can delete existing service profiles for your organization. This task is not
available to user masters, user administrators, product users, and self service users.
Note: Deleting a service profile removes it from all users to whom it has been assigned. This task cannot be undone.
Starting Point: Setup > Service Profiles
1. Click on the service name.
2. Click on the profile name.
3. View the profile details to verify it is the profile to be deleted.
4. Click Delete.

Getting Started with the ADP Security Management Service
ADP, the ADP logo, and Always Designing for People are trademarks of ADP, Inc
Delegations - For Customers
Go to the Setup > Delegations menu to manage your provider setup.
Delegation is the feature that allows your organization to receive the services from a third-party provider. This feature is
available if your organization uses at least one ADP service that can be serviced by a third-party provider.
When available, your security masters and security administrators can access Setup > Delegations menu to manage providers,
assign or remove service profiles managed by the providers.
Adding a Third-Party Provider
Your security masters and security administrators can add a third-party provider and assign delegated profiles. This task is not
available to user masters, user administrators, product users, and self-service users.
You will need the client ID of your provider to get started. Contact your ADP representative or your provider to confirm that
the third-party provider has an ADP client ID and has been set up to provide third party delegate enabled services.
Starting Point: Setup > Delegations
1. Click (+) to add a new third-party provider.
2. Enter the exact client ID. If you do not know the client ID, contact your ADP representative.
3. Click Next.
4. View and confirm the organization name of the provider.
5. Click Next.
6. If required, you can filter the list of available profiles for each ADP service.
7. Click to select the available profiles and move them to the Delegated Profiles list.
You can use Ctrl+click to select multiple profiles, then drag and drop them to the delegated profiles list.
8. Click Done.

Getting Started with the ADP Security Management Service
ADP, the ADP logo, and Always Designing for People are trademarks of ADP, Inc
Assigning Delegated Service Profiles to Third Party Provider
Your security masters and security administrators can assign available profiles to your third-party provider. This task is not
available to user masters, user administrators, product users, and self-service users.
Starting Point: Setup > Delegations
1. Click on the client ID of the third-party provider.
2. Enter the exact client ID. If you do not know the client ID, contact your ADP representative or your provider.
3. Click Next.
4. View and confirm the organization name of your third-party provider.
5. Click Next.
6. If required, you can view the list of available profiles for each ADP service.
7. Click to select the available profiles and move them to the Delegated Profiles list.
8. You can use Ctrl+click to select multiple profiles, then drag and drop them to the delegated profiles list.
9. Click Done.
Removing Delegated Service Profiles from Third Party Provider
Your security masters and security administrators can remove delegated profiles assigned to your third-party provider. This
task is not available to user masters, user administrators, product users, and self-service users.
If all service profiles are removed from the third-party provider, the provider-customer relationship between your organization
and the provider will be removed. The provider can no longer access the profiles and perform the required tasks. When required,
you can add the third-party provider again and assign profiles to enable delegation with the provider.
Starting Point: Setup > Delegations
1. Click on the Client ID of the third-party provider.
2. If required, you can view the list of delegated profiles for each ADP service.
3. Click to select the delegated profiles and move them to the Available Profiles list. You can use Ctrl+click to select
multiple profiles, then drag and drop them to the available profiles list.
4. Click Save.

Getting Started with the ADP Security Management Service
ADP, the ADP logo, and Always Designing for People are trademarks of ADP, Inc
Delegation - For Providers
Go to the Setup > Delegations menu to manage your customer setup.
Delegation is the feature that allows your organization to provide services to a third-party customer. This feature is available if
the customer organization has assigned at least one delegate enabled profile of any ADP service to your organization.
When available, your security masters and security administrators can access Setup > Delegations menu to manage customers,
remove service profiles assigned by the customer.
Note: The availability of menu options may vary based on your organization’s setup and the security role of your
administrators.
Removing Delegated Profiles
Your security masters and security administrators can remove delegated profiles from your customer. This task is not available
to user masters, user administrators, product users, and self-service users.
If the delegated service profiles are removed from the customer, your organization (the provider) can no longer access the
profiles and perform the required tasks. Removing all delegated profiles will remove the delegation with the customer.
Starting Point: Setup > Delegations
1. Click on the client ID of the customer.
2. Select the profiles to be removed from the list of delegated profiles assigned by the customer.
If required, you can view the list of available profiles for each ADP service.
3. Click Save.
Removing the Delegation with the Customer
Your security masters and security administrators can remove delegated profiles from your customer. This task is not available
to user masters, user administrators, product users, and self service users.
If all the delegated service profiles are removed from the customer, your organization (the provider) can no longer access the
profiles and perform the required tasks. This would also remove the delegation between your organization (the provider) and
your customer.
Starting Point: Setup > Delegations
1. Click on the client ID of the customer.
2. Select the profiles to be removed from the list of delegated profiles assigned by the customer. If required, you can
view the list of available profiles for each ADP service.
3. Click Save.

Getting Started with the ADP Security Management Service
ADP, the ADP logo, and Always Designing for People are trademarks of ADP, Inc
Myself - Updating Your Contact Information
Go to Myself > Contact Information to manage your contact information.
Changing Your Email Address
Starting Point: Myself > Contact Information
1. In the Work and/or Personal email address fields, enter a valid email address.
2. Select the email address that you access frequently for notification.
3. Click Save.
Activating Your Email Address
You must activate your notification email address to confirm it belongs to you and can be used when necessary. If you change
the email address associated with your account, you will receive a notification of change from ADP.
Starting Point: Myself > Contact Information > Activate Email/Mobile
1. Select the email address to send the activation code.
2. Click Send Activation Code(s).
3. Enter the activation code you received from ADP.
4. Click Submit.
Changing Your Contact Phone Numbers
Starting Point: Myself > Contact Information
1. In the phone number fields, enter your contact mobile phone numbers and your work phone numbers.
2. Select the mobile phone number you access frequently to receive text message from ADP.
3. Click Save.
Activating Your Mobile Phone Number
You must activate your mobile phone numbers to confirm they belong to you and can be used when necessary. If you wish to
receive forgotten credentials via your mobile phone, you must activate the mobile phone number associated with your account.
If you change your mobile phone number associated with your account, you will receive a notification of change from ADP.

Getting Started with the ADP Security Management Service
ADP, the ADP logo, and Always Designing for People are trademarks of ADP, Inc
Starting Point: Myself > Contact Information > Activate Email/Mobile
1. Select the mobile phone number.
2. Click Send Activation Code(s).
3. Enter the activation code you received in a text message from ADP.
4. Click Submit.
Requesting a New Activation Code
You must activate your email address and mobile phone numbers to confirm they belong to you and can be used when
necessary. If you did not receive your activation code or your activation code has expired, you must request a new activation
code.
Starting Point: Myself > Contact Information > Activate Email/Mobile
1. Select the email address and/or cell phone numbers.
2. Click Send Activation Code(s).
About Activating Your Contact Information
To confirm that you are the rightful owner of the contact email address and mobile phone numbers associated with your
account, ADP requires you to activate them. If your contact information is not activated, the options to send your login
information i.e., temporary password, user ID upon your request to your email address and/or mobile phone numbers will not be
available.
Activation can be done soon after the employee self service registration or at a later time from the Myself Tab.
Newly registered employees can do the following:
• Once you are registered, ADP will send you an email with instructions on how you can activate your email address. Click
the link in the email you received from ADP to activate your email address.
• If you provided a mobile phone number during registration, look out for a text message from ADP. Reply with the code or
follow the instructions in the text message to activate your mobile number.
Note: In some countries, this text message based method to activate your mobile phone is not available, so your
activation process will differ. Follow the instructions on the confirmation page and in the activation email you receive
from ADP to complete the activation.
When required, this task can also be performed from the Myself Tab.
Existing employees must complete the activation of contact email address and/or phone numbers from the Myself Tab.
Note: Employees and administrators/practitioners must activate their contact information after updating their account.
About Text Messaging
ADP supports the use of text messaging to receive your login information e.g., temporary password, user ID upon your request.
To get started with this process, you must select to use your mobile phone to receive text messages from ADP upon your
request.

Getting Started with the ADP Security Management Service
ADP, the ADP logo, and Always Designing for People are trademarks of ADP, Inc
To confirm that you are the rightful owner of the contact mobile phone numbers associated with your account, ADP requires
you to activate your contact information. Your mobile phone number must:
• Have a service from a supported mobile phone carrier.
• Be able to receive text messages.
• Not have a text message block.
The complete Terms and Conditions can be viewed on the Myself > Contact Information page.
Frequently Asked Questions
Use the information on the page to view solutions to frequently asked questions.
1. How do I change my name associated with this account?
You can contact your organization’s administrator to update your name in your organization’s records.
2. I changed my name associated with this account. How do I change my user ID?
Your user ID was created when you first registered to access ADP services. Changing your name does not change
your user ID. You can continue to use your existing user ID and password to access your ADP services. If required,
your administrator can delete your user ID from your organization’s records and you can register with your
updated name. Contact your organization’s administrator for assistance.
3. How often should I activate my contact email address and mobile phone numbers?
After you change your contact email address and mobile phone numbers, you should activate it to confirm that is
in service and available for use. If your activated mobile work phone becomes your mobile personal phone or vice
versa, activation is not required.
4. During password change, why can I not use my previous passwords?
To protect your account security, ADP's security policies do not allow the reuse of your last four passwords.
5. Are there any recommendations to increase the password strength?
Yes. It is recommended that passwords be 12 or more characters and contain a mix of upper case and lower case
letters, numbers, and special characters. For example, the mnemonic, “The first time I traveled to a foreign country
I was 9 years old” can be used to create the password “tFt!t2@FC1w9y0” using the following techniques:
- Use the first letter of most words.
- Capitalize all letters in the first half of the alphabet.
- Use similar-looking substitutions e.g.! for 1, 2 for “to”, @ for “a”, etc.
6. Why are previously selected security answers not displayed on the Security tab?
ADP constantly updates its security policies and security questions that you can select from. To protect your
account from unauthorized access, previously selected security answers are not displayed. When required, you
can select from the current list of questions and enter answers to protect your account.
7. I’m not receiving an email with an activation code. What can I do?
Check your spam and junk mail folders.
8. I’m not receiving activation code via phone. What can I do?
You can do one of the following:
- Make sure your carrier is supported. Refer to Terms and Conditions on the Myself > Contact Information page.
- Make sure your phone number doesn’t have a premium message block on it.
- If it does, contact your carrier, remove it, and then follow instructions in the Terms and Conditions to turn
messaging on.

Getting Started with the ADP Security Management Service
ADP, the ADP logo, and Always Designing for People are trademarks of ADP, Inc
Myself - Updating Your Login Information
Go to Myself > Security to change your password and update your security questions and answers.
About Your Security Information
To protect your ADP account, you select three different security questions and enter different security answers. For your
security, the security questions and answers already associated with your account are not displayed.
If you forget your user ID and/or password to your ADP account, you can use the Forgot Your User ID and Forgot Your
Password links on your ADP service home page to retrieve your login credentials. During this process, you will be prompted to
answer the security questions that you established to protect your account.
• If your entries match the information associated with your account, you identify yourself as the rightful owner of the
account and can retrieve your user ID and/or reset your password.
• If your entries do not match the information associated with your account, you will not be able to retrieve your user ID
and/or password. If you are unable to retrieve your account login information, be sure to avoid any typographical errors
and retry your request. If the problem persists, contact your organization’s administrator to request your user ID and/or
reset your account password.
When you log in to your ADP service with your temporary password, you will be prompted to enter and confirm the new
password. Use your new password to login to your account. Once you log on, be sure to update your security questions and
answers to keep them current.
Changing Your Password
Starting Point: Myself > Security > Password
1. To authorize a password change, enter your current password.
2. Enter your new password.
3. Re-enter your new password to confirm.
4. Click Save.
Changing Your Security Questions and Answers
Starting Point: Myself > Security > Security Questions
1. To protect your account, select three different security questions.
2. Enter a different security answer for each question.
3. Click Save.
Changing Your User ID (If Available)
Important: This feature is not applicable for administrators/practitioners.
Employees can change their user IDs once in every 24 hours, however, users will not be able to recover or reuse their previous
user IDs. After successfully changing their user ID, employee users can log on with the newly created user ID and their current
password to access their ADP account.

Getting Started with the ADP Security Management Service
ADP, the ADP logo, and Always Designing for People are trademarks of ADP, Inc
The user ID format that was in effect for your organization’s employees prior to this release will influence the extent of change
that can be allowed for a user:
• Users who previously had the option to create their user ID during registration can change their complete user ID (for
example, change "johndo[email protected]m" to "SandraSmith5555@myemail.com")
• Users who previously had the system-assigned user ID format will be able to change the name component of their user
ID (for example, change "jdoe@clientID" to "johndoe2126@clientID").
Starting Point: Myself > Security > User ID
1. To authorize a user ID change, enter your current password.
2. Enter your new user ID.
3. Confirm the new user ID.
4. Click Save.
Important: Users will be logged out immediately and must log in with the new user ID and current password.
Changing Your Voice PIN (If Available)
Important: ADP is currently piloting the Voice PIN feature with a limited number of client organizations. Your
administrator/practitioners should not set up their Voice PIN until your organization receives information from ADP to begin
using this feature.
When available to your organization, administrators can navigate to Myself > Security > Voice PIN page to set up the Voice PIN
for authentication.
On the Myself > Security > Voice PIN page, administrators can view the Voice PIN status (i.e., active, locked, or expired).
Administrators can create a new Voice PIN to reset a locked or expired Voice PIN. As a usability enhancement, administrators
receive an email alert to change the Voice PIN 15 days before it expires.

Getting Started with the ADP Security Management Service
ADP, the ADP logo, and Always Designing for People are trademarks of ADP, Inc
Myself - Viewing Your Services
Go to Myself > Manage Services to view, add, and delete the ADP services available to you
Depending on your organization’s setup, you may already have access to the ADP services available to you. The information in
this section applies to users who need to provide additional verification before they can access the services.
Viewing and Adding a Service
Starting Point: Myself > Manage Services
1. View the ADP services that are available to you.
2. Click Add, when available, to add the ADP service available to you.
3. Follow the instructions on the page to complete adding this service.
Deleting a Service
Starting Point: Myself > Manage Services
1. Click Delete, when available, to delete the ADP service available to you.
2. Follow the instructions on the page to complete this task.

Getting Started with the ADP Security Management Service
ADP, the ADP logo, and Always Designing for People are trademarks of ADP, Inc
Reports – Run and View Reports to View Information
Security administrators and security masters can go to Reports > Run & View Reports to generate reports that contain
information on your organization’s users.
Run reports to get information on your users and the ADP services your organization has purchased. Once run, report results
can be viewed or saved as a Portable Document Format (.PDF) or Comma Separated Value (.CSV) output. You can view the
outputs of current and historic reports with success status.
Types of Reports
You can run five different reports from Reports > Run & View Reports.
Use This Report
To
User Information
Get basic information on users such as status, user ID, security role, phone number,
email and business addresses
Self Service User Status
Get information of self-service users who registered for specific ADP
products/services. You can also get information of users who are not registered to
your ADP service. This information is available only if your organization sends user
information to ADP.
Admin User Status
Get information such as security role, service profile, product role, and authorization
codes as applicable.
Associate Information
Get detailed information on associates, both registered and not registered, in your
organization based on the information available to ADP. Federated user information
is also available to be included in this report.
Services and Profiles
Get information on your ADP services, associated profiles, and assigned
authorization codes (if available to your organization).

Getting Started with the ADP Security Management Service
ADP, the ADP logo, and Always Designing for People are trademarks of ADP, Inc
Running a Report
Starting Point: Reports > Run & View Reports > Current
1. Click on the name of the report you want.
2. Enter or change the report ID as needed.
3. Select filter options.
4. Select sorting options.
5. Select additional fields.
6. Click Run.
Viewing a Report Output
You can view outputs of reports that have been executed and are in success status.
Starting Point: Reports > Run & View Reports > Current
1. Click the Action icon next to the report with success status.
2. Click on an output format.
Refreshing a Report
You can refresh reports that have status as submitted, scheduled, or processing.
Starting Point: Reports > Run & View Reports > Current
1. Click the Action icon next to the selected report.
2. Click Refresh.
Note: The status of the selected report will be refreshed.
Cancelling a Report
You can cancel reports that are in submitted, scheduled, or processing status.
Starting Point: Reports > Run & View Reports > Current
1. Click the Action icon next to the selected report.
2. Click Cancel.
Viewing a Historic Report Output
You can view the history of a report that was run at different times within the last 30 days. This history includes dates when
the report was run.
Starting Point: Reports > Run & View Reports > Historic
1. Click the Action icon next to the report you want.
2. Click on an output format.

Getting Started with the ADP Security Management Service
ADP, the ADP logo, and Always Designing for People are trademarks of ADP, Inc
Note: The output options available vary based on the status of the report.
Deleting a Report
You can delete current and historic reports that have status as submitted, scheduled, or processing.
Starting Point: Reports > Run & View Reports > Current
1. Click the Action icon next to the current or historic report with a status of Success or Failed.
2. Click Delete.
3. In the Confirm Action window, click Yes.
Note: To delete one or more historic reports select the reports and click the Delete (-) icon.
Reports Frequently Asked Questions
You can find information to frequently asked questions on reports:
1. In the User Information report, few users have suspended status. What does that mean?
Users may have suspended status if an administrator changed their status from active to suspended because they
were on extended leave of absence or other reason. If users have been inactive (did not login to access the
account) for a long time, they were automatically suspended.
2. User included in one of my reports has creation date information but the Last Login Date and Time field values are
blank. Why is this?
If a user has not logged in after registering for administrator access, the Last Login Date and Time field values
will be blank.
3. Can I find which products/services our organization’s administrators have access to?
Yes, you can generate the Admin User Status report to obtain information such as product, service profile,
product role, and authorization codes as applicable.
4. In the Self-Service User Status report for registered users, some users have registered for only one
product/service. Will such users have full access to their ADP services?
No, these users only have access to the product/service to which they registered. To obtain complete access,
these users must add the services available to them. Refer to Adding a Service.
5. Why don’t any of the reports display a user’s full Social Security number (SSN)?
To protect user information from accidental or intentional misuse, ADP displays only the last four digits of the
Social Security number (SSN).
6. In the Self-Service User Status report, user information (for example, first name, last name, date of birth, home
zip/postal code, Social Security number) displayed is incorrect. What should I do?
This information was sent by another ADP system (for example, Payroll, Human Resources or Time and Labor
applications). Check your organization’s records and contact ADP to update this information.
7. In the Admin User Status report, the total of users registered for the different ADP products/services is less than
the actual number of users. How is this possible?
Depending on your organization’s setup and use of ADP products/services, users may be able to register for more
than one ADP product/service individually. When this happens, the totals displayed in the report will reflect the
total number of users who have registered per product/service.

Getting Started with the ADP Security Management Service
ADP, the ADP logo, and Always Designing for People are trademarks of ADP, Inc
8. In the Self-Service User Status report, the same person is included in the list of registered users and the list of
unregistered users. How can a user be included in both versions of the report?
If the information provided by the user during registration (for example, first name, last name) during registration
did not match the information that ADP received from your organization, the user may be included in both reports.
You can verify the user information in your organization’s records and update the correct information in your
system. You may also need to contact your ADP representative and request assistance.
9. On the Self-Service User status report, how do I tell if a user is registered?
When a user registers for certain ADP services, they are automatically registered for additional ADP services.
Users who have completed this process will have a “Yes” in the One Time Registration column. In this scenario,
the specific services that the user registered for will not be displayed.
For the other ADP services that are not automatically available to the user, the user must go to Myself > Manage
Services to add the services. Users who have completed adding the services available to them will have a “yes” in
the Registered column. There will also be corresponding values in the “Service” column to indicate the other
services that were added.
Users who have not completed the registration will not have a “yes” in either the “One Time Registration” column
or the “Registered” column.
