
THANK YOU
FOR YOUR iBUYPOWER
SNOWBLIND PURCHASE!
WWW.IBUYPOWER.COM
529 N. Baldwin Park Blvd
City of Industry, California 91746
QUICK
START
GUIDE
Displaying content
Snowblind’s side panel acts like a monitor for your PC. We encourage you to get
creative with nding images and videos to display. High contrast abstract imagery
looks best. Keep in mind that white color will become clear while black color becomes
opaque so content with a primary white background look best.
If you would like to download our Rainmeter meters for the display, visit:
https://www.ibuypower.com/Support/Driver
Make sure you have installed Raimeter rst, which can be downloaded from
Rainmeter.net
iBUYPOWER recommends using Wallpaper Engine, which can be purchased from
Steam. Sometimes it will come bundled with Snowblind systems when purchased
from ibuypower.com (check your email for a code if you qualify for the promotion)
If you have any questions regarding the Snowblind, don’t hesitate to contact us.
Thank you,
iBUYPOWER Product Team
Technical Suport Hours:
Mon-Fri 8:30 am - 5:00 pm PST
Toll Free: (888) 648-6040
Phone: (626) 269-5170
Email: techsupport@ibuypower.com
Important: Please complete the setup of your system on a standard
monitor before plugging in the LCD side panel.
Upon receiving the system and inspecting it for any bumps or bruises from shipping,
remember to open the side panel door and remove the expanding foam insert that
protects the video card if purchased as a complete system.
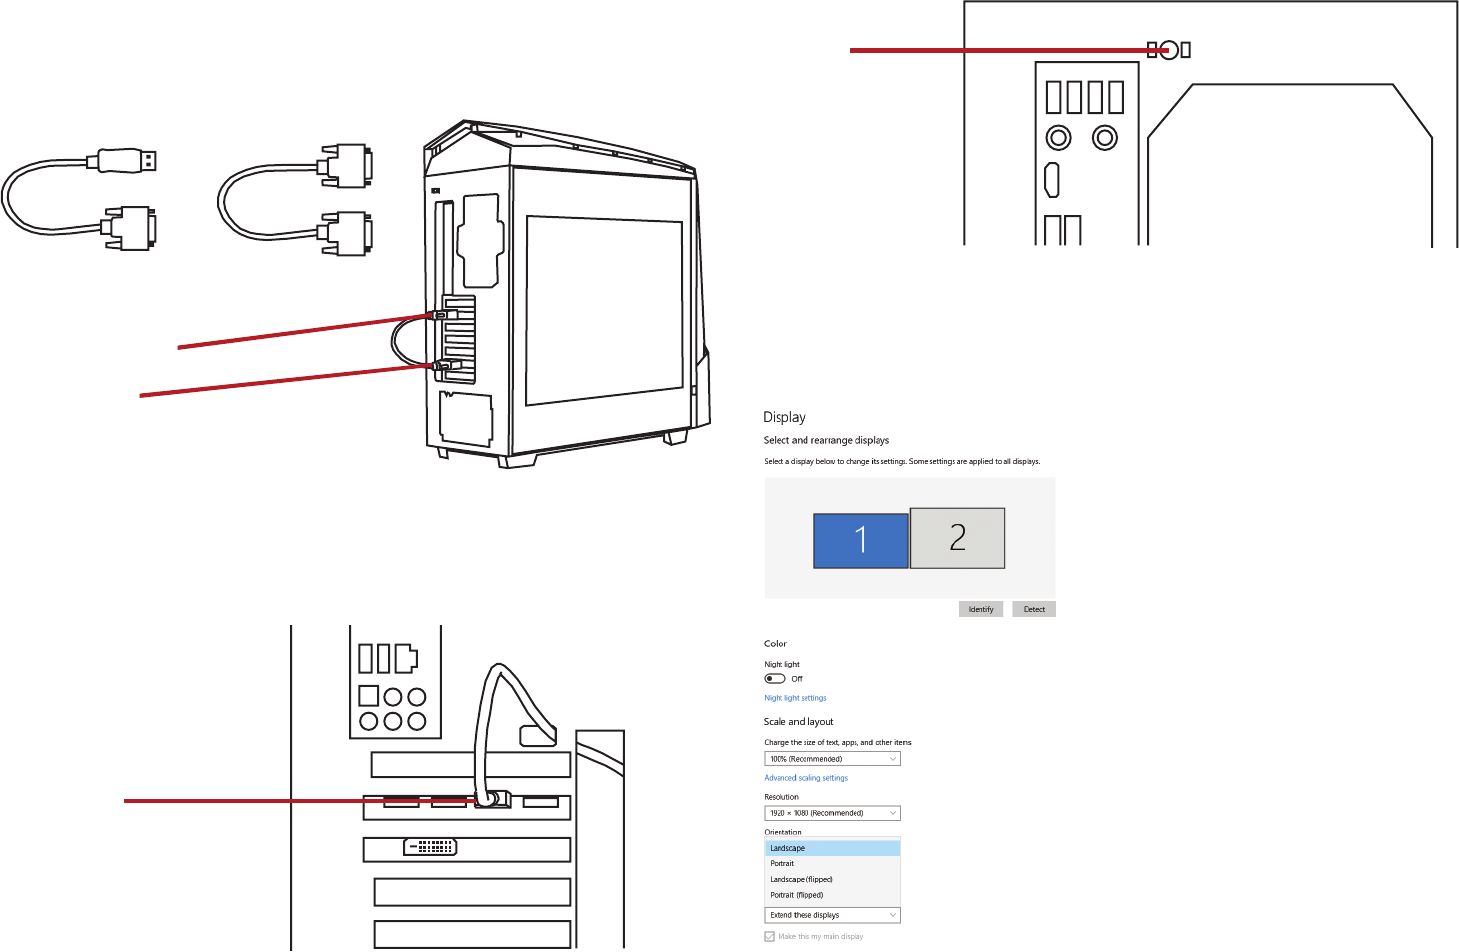
Connecting the LCD on Snowblind N450 and Snowblind Element
Look for a short video cable in your accessory bag. This will either be DVI-DVI or DP-
DVI. Plug the DVI end into the LCD panel input and the other end to your video cards.
If your cable does not seem to be compatible with the video card in your system,
please contact our support.
Connecting the LCD on Snowblind S
Snowblind S has an integrated HDMI cable that comes out of the rear of the system.
You will need to plug the loose end into your video card.
Turning lighting on and off
Snowblind Element and Snowblind S have buttons to toggle the interior lighting on
and off. This button is located at the top of the rear of the PC. There should be a
noticeable bright white light emanating from the holes in the PC. If you don’t see the
light, press this button while the PC is running. If it doesn’t work, contact our support.
Snowblind N450’s lighting is always on.
Setting up your display
In Windows 10, your Snowblind LCD will show up as monitor 2 (or monitor 1, 3, etc. if
you choose to arrange it that way)
To adjust the position of the screen,
use the Display Settings option in
Windows 10. To access that menu,
either right click your desktop then
click display settings, or click start
then type display settings.
You may need to rotate the display to
get it to the proper position.
Snowblind Element’s display will need
to be set to “Portrait.”
Snowblind S to “Landscape Flipped.”
DVI to Display Port
LCD Panel DVI Input
Video Card DVI/DP Output
Video Card Output
DVI to DVI
Light On/Off
